Welcome Back Fellow Artists!
I have been really enjoying perspective drawing lately. It is such an amazing thing to be able to figure out how to draw in perspective. There are so many cool tricks and techniques to learn.
So today I want to share a few of my favorites with you. Let’s dive on in and make perspective drawing easy!
First thing that I want to cover is basic dividing techniques. This allows us to properly space details like windows, columns, and trim designs.
Here is an image with a couple basic methods to practice.
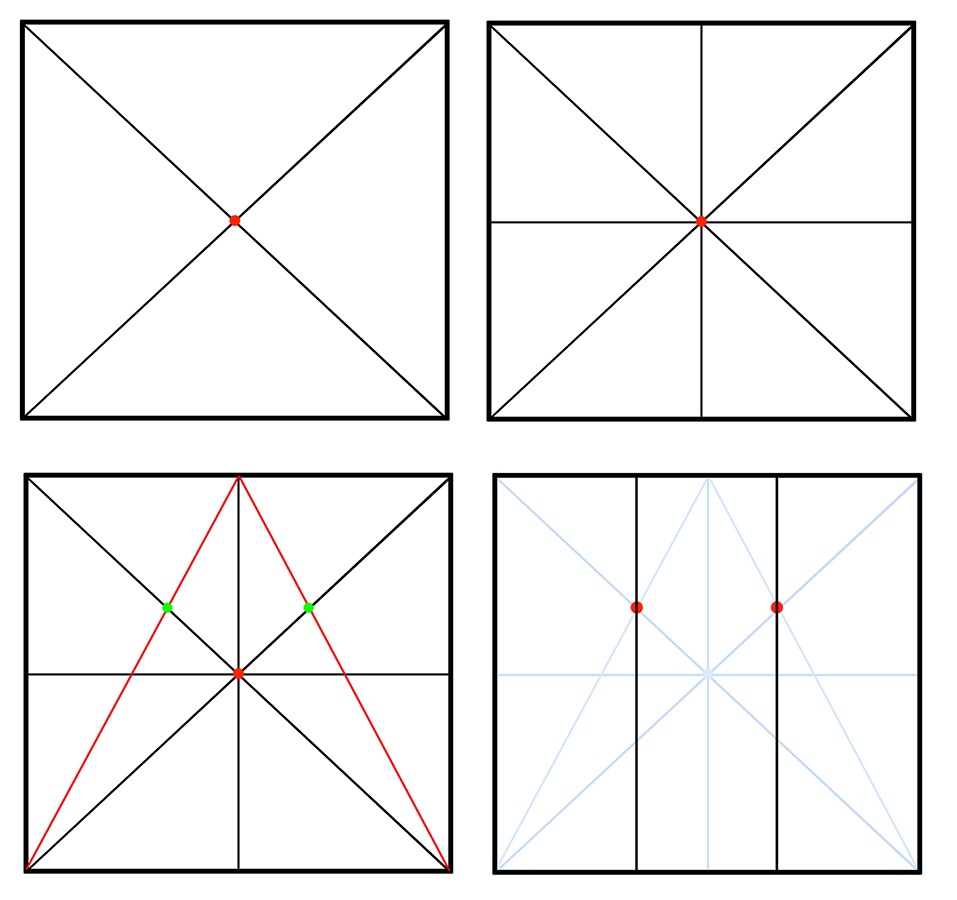
Subdividing Shapes and Finding the Center Point
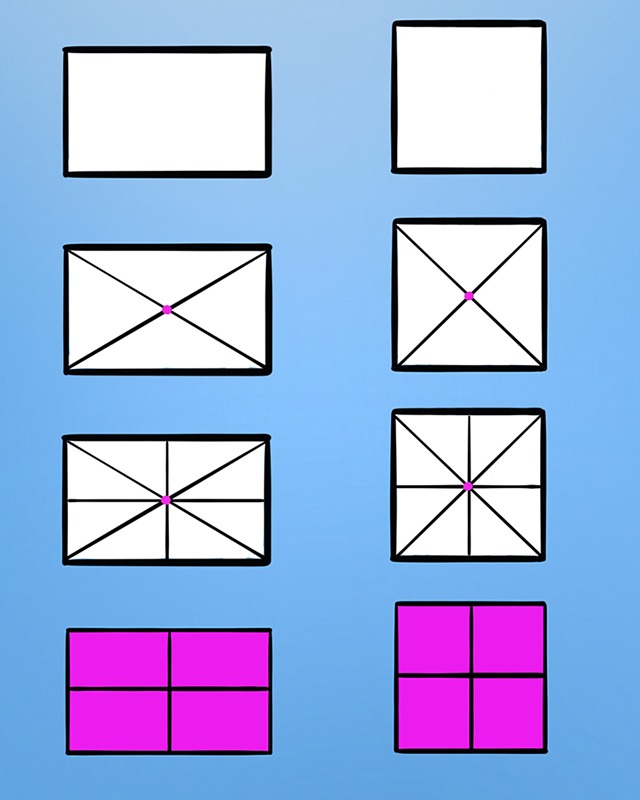
In these examples you start by drawing a flat plane. It works with a box or a rectangle. Just add diagonal lines from corner to corner to find the center point.
Then add a vertical line through the center as well as a horizontal line through the center. This now subdivides the shapes into even quadrants. This can be repeated as many times as you need and it will keep dividing the shapes up evenly as you go.
This allows us to do all sorts of neat things in perspective so give it a try. It also works in perspective as you will soon see.
Duplicating Shapes from the Center Point
In this next set of examples you will see how easy it is to duplicate shapes by using the subdivided method. Here is the next image for you to work from.
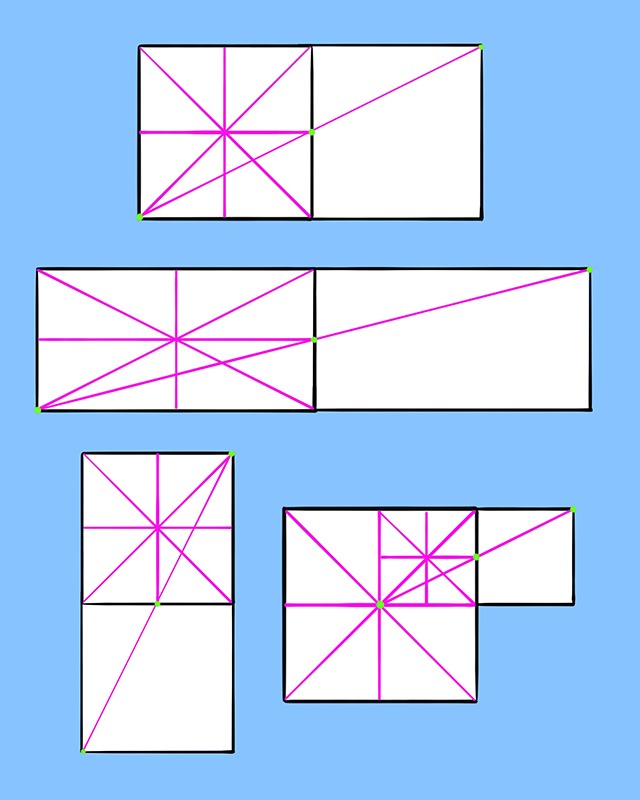
Notice in this set of examples how you can use the same subdividing method to now duplicate the shape by drawing a line from the corner point of the shape through the center of the opposite side.
This works in any direction and in perspective as well. This method is great for quickly mapping out distance and making sure that each new shape is the same proportions with the one you started with.
Notice in the last part of the diagram that you can even break down smaller sections of the shape and use the same techniques to extend that part. This works in all directions but you just need to start from a different corner. Practice this over and over and it will become second nature rather quickly.
Mirroring Shapes in Perspective
In this next example we will use the same technique but in perspective.
You will start with a Horizon Line and place a point to the right on the Horizon Line. This new point will be our Vanishing Point. This is how we start a One Point Perspective.
From here you will draw lines from the Vanishing Point and this will give us a sense of Perspective. From here you will draw two vertical lines to create a flat plane.
Draw another line closer to one side. The exact point at which you draw these lines is up to you. The point is to end up with two rectangular shapes that aren’t even in width but aligned next to one another.
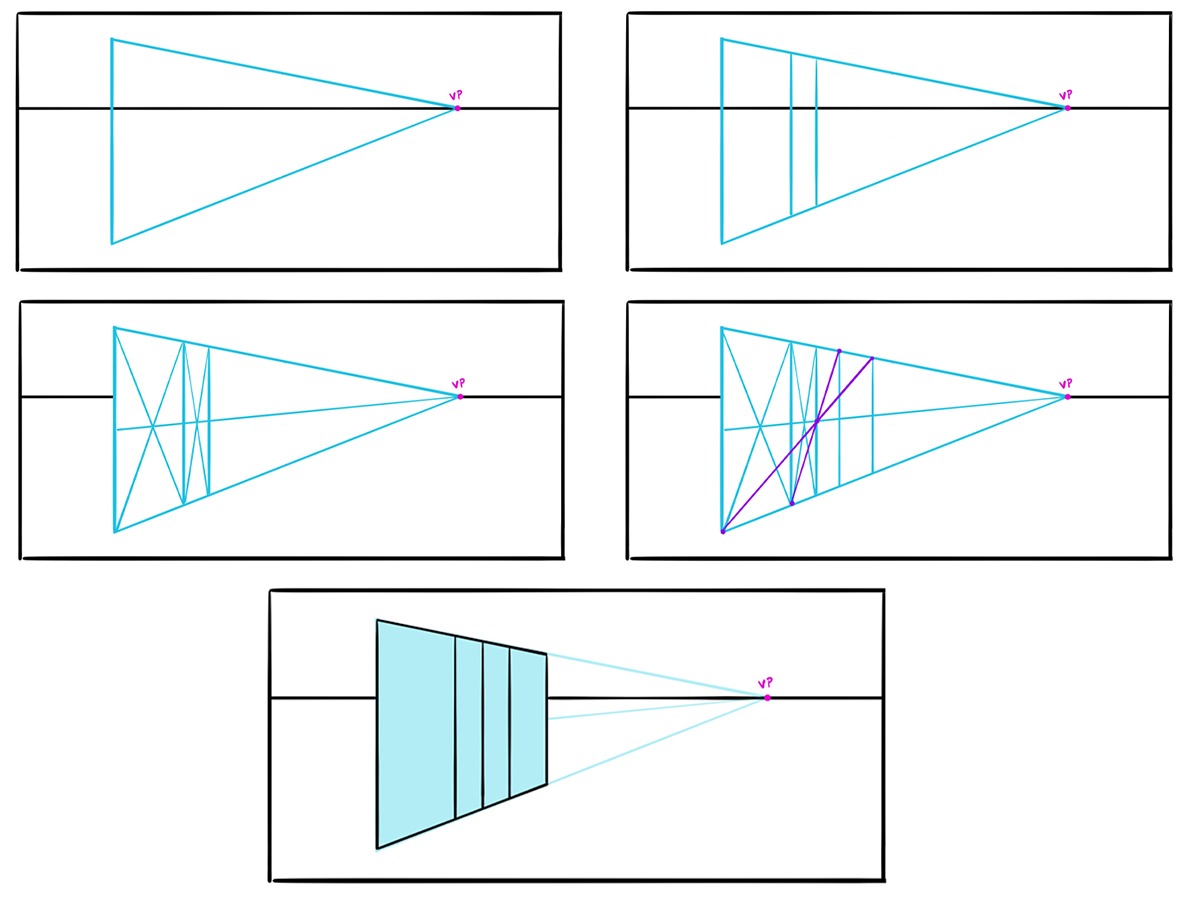
Again, you will next to use your diagonal lines to find center to each new plane. Notice in the 4th illustration that we are now moving the angled lines to different points to create our new shapes.
The one that starts at the furthest left corner is intersecting the center at the farthest right point. This allows us to find the distance of both shapes combined and create the line furthest to the right.
Then notice that the second angled line starts on the lower left of the thinner rectangle then moves through the same center point.
This now mirrors the smaller rectangle and gives us our other line. Just like that we have mirrored the two shapes in perspective giving us 2 new rectangles that are mirrored copies of the first two but in perspective.
This method is great for all sorts of drawings. This also works in any direction. I find it very helpful for creating windows and columns but be creative and think outside the box. No pun intended!
Duplicate 3D Objects with the Same Techniques
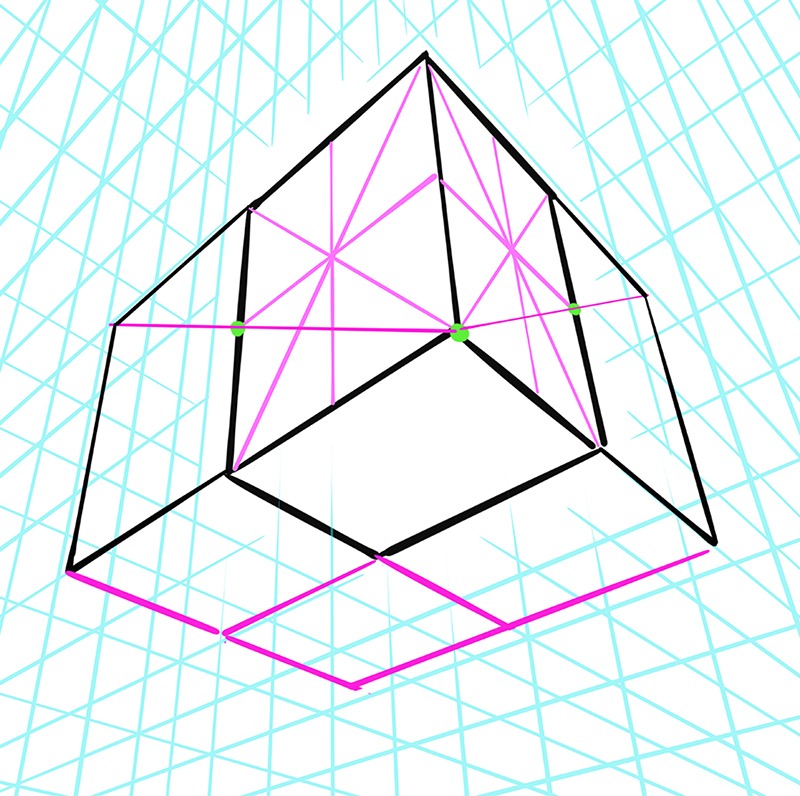
You can see in the example above that these same techniques work with a three dimensional prism. This allows you to duplicate the object in even a 3 Point Perspective. You will still go from the lower corner point through the center to find the new points of reference.
Then the other lines are created by using the other vanishing points off the page and also referencing the lines from the original cube. You can continue this method as many times as you need. You’re on your way to drawing your very own Rubik’s cube in Perspective!
Dividing into Equal Thirds
For this next example you will learn how to divide a plane into equal one thirds. Again, this is based upon the subdividing technique with one small change.
By adding the lines you see in red we now create two new points that overlap the diagonal lines. This gives us our reference points to draw two new vertical lines. This also works in any direction.
Mapping Distance in Perspective
Now to show you how to map distance and divides in Perspective. For these lessons I have created a video for you to watch. It’s far better to show you these techniques but you now understand the basic methods that help to get us there.
You can watch this video here where I show you how to divide and map distance in perspective three different ways.
If you want to learn more about basic 1, 2, and 3 Point Perspective you can check out this blog post that I created for you here –
I will be bringing you more content on drawing in perspective very soon. I also have a full 10 hour course that details many of the techniques that help us to draw amazing background in perspective. You can view that content here on Udemy – https://www.udemy.com/course/drawing-amazing-backgrounds-with-perspective-step-by-step/?referralCode=35A59D03018A265549C2
With this course you get lifetime access and all future updates are free. My next update will include how to draw archways and various window designs.
I hope you have found today’s perspective tutorial informative and more on the way. Consider joining our newsletter or stopping back to see our future updates. Reach out if you have any questions. You can use my contact form on the main page if you need to reach me.
Good luck with your perspective drawing and have an awesome day!
Robert A. Marzullo
Ram Studios Comics
0 Comments