In today’s tutorial I will show you how to draw backgrounds using basic perspective techniques.
Drawing in perspective can seem confusing at first but once you know a few of the rules you can draw more freely and start to have fun with them. We will focus on 1, 2, and 3 Point Perspective in this post.
There are others of course but most of your work will fall into these three primary versions. First off, let’s talk about the basic principles of perspective by going over the terminology.
( You can click the images to enlarge them and feel free to use them for reference. )
Basic 1 Point Perspective
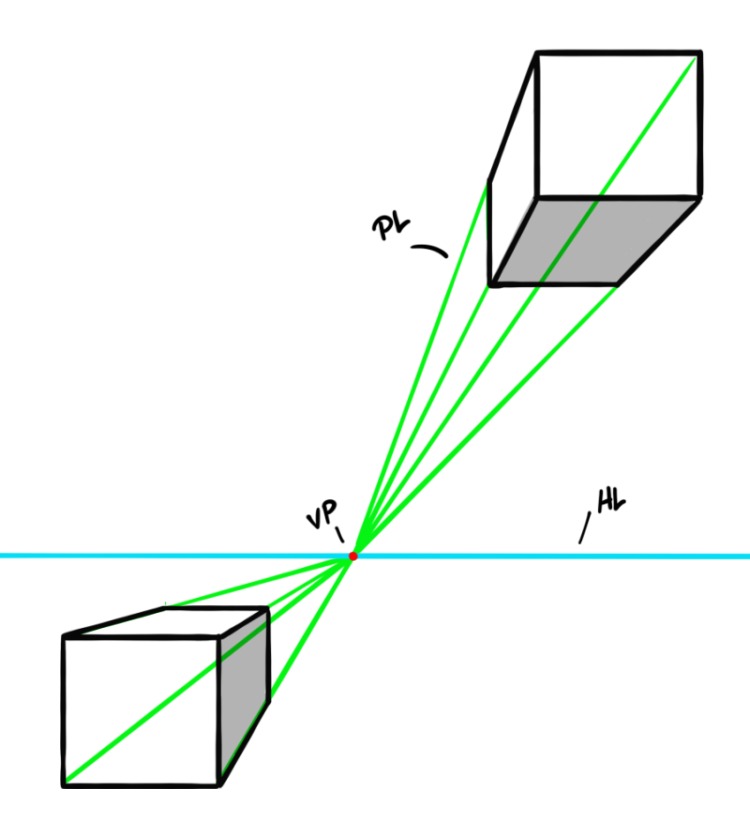
This basic diagram will give you some of the ideas to understand a 1 Point Perspective drawing.
Notice the light blue line running horizontally through the canvas. The HL = Horizon Line.
This is where our eye level is within the scene. That is why we see the bottom of any objects above this line and why we see the tops of anything below this line.
The VP = Vanishing Point. This is where all the PL = Perspective Lines converge and ultimately vanish into the distance of the horizon.
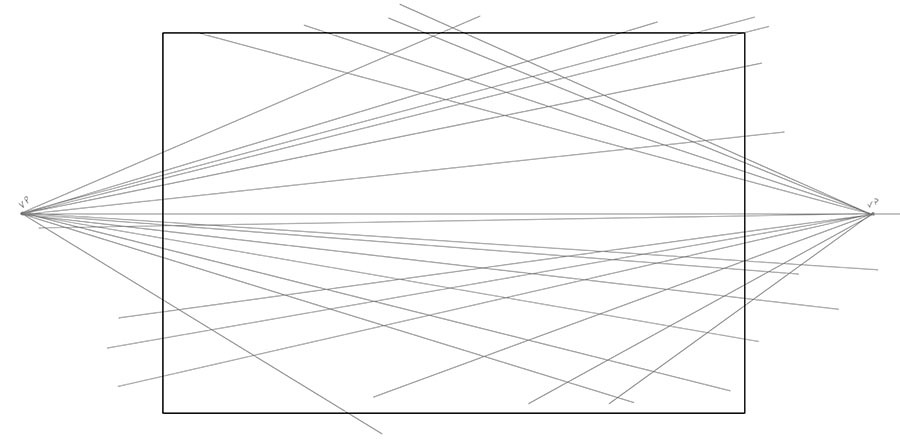
Basic 2 Point Perspective
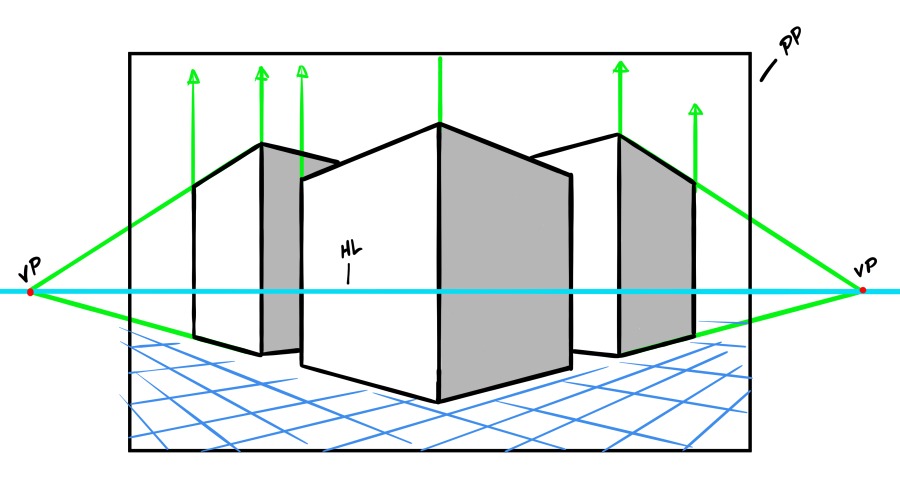
In this next example you can see that much of the initial layout is the same, except now we have a second VP ( vanishing point ). So now the same box like prisms recede away from our view in 2 directions.
This works for more complex scenes and ideas because things are rarely parallel to our view. Notice that everything radiates toward the VP’s except for the vertical lines going up and down.
Another thing to note here is that since the HL ( Horizon Line ) is in the approximate center of the scene, we can see the top and bottom edges of our forms but not the top or bottom plane of the forms.
If the forms were drawn completely above the horizon line we would clearly be able to see the bottom plane and the reverse is true as well.
Basic 3 Point Perspective
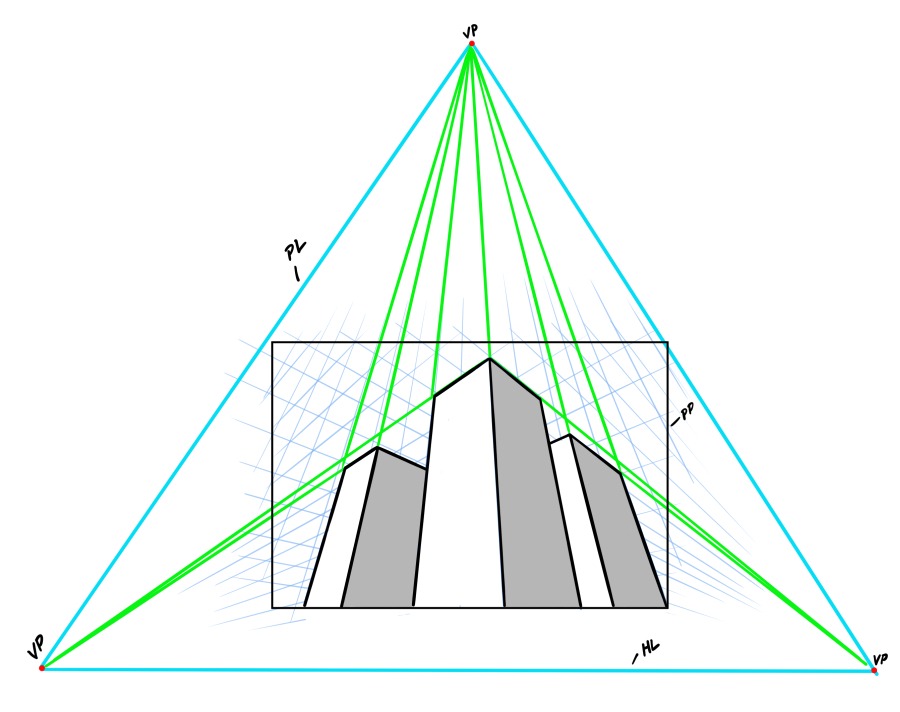
Here we add another VP ( Vanishing Point ) but this time we put it up above or below to create a triangular effect. This gives us a much more dynamic representation of the viewing angle.
Just picture yourself on a city sidewalk looking upward at a massive set of buildings. Likewise you could be on top of the building looking down. Each of these would be best described with a 3 Point Perspective.
Quick Tip – Make sure that the 3 Points form a triangle ( Light Blue Lines ) that is outside of the PP ( Picture Plane ). This will help you avoid any distortions in your perspective.
Take the time to implement these three basic diagrams in your own way. Move the horizon line around and play with different sized picture planes. Also, experiment with a variety of compositions within the scene.
Practice Activity! Try taking some of your favorite scenes from comics, movies, games, and even from life, then draw these perspective grids through them. You will learn a lot from that process and start to feel more comfortable with these concepts!
Here is an example of what I mean –

Notice how I took from the big forms and simplified things. This can help us to bridge the gap in those complex scenes and learn as we go. Give it a try and you’ll be glad that you did!
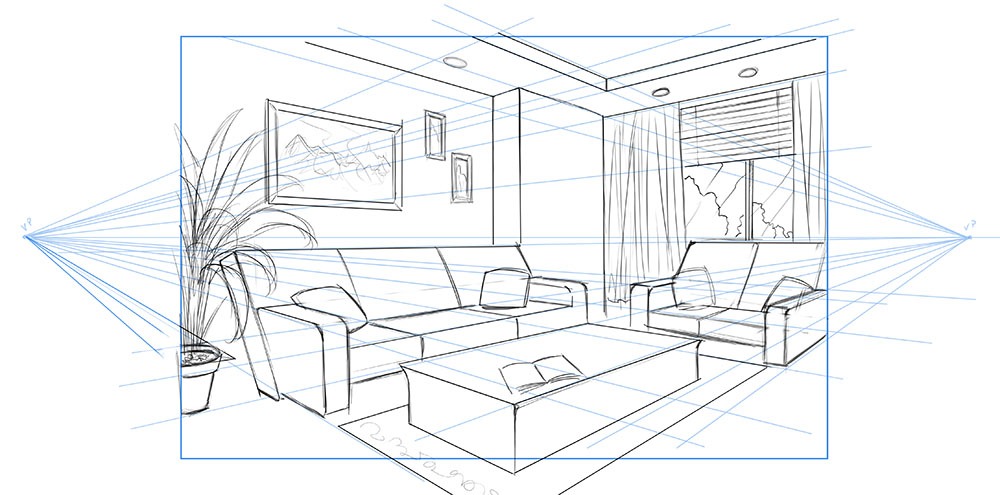
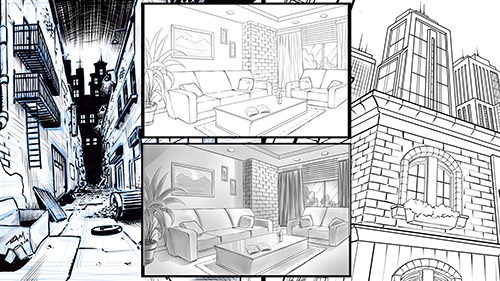
For this next part I will walk you through a full scene creation. We will use all the basic concepts that you have learned so far.
Step 1 – Draw a Rough Concept
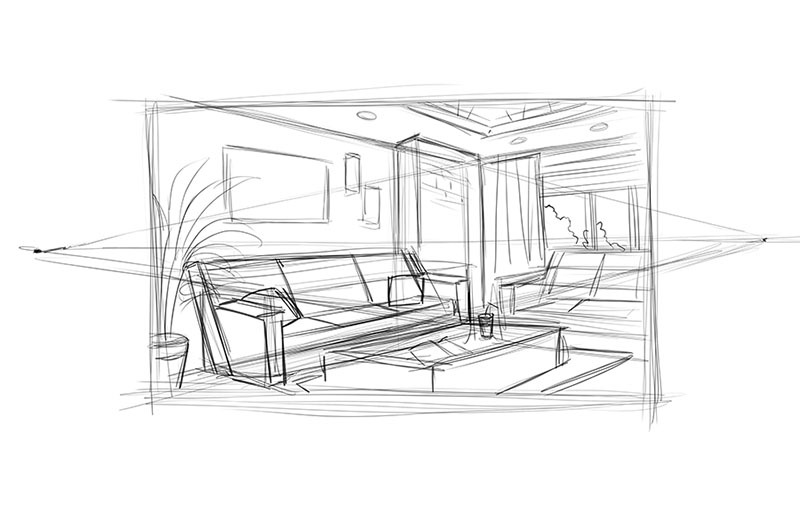
This becomes your blueprint for the rest of the process so think loose and fast. No refinements here, just get in any of the concepts with as few lines as possible.
You’ll have plenty of time to clean things up as you go so think more as a designer at this stage of the art.
Step 2 – Establish Your Perspective
Now draw in your VP ( Vanishing Points ), PP ( Picture Plane ), and PL ( Perspective Lines ). Add as many or as few PL as you will need to redraw your ideas from the previous step.
Remember, you can also be strategic in the placement of these lines, adding more where more detail will be needed and so on.
Step 3 – Draw in the Foreground Elements

Now you can reference your rough sketch and start to draw in the elements of your scene. Sometimes, it can be a good idea to work from big to small or from the foreground to the background.
It really depends upon the overlaps of the design and what you feel comfortable with. Sometimes, I will draw all the walls first so I have a better idea of where to place the furniture. Either way, just keep adding in the details from your initial concept.
These lines will be more refined than the rough sketch but these are still not the finished product so don’t be too critical yet!
Step 4 – Adding in the Background Details
Now add in the background details of the scene. Same as before, cleaner lines but nothing needs to be perfect. Remember to take breaks and come back to the work with fresh eyes.
You may just spot a bad overlap or tangent of some kind. Look for size relationships from object to object. It’s easy to get caught up in all the fun and miss a glaring mistake so don’t rush unless there is deadline of course!
Step 5 – Refinement of the Lines

Now it’s time to refine the lines one more time. I am using “Layers” so I can easily convert the previous sketch to a blue line. If you are working traditionally that may just be a light table or transparency paper.
Here we can be a bit more careful about our lines but still keep in mind that there no such thing as perfect and when lines are too clean they look mechanically engineered. Safe those for your alien spaceship drawings.
These can have little bit of an organic feel. Generally that will add to the illustration, not hurt it.
Step 6 – Refining the Background
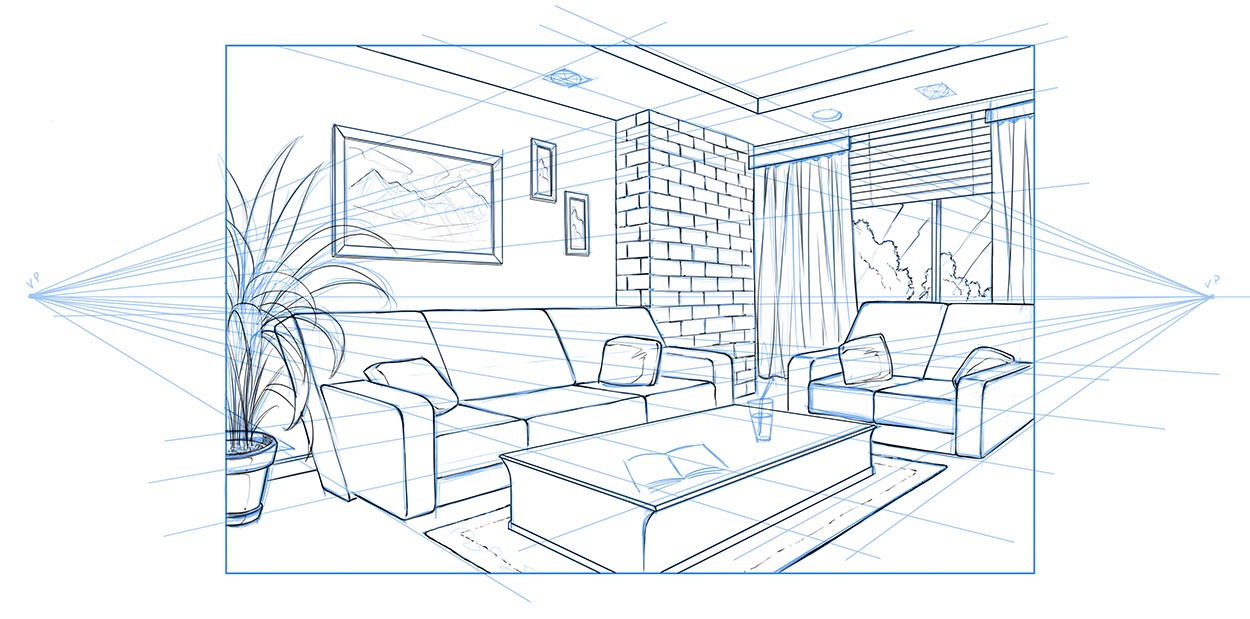
Now to clean up the background details. Keep in mind that elements in the foreground tend to be more visible and pronounced. So you can use a slightly heavier line on those objects. You don’t need to hit the viewer over the head with those thick lines but it can be nice way to direct their focus and make the scene appear more dimensional.
Step 7 – Final Line Work
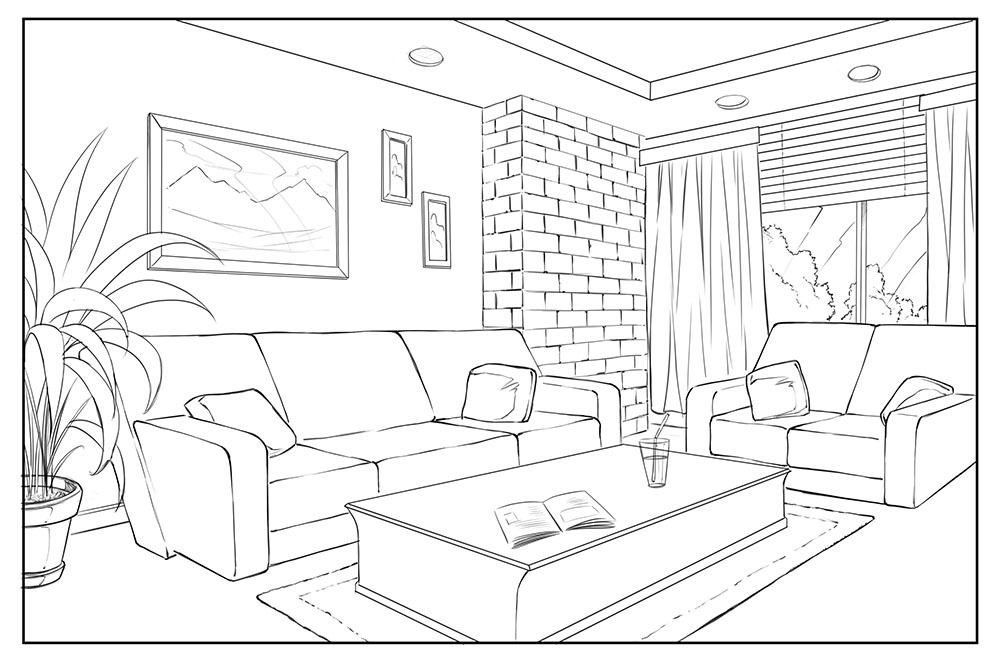
Now we can get rid of the previous layer and touch up the lines one more time. What I generally notice is that when I get rid of my previous sketch, my lines tend to be more visibly faint.
This is a good time to beef some of them up with a little more line weight and even erase back any mistakes. You may even have to break out the white out. Sorry, it’s just part of the game!
Step 8 – Adding in Value
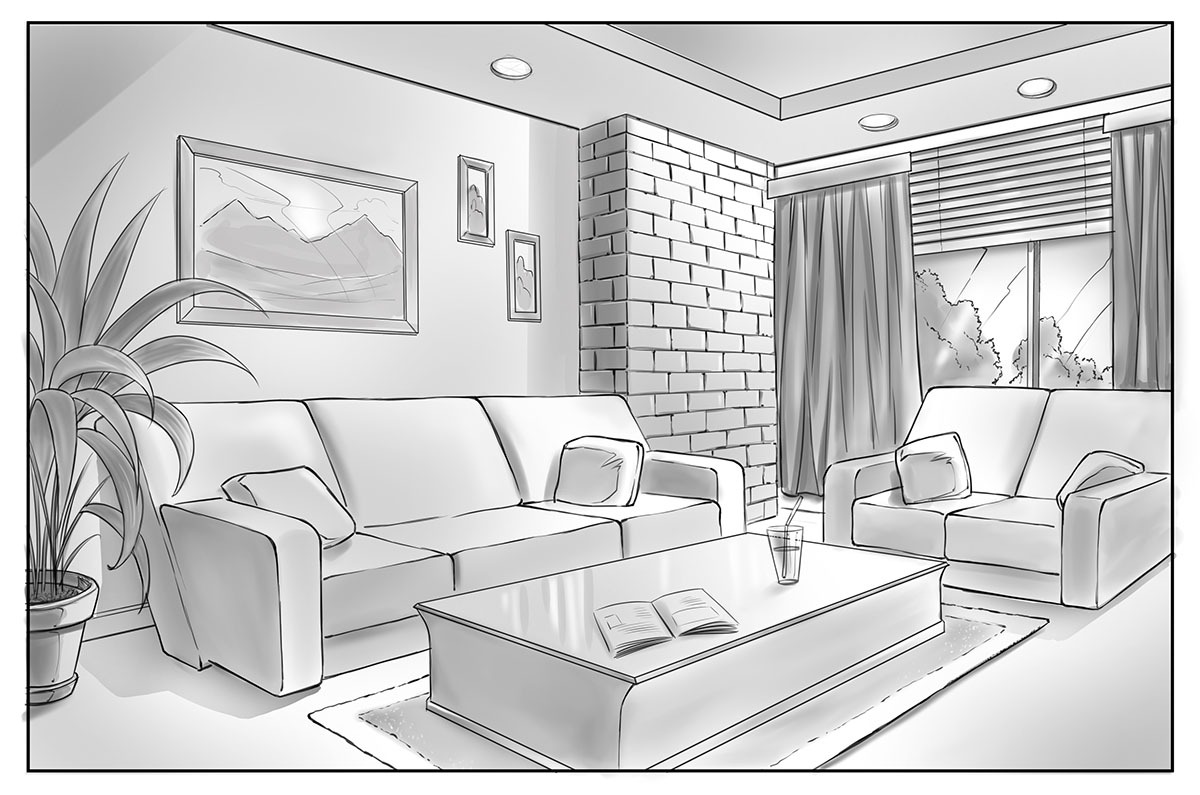
To finish this one off I wanted to introduce some value to the work. Varying shades of grey can make the scene look more three dimensional and it’s fun to do.
Just pick a light source or two and start shading. I like to start light and slowly add to the values. Mix in some hard edge and soft edge shadows to convey different materials and there you have it. A scene in 2 Point Perspective all ready for your portfolio.
I hope you found this to be informative and if you want to learn more on How to Draw Backgrounds please check out my full course below –
You can check that out here if you like – https://ram-studios-comics-art-school.teachable.com/p/drawing-amazing-backgrounds-with-perspective-step-by-step?coupon_code=RAMSTUDIOSPOST
Here are some of my Youtube videos on How to Draw Backgrounds in Perspective. Please LIKE – SHARE – SUBSCRIBE for new content each week! –
Thank you for viewing the content and please comment below if you have any questions or requests for new art tutorials.
I hope this post has given you some insights into how to draw backgrounds for your illustrations!
Good luck with your perspective drawing studies and more on the way soon!
Sincerely,
Robert A. Marzullo
Ram Studios Comics
Would you like to get notified of upcoming content? Join our Newsletter here – https://ramstudioscomics.com/index.php/ram-studios-newsletter
2 Comments
marcelo castilho · August 31, 2022 at 8:09 pm
ficou muito bom! parabéns
RAM · September 9, 2022 at 5:24 pm
Thank you very much! 🙂