Welcome back my fellow artists!
In today’s tutorial you will learn how to draw hair a few different ways. I will show you some patterns to look for that make drawing hair much easier to accomplish.
So let’s get drawing and give those characters some hair that will keep their heads warm!
Drawing Hair with the Ribbon Technique
There are many different hair styles to choose from but with these techniques you can start to create all sorts of variations. The first practice activity that I want to show you will be to draw the hair by thinking of ribbons.
The reason this works so well is that in the beginning we tend to think of hair as a bunch of lines versus the forms and volumes that give hair it’s bounce and flow.
When drawing the hair as ribbons we start to get more curves involved and begin to roll the forms around one another.
Let me show you with a few sketches since it is much easier to illustrate this method than try to explain it.
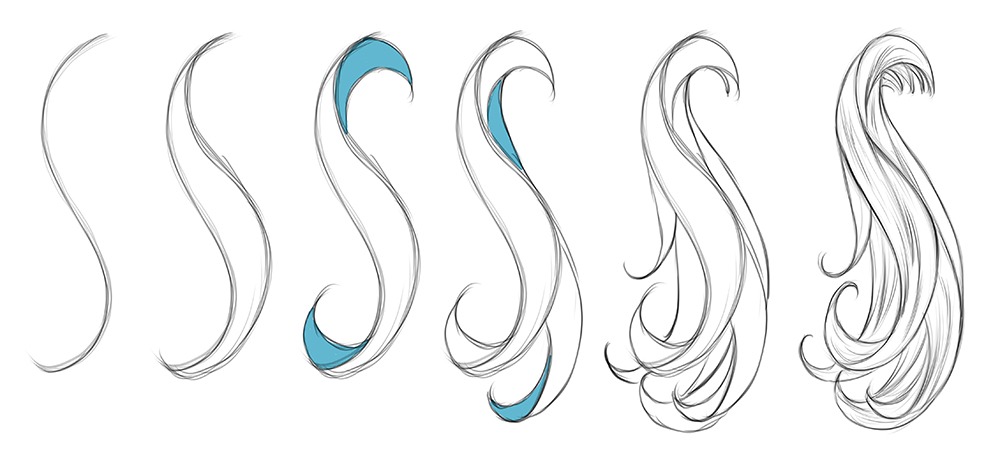
Notice in the illustration above that we can start with a basic “S” curve and then by adding a second one we start to get a sense of the first volume.
Then by continuing this method we can roll the form around like a ribbon. Pay attention to the areas labeled in blue. Each time we add a new ribbon to this drawing it adds more depth and dimension to the hair.
By the end of the this drawing you can add in some fine lines for texture. Just make sure not to draw them too aligned to one another. This will flatten out the forms and will make the hair appear more rigid.
Also notice that by varying up the little flips or curls at the end of the ribbons we can give the hair more body.
Those little flips at the ends are called “Beauty Lines” and you can really add lots of style to that part of the work as many comic artists do.
Blocking in the Shape of the Hair
Another technique that pairs with this ribbon drawing method is blocking in the shape of the hair.
This helps us to simplify more complex hair styles and it is also another great opportunity to introduce your style.
For a more cartoony style use bigger shapes and volumes. This can really speed things up and you can always learn to develop more details as you gain confidence with these techniques. It’s easy to kind of overdo the hair renderings anyways. I like to believe less is more in this area of our work.
Drawing a Female Hair Style Step by Step
Let’s go through a step by step and see the process in action. Start by drawing a character of your choice. I will go with a comic style female face from a front view. Now let’s get into the steps.
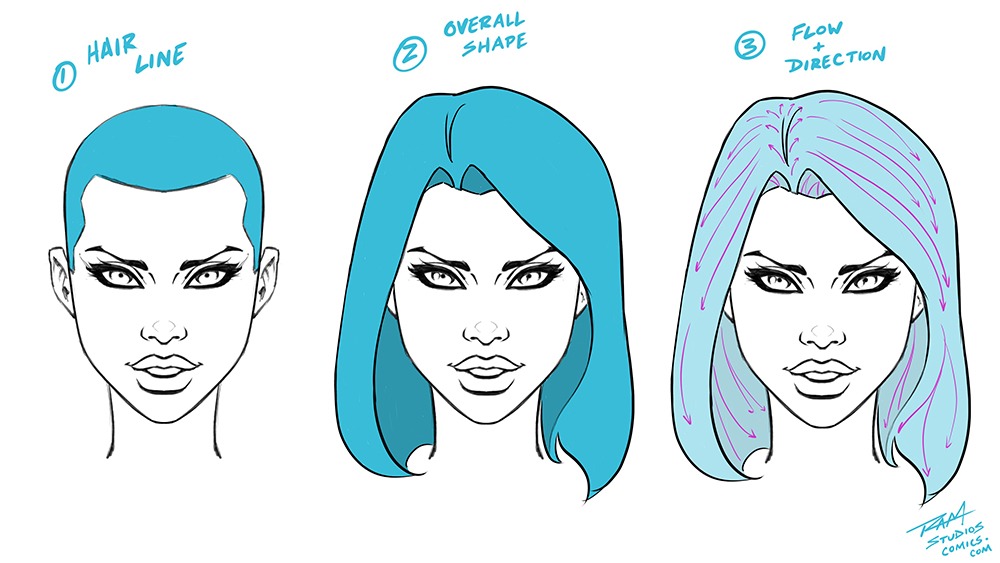
Step 1 – Draw a Basic Hairline Shape.
This gives us a great starting point to work from. Even if you draw a hair style that completely covers the hair line this method still helps out in my opinion. Most hair styles will show at least some of the hair line so this is a good place to start.
Step 2 – Draw the Overall Shape of the Hair
This is a great way to simplify the hair. Since the hair can get pretty complex to draw these simple shapes can help us focus on certain aspects of the design.
Notice how this hair style is like a bell shape. Also, notice how the folds in the darker blue by the scalp are in the shape of an “M”. Little observations like this make the process much easier to accomplish.
Try observing a series of photos or comics and drawing a bunch of these basic hair shapes. You’ll learn a lot from the exercise, I promise!
Step 3 – Draw the Flow and Direction of the Hair
Now that we have the shape of the hair in place we can now draw in some directional lines.
These will keep us on track when drawing the interior hair shapes and smaller volumes. This also becomes another area of study since these directional lines will vary based upon the hair type. I will use slightly wavy lines for this example.
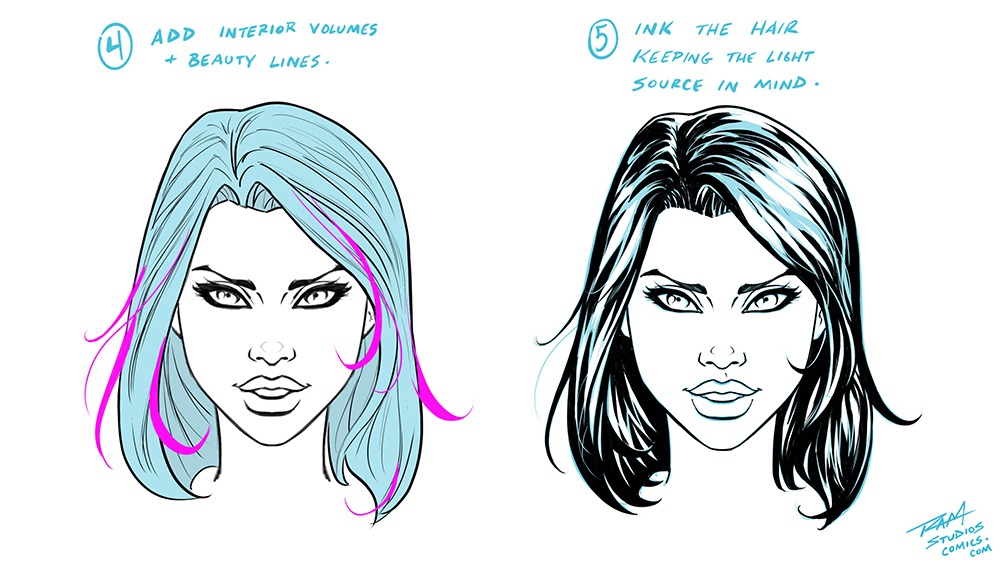
Step 4 – Draw the Interior Volumes of the Hair and Beauty Lines
Now we can break down the interior forms with the previous steps guiding us. This is also a good time to add those beauty lines or curls.
Those little flips of hair add a lot of character and can make a stiff hair style look more organic and interesting.
Step 5 – Ink the Work!
Now we can finalize the line work and place the shapes of shadows. In this example I am putting the light source on the top of the hair. Light and shadow can be a complex topic so I will cover that in more detail soon.
Just try to simplify the idea and keep the light source in mind as you draw in the big shapes. So establish a more focused area then break off into smaller areas since light doesn’t just end abruptly on an object unless there is a steep angle.
As I start to ink the hair I am looking for patterns that create a sense of texture. When I study hair I tend to see “W” like shapes for the glares and half moon shapes for the shadows. Remember that simplifications like this can make recreating your work easier and therefore faster.
You may see different shapes than I do, the point is to relate them to something you can remember and to practice often so that you are consistent.
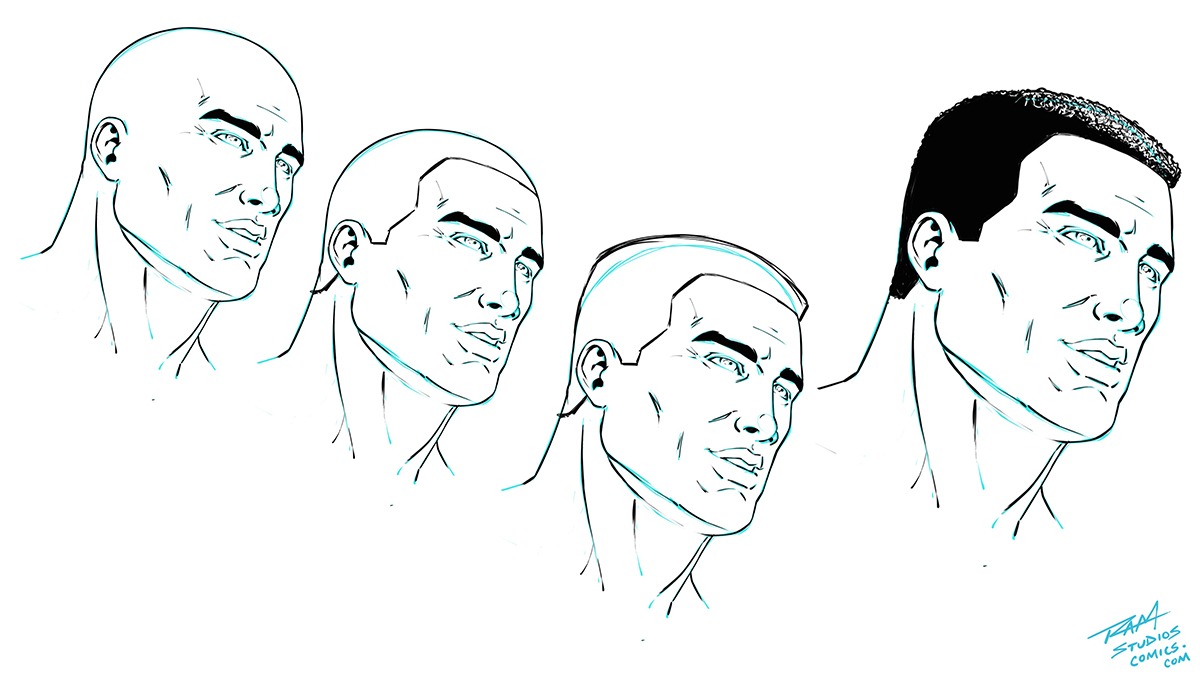
Let’s use the Same Techniques for Drawing Short Wavy Hair
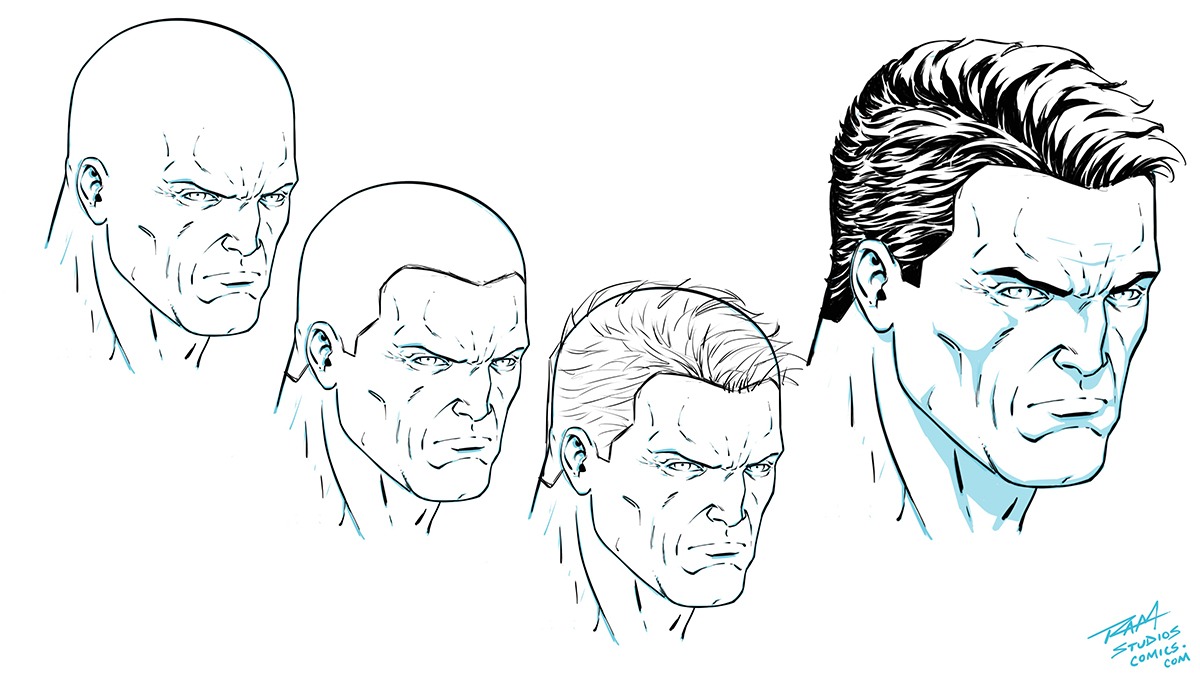
Notice in this next example that the same step by step approach will work on this shorter male hair style. Probably the biggest differences that I see when drawing this hair style is that the hair volume is more angular.
This is part of my style choice of course but also it tends to look more masculine and also a bit rigid.
The same patterns are apparent in the inking stage but they are more compressed together. Practice drawing intersecting waves with points on the end. Usually after you warm up and get the pattern working in your mind it goes much faster with less effort. Remember, you can also try to draw a similar pattern with less details. You can see that the larger folds of hair on the right are an example of this idea.
How to Draw Black Curly Hair
Let’s start with the easy one. Short curly hair can be simplified even further than the previous examples. We will still use the same step by step approach but then as we get to the inking stage we can use a bit of stipple shading.
Notice in the example below that I have drawn a perimeter shape of the hair but then filled most of it in. This allows me to just focus on the light source side and render tiny curls over and over.
Just make sure to space them out as you reach the lighter side of the hair. This also works with bounced light but on this drawing I am only using a single light source.
Notice that I also added some curls to the edge of the hair style. Sometimes leaving it overly smooth can look a bit fake or out of style. Just play around with this effect and pay attention to hair style trends.
Pinterest is great for looking up cool hair styles by the way!
How to Draw a Braid
For this next part I will break down how to draw a braid. These come in all sorts of variations but this techniques should help you draw them regardless of the style.
Study this step by step below and see if the shapes makes sense to you. You may have to draw this a couple of times before you commit the process to memory but that is normal. I still struggle to see the patterns and use this style of template myself from time to time. How embarrassing right? lol
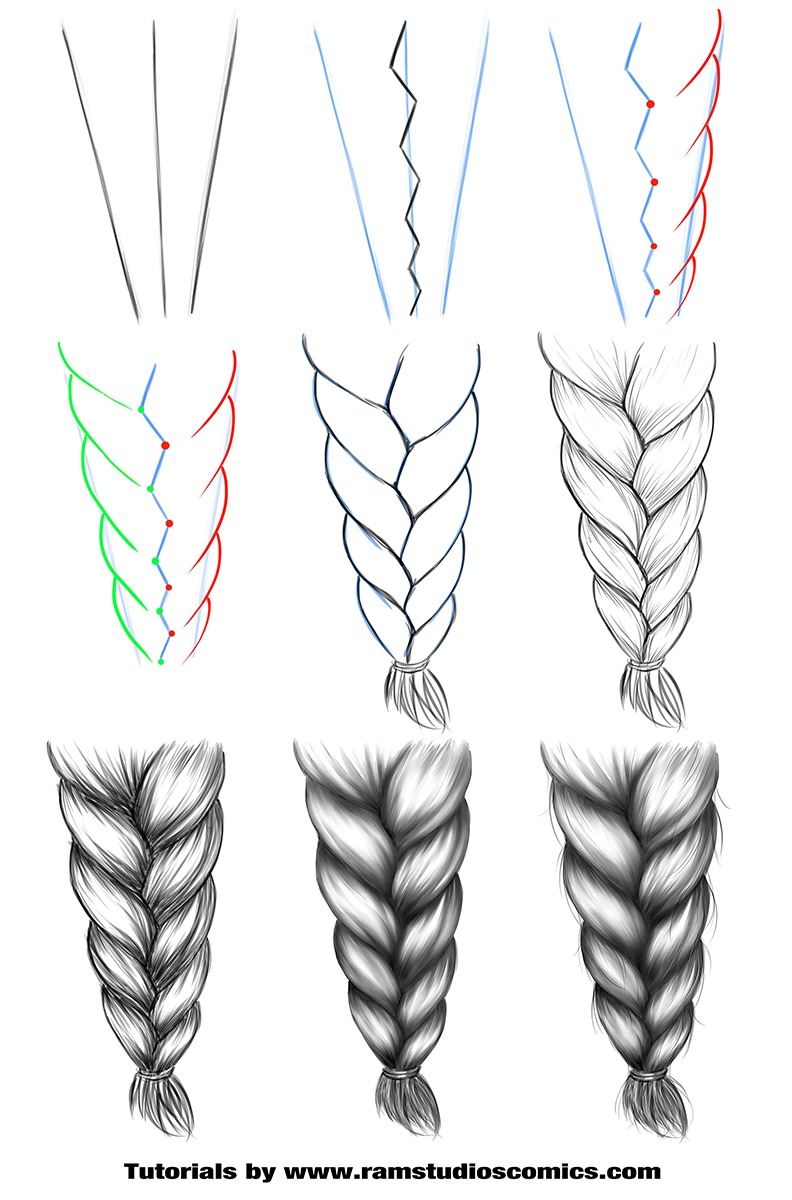
Step 1 – Draw the Taper and Centerline
For this style of braid we want it to be larger near the head of the character and thin down toward the end. By starting with the tapered lines it will help guide us to this outcome.
Like many things that we draw a center line can be very helpful as well. The centerline will get us ready for the next step.
Step 2 – Draw a Zigzag Over the Centerline
This zigzag is a simplification but it can be very helpful to work with. You can play around with the thickness of the effect but I like to keep it pretty tight to the middle of the braid.
Another thing to pay attention to is the way that the zigzags get smaller as they move down the braid to the tapered end. This helps us to proportionately decrease the size of the braid in the next couple of steps.
Step 3 – Draw Curves Towards the Red Dots
Notice how the red dots are only on the right points of the zigzag. The curves that we will add will start higher and flow down to the red dots.
Step 4 – Draw the Curves on the Opposite Side
Now to do the same thing on the opposite side but staggered just a bit.
Step 5 – Draw the Braid Over the Template
Now that we have established a base template to work with we can draw the braid more organically over the top.
As you draw this part try to think about how the braided hair passes in front and behind the other sections. That way you start to put a bit more curve on the parts that need it to imply depth.
Step 6 – Add Texture to the Hair
We can start to add texture to the hair and a sense of flow by drawing the hair in the right direction. Draw the hair lines going from top to the bottom of each segment but also try to break things up from left to the right across the volume of the hair.
You don’t want a bunch of lines that are too evenly distributed because that will flatten out the volume of the hair. Instead, try to picture highs and lows in the volume of the hair. Then draw your lines accordingly.
Step 7 – Additional Rendering to the Hair
Now we can add more rendering lines and a greater sense of shadow to the braid. Like before, try to keep the volumes in mind as you apply the rendering. You want to round out each segment of the braid but you also want small variations in the segment itself.
Hair is very organic so if you find yourself being too repetitive in your drawing process then it may be hurting the look of the illustration.
Step 8 – Blending the Texture of the Hair
Now to soften things up a bit. I am working digitally with Clip Studio Paint for this drawing so I am using the “Blending Brush” to soften up the harsh edges to the lines.
This helps to give the hair volume a little more of a pillowy sort of look. Be careful with this part of the process. It is all about balance. You need a nice mixture of soft shadows and hair texture to make it look believable.
Make sure to blend with the direction of the hair strands and not side to the side. You can also switch to the eraser or a white pencil tip to bring out more of the highlights as you go.
Step 9 – Adding in Strands of Hair
Now we can finish this braid up by drawing in some loose strands of hair. This adds a sense of realism to the work. No matter how tight your braids are you will have some loose strands here and there.
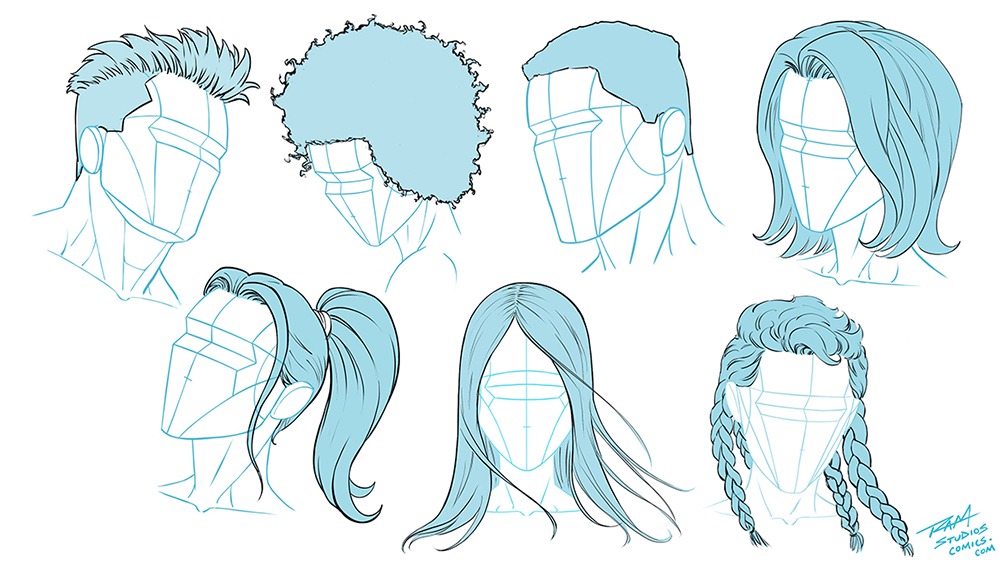
Hair Shape Examples to Practice
There are tons of various hair shapes to use these methods on. Here are a few that I drew for you to reference.
Just try to simplify the hair as much as possible at this stage. Try to look through all the details and just find the big shapes. I will repeat myself here, not only does this make the drawing process easier it will also help you find ways to add more style to your work.
I hope that today’s blog post has given you some ideas on how to draw various hair styles for your characters. I will add more content to cover this topic again in the future. We are constantly learning and growing and this post has inspired me to learn even more on this subject.
Let me know what other topics you want to see covered and I will make sure to work on that as soon as I can. Good luck with your art and never stop drawing!!
Robert A. Marzullo
Ram Studios Comics
If you are looking for a course related to this subject or know someone who is please checkout my content here –
How to Draw Heads from Any Angle ( Full Course ) https://ram-studios-comics-art-school.teachable.com/p/how-to-draw-heads-step-by-step-from-any-angle
Would you like to know when new courses are released and stay up to date with new art tutorials and resources? Then sign up for our newsletter here – https://ramstudioscomics.com/index.php/ram-studios-newsletter/
0 Comments