Welcome back fellow artists! In today’s post we will delve into the exploration of drawing heads from various angles. This is an extremely sought after skill and it does take some time to master.
I will show you some techniques that make this complex subject a bit easier to process so that you can start drawing the characters you imagine with confidence.
I like to use a modified version of the Andrew Loomis method. I say modified because I tend to use a few more basic shapes or primitive forms as I construct the face.
I highly recommend the book, “Drawing the Human Head and Hands” by Andrew Loomis. It is my favorite book on this topic. You can get it here on Amazon ( my affiliate link ) – https://amzn.to/3LRPKIW
So let’s get started by drawing a few of the basic forms we will need to progress through this tutorial. You can use whichever drawing method you prefer. I tend to draw on either my iPad Pro or on paper with a 2H lead.
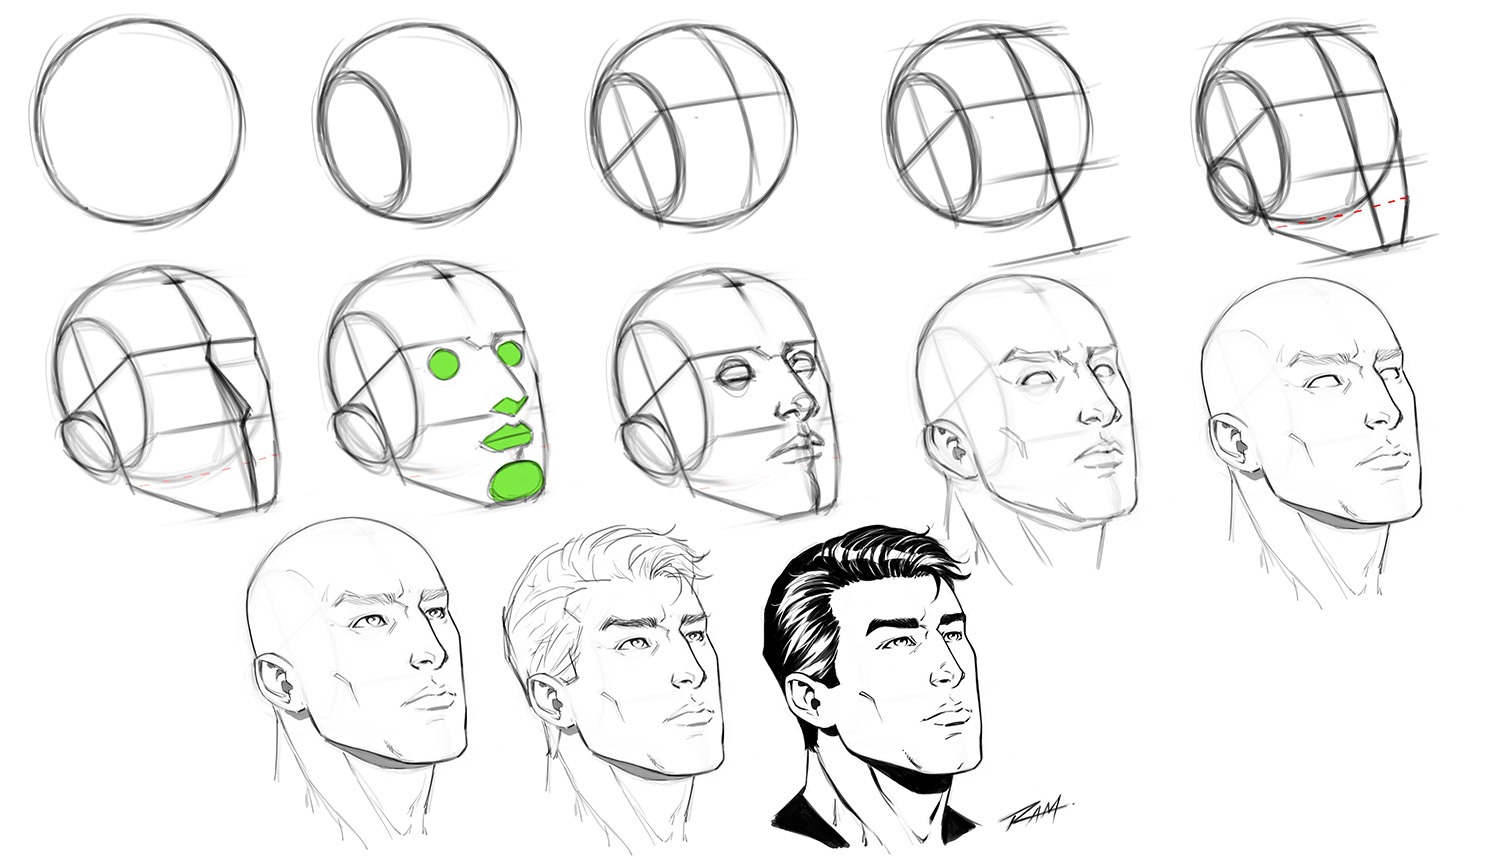
Step 1 – Drawing the Basic Form for the Cranium
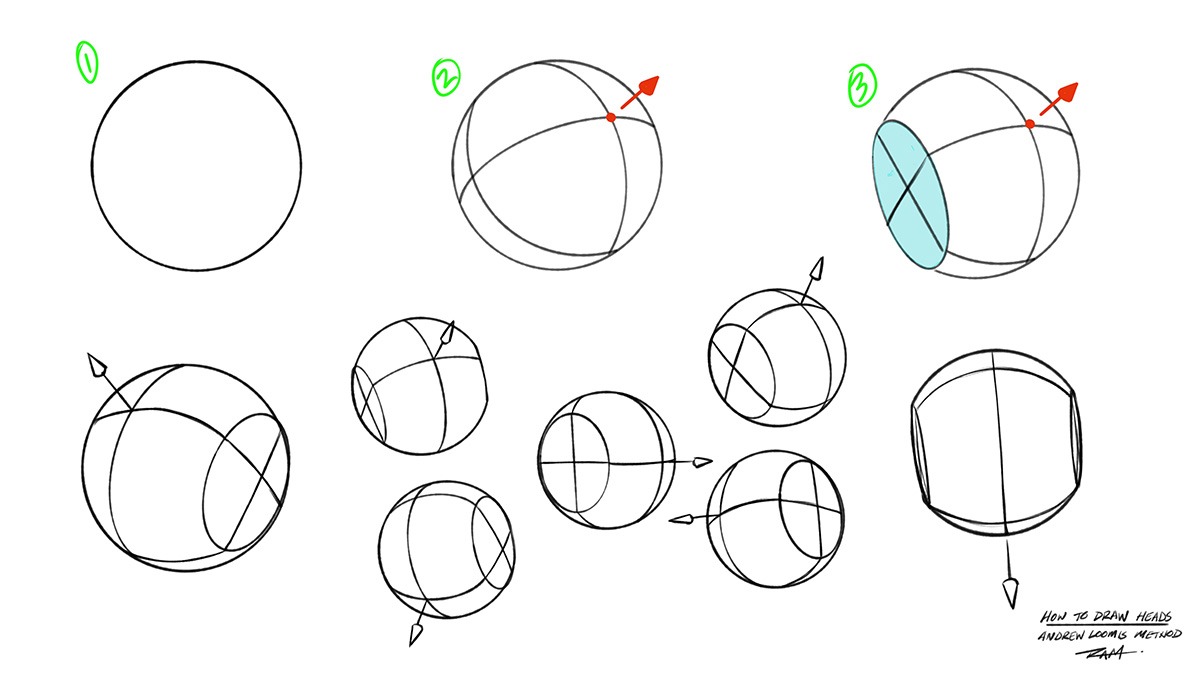
- Start with a sphere or circle. I cleaned this one up your viewing but it doesn’t need to be this precise. Remember that perfection is the enemy of progress. I would rather see you log in more examples than spending too much time perfecting the circle!
- Then divide it along the horizontal and vertical axis. This will give you a bit of a globe like effect. This is also where you will pick the center of the brow line. This tells us which way our characters head is facing.
- You will then draw an oval on the side of the head. Picture slicing off a bit of the sphere. This gives us a sense of the plane change that occurs on the cranium.
Now take those same steps and draw them over and over again until you feel comfortable with that part of the process.
Try various examples at more and more extreme angles. This is the building block that will guide you through the rest of the process, so don’t feel the need to rush past it.
Step 2 – Dividing the Face into Thirds
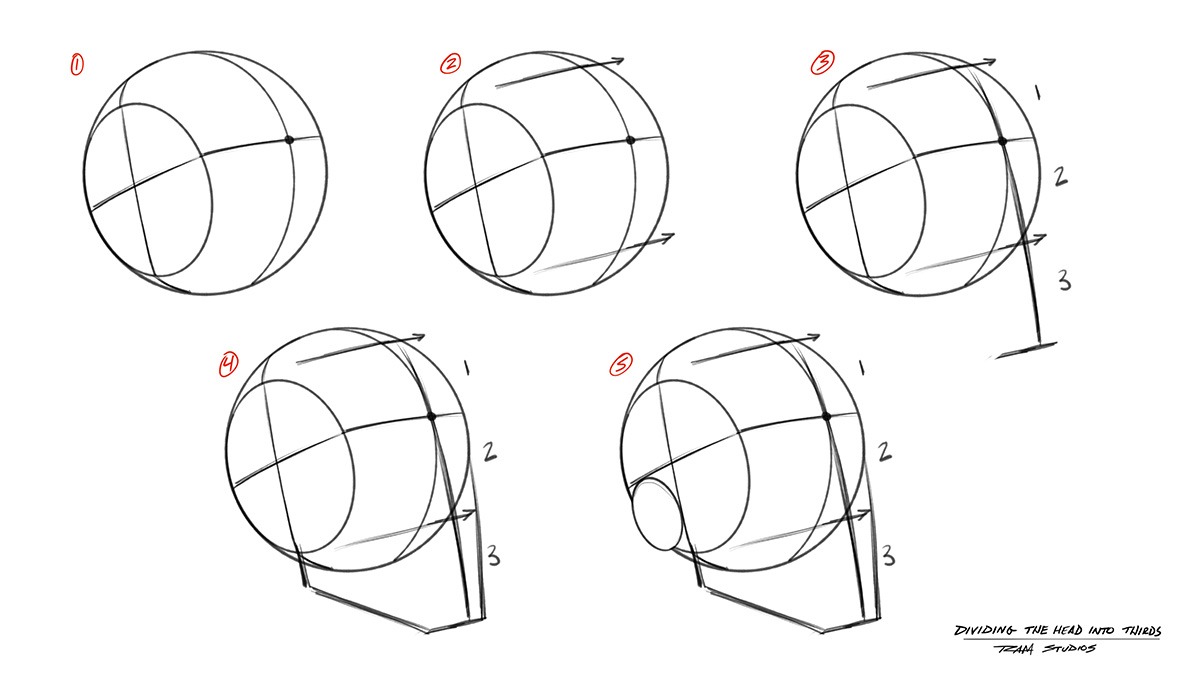
- Take one of your previous head shapes or draw a new one with the center point of the brown line ready to go.
- Draw two lines from the top and bottom of the oval or side plane of the head, parallel to the horizontal brown line. This should now give you a sense of the first 2 sections the face.
- Take a basic measurement of those two sections and add one more for the bottom of the jaw line. This is bound to change based upon the character types you like to draw so don’t worry to much about it being exact. The main thing is that you move through the process and learn the steps for now.
- Now add a jaw line. This too will be very subjective to the character you are imagining. I like to use angular lines to design the shapes at this point but you don’t have to follow my every move. Just do what feels right.
- In the lower quadrant of the side oval you can place another oval for the ear. Now we have a very primitive head shape ready for some facial features!
I also created a Youtube video explaining this part of the process. You can watch that here –
Before we progress I want to address a common question that I get about this process. Many students will ask,
“How big do I make the oval for the side of the head?”
My answer to this is to play around with it. For the most part I would say roughly 2/3 of the height of the circle. Personally, I think that this part will effect the rest of the drawing so I like to try various sizes.
The other factor that you may consider is how far to cut into the sphere, thereby making the head wider or thinner based upon your placement. Again, I want you to experiment here so that you can develop a nice variety with your characters.
I will show you later in this post how I mix in various head shapes as I draw the structure, which I find to be a nice mixture of the techniques for my own style.
Now on to the next step!
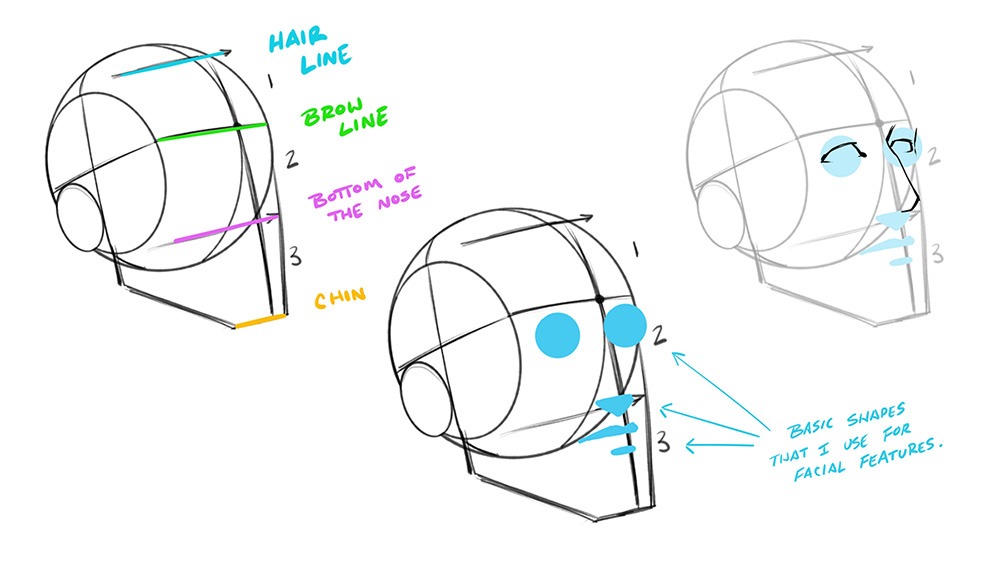
Let’s take the previous head template and break it down a bit further. Notice on the first illustration we have the segments of the face from top to bottom as the hair line, the brow line, the bottom of the nose and the bottom of the chin.
These are subject to change based upon character types. For example I am going to have a much higher line for the nose area when drawing someone like the hulk.
In this case, we will be drawing someone resembling Alfred from the Batman comics. So we will use a much taller area for the height of the nose. I am also going for a more slender head template for this character type.
Draw in Basic Facial Feature Shapes
Notice the middle illustration above when I have established some basic shapes in the light blue color. These primitive shapes help me to draw more dimensionally and keep things in perspective.
Circles for the eyes are a great way to help you draw eye lids that wrap around the eye ball area and also help with the foreshortening. Without places the spheres below the brow line, I usually skew things a bit.
For the nose you can use a larger pyramid like shape or in this case a small upside down triangle. I find this to work well by simply keeping the shape of shadow in mind. It allows me to perceive the nose from there.
Likewise with the mouth. I use a basic “M” like shape for the top lip and I tend to think of the bottom lip as a “U” like shape.
The main thing is that you pick shapes that make sense to you and simplify the subject matter. This doesn’t work for everyone so don’t force it but I must say it was a game changer for me.
Now with those primitive shapes in place, try drawing your line work around and through them. Remember that these are just guides, you need to practice seeing past them and letting your imagination run wild.
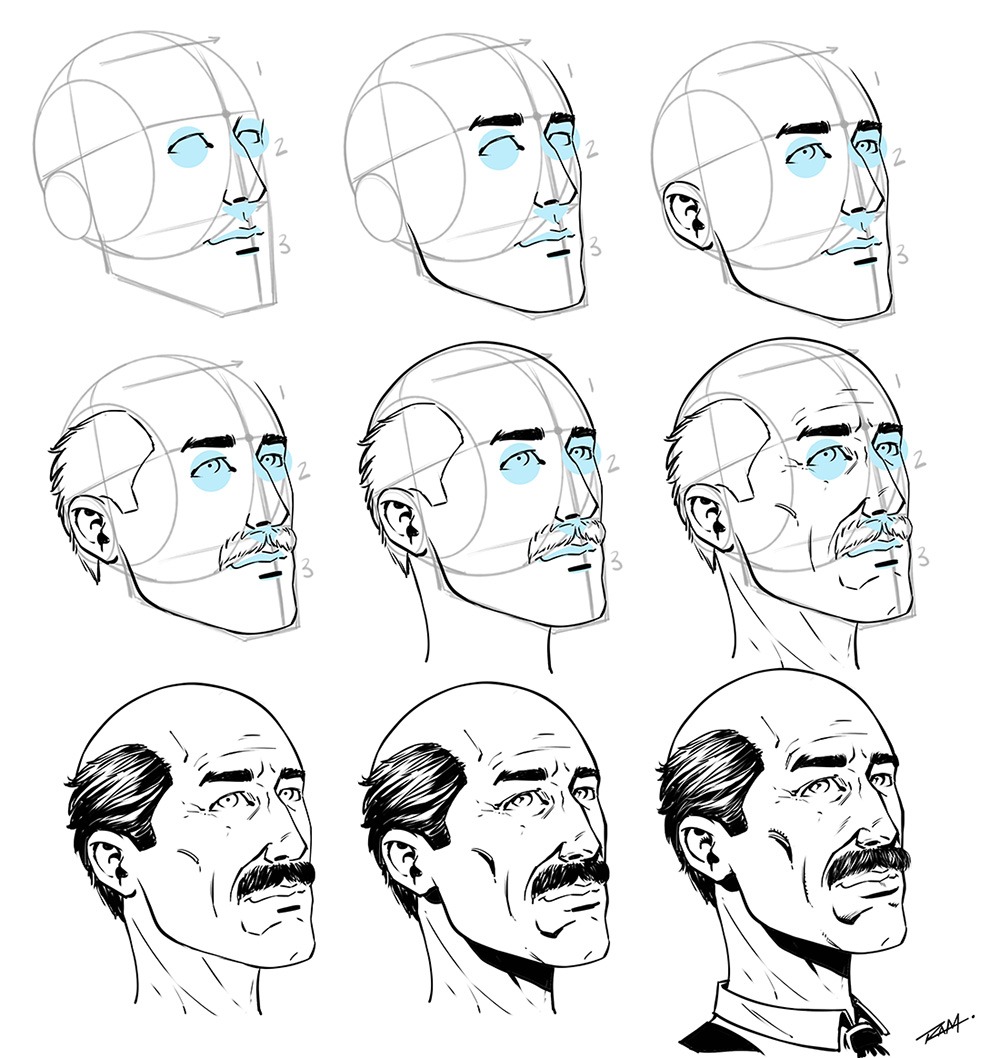
Now follow along with these next few step to draw whichever character you want. I will be drawing Alfred from Batman. He is a fun guy to draw and pretty easily recognized.
Another quick tip is to try drawing with shapes here and there. Notice that I draw the hair and mustache with a big shape and then add in the rendering.
Also, try to make any lines on the interior of the face thinner than the lines on the outside perimeter of the face. I really could have taken that much further.
Practice Drawing Your Favorite Characters with These Techniques!
Now that you know the basic steps you can follow along with a few more tutorials below. Try drawing lots of various character types and play around with the measurements like I mentioned above.
For this next one we will stick to the Batman theme and draw Bruce Wayne or Clark Kent without his glasses. They are basically the same facial type.
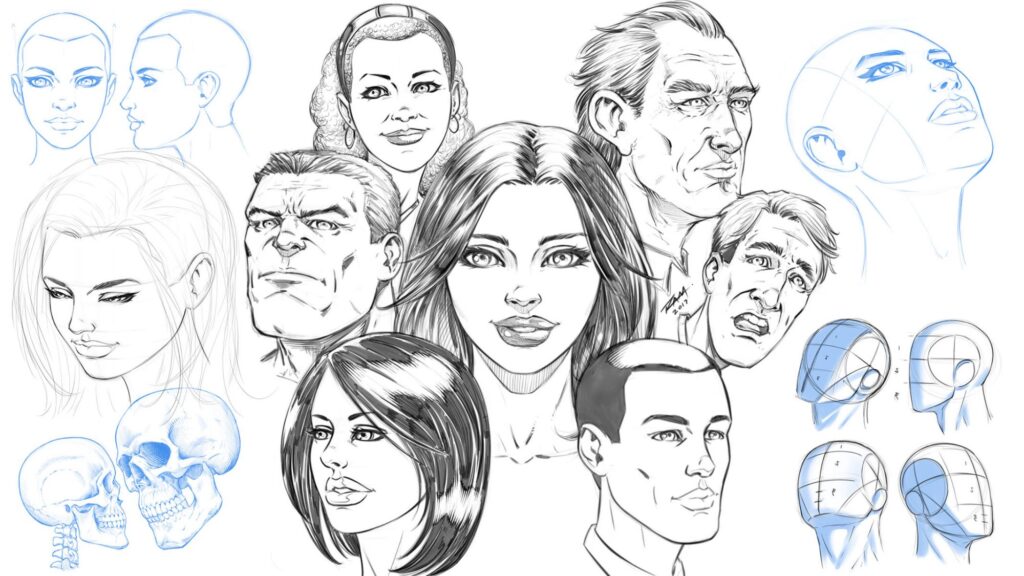
Hopefully you are getting the hang of this by now but what if you are not? What else will help you master this maze of possibilities?
Practicing head shapes and the individual features of the face has helped me tremendously. They are all tricky in their own right but with lots of sketches from different angles we start to find the patterns that resonate with us.
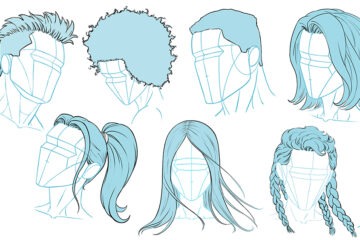
Drawing Various Head Shapes
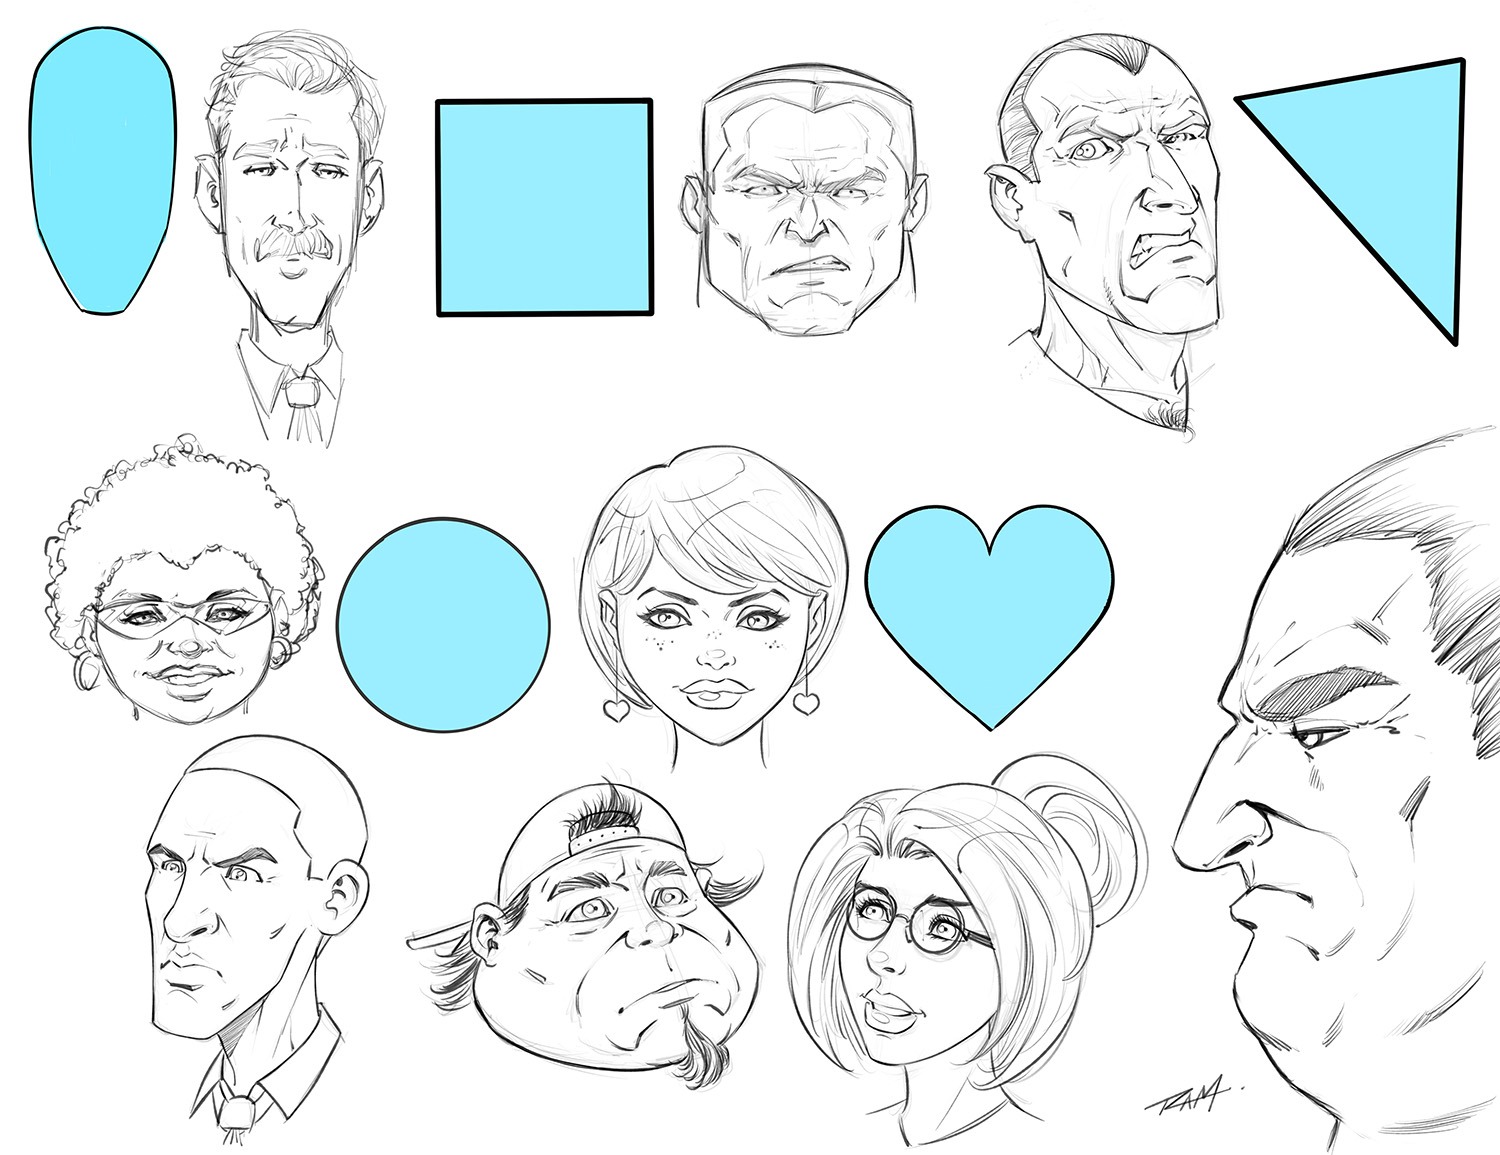
In the examples above you can see some of the primary shapes at work within the character designs. There are all sorts of shapes and variations that you can introduce.
So play around with this technique and don’t be afraid to exaggerate the characters features. It is a great way to caricature and add more narrative to your character designs.
Quick Tip – Shape language also plays a role here. Use sharp angles for villains and round forms for friendly characters.
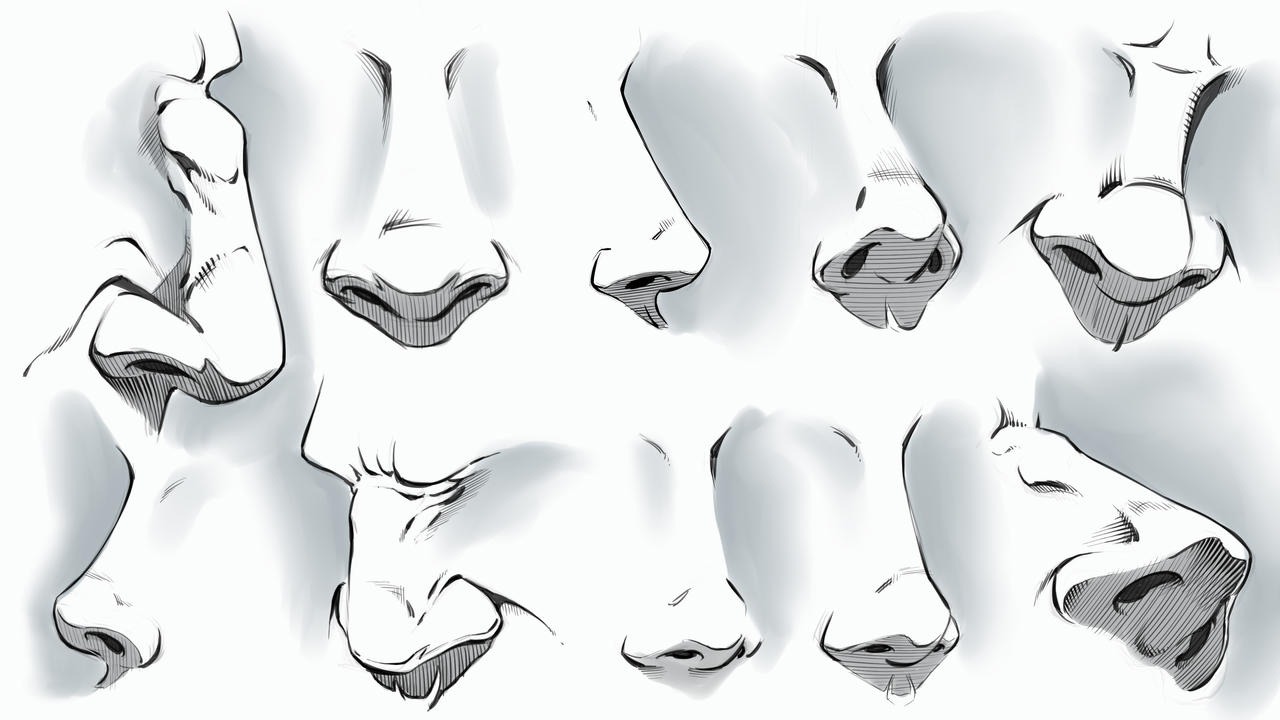
Another thing that I find helpful to do is to draw the different facial features from a variety of angles.
These individual studies can really add up over time. Plus, if you find that you do pretty well with the face drawing until you get to the nose, then drawing the nose over and over from tricky angles will more than likely get you past that problem area in your work.
Here are a few examples of how I practice noses from different angles.
Hopefully these techniques give you something to practice and learn from. Be patient with yourself and practice a little each day. That way you don’t give up or burn out.
Consistency is very important for the growth of an artist. Don’t feel bad if you don’t get it right away. I have been drawing for many years and I still struggle at times! Luckily for us artists, the passion to create drives us to keep going.
If you want more instruction on how to draw heads I have a full course here on my website that can view below. The first two lessons are free to watch so you can see if you like my teaching style.
How to Draw Heads from Any Angle ( Full Course ) https://ram-studios-comics-art-school.teachable.com/p/how-to-draw-heads-step-by-step-from-any-angle
Would you like to know when new courses are released and stay up to date with new art tutorials and resources? Then sign up for our newsletter here – https://ramstudioscomics.com/index.php/ram-studios-newsletter/
Thank you very much for following my content and good luck with your art!
Robert A. Marzullo
Ram Studios Comics
I am the author/illustrator of the book, “Learn to Draw Action Heroes.” You can get a copy here – https://amzn.to/3Keku4a
Check out my Blackstone Comic here – https://robertmarzullo.gumroad.com/l/FGmzo

0 Comments