In this post I want to talk a bit about the primary stages of the drawing process for comics. There are obviously a lot of different ways to create stunning art for comics but the main ones that come to mind are the rough sketch, the pencils or refined lines, and the inks!
Most artists develop the work in this way but not every artist goes about it the same. Some comic artists can draw a clean image over a very loose sketch and sometimes no sketch at all. Yes, they do exist and yes, I do want to Karate kick them in the face. Just kidding…I don’t know Karate. 😂
People like me at least need to refine things a bit more to stay consistent with my end result. Some artists might need to draw things over and over again to get what they want. The point is, whatever works for you is, “The Right Way!” Over time we all get better at skipping steps that once were essential to the goal. It’s kind of the magic of art really. It’s also why it’s so powerful when you see the work of an artist you admire. You are witnessing the collective ability that they have acquired over years and years of hard work. That is the reason they make it appear so easy. Drawing for comics isn’t an overnight process, it’s a journey so be ready.
Step 1 – The Rough Sketch
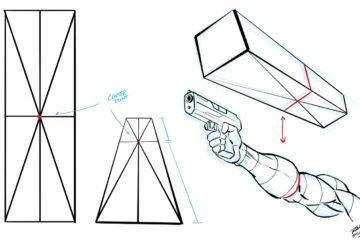
I take my time with the initial sketch. Let me be specific, I take as much time in the thumbnail stage as it takes to know I have a good concept to work from. I purposely draw them loose and fast. I know, I just contradicted myself. I draw them quickly because they are small and very little detail but I also take my time to draw as many as I need to get the composition right. Not getting caught up in the details too soon.
Drawing for comics is a tricky thing. We tend to overthink it or put details where they don’t belong or will not even get noticed. Try to think big to small as you layout your scene. If the big shapes make sense then all those amazing details will just be icing on the cake.

Drawing for comics is hard work but it gets much easier when you plan it out!
Step 2 – Refining the Pencils
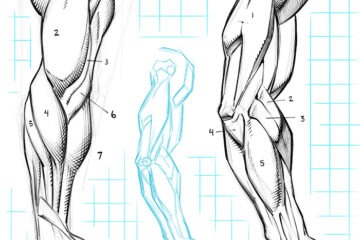
Now I move to exploring my composition. Refining the lines and seeing if I can realize my original vision. The good news is if you work through the rough sketch properly this part is much easier. If you fail to put in the necessary ground work then you have to work harder at this stage. Some artists can envision things a bit better but if you can’t just double check you initial sketch. Check the perspective, proportions, composition, and gesture. Chances are if those things are working this stage will be much more fun!
Tighten up the work and add in the details but not everywhere. You have to have negative space for the viewers eye to rest. Cluttering up every square inch of the page can actually hurt the scene. Use a combination of angles and curves to explain the forms. Too much of one or the other can leave the art feeling too stiff or too soft. Same rules apply to texture. Some surfaces need to look shiny, some need to look gritty. Balancing out the contrast while keeping your focal point In mind is the key.
Step 3 – Inking the Work
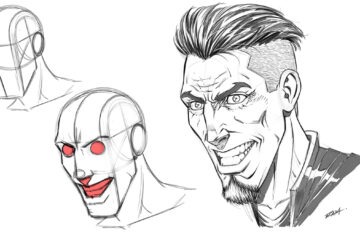
Now you get to put those pretty solid lines everywhere. This is where the real commitment comes in. I like to think about this part as making the art feel solid but not so much that it looks lifeless. Not always easy to do, for me anyways. Depending upon your style, rendering can make things appear overly stiff. Just do your best to remember that initial concept. That is one of the reason I like to save the incremental steps as I work. I can look back and see where I may have lost the initial energy of the thumbnail sketch.
I also think that when your inking the work you should experiment with different levels of shadows and cross-hatching.
Some styles work better with less and the opposite can be true too of course. Another thing I like to pay special attention to is the time to add all those glorious little details.
As I mentioned before, think like a painter does, large to small. Make sure everything works with the bigger shapes and then render in the tighter refined lines. We can get caught up in the details that no one ever really sees. Plus, we are trying to draw comics here. Waste too much time and we miss our deadline and no one wants that!
In what ways do you stage your work or break things down. Be sure to comment below and let others know how you draw for comics. We all learn and grow together.
I hope you find this post helpful and be sure to share the content. Good luck with your art and remember to have fun along the way! 🙂
-Robert
Do You Want to Learn more? Check out my Art Courses here – https://www.online-courses.ramstudioscomics.com
You can sign up for my free course on The Importance of Thumbnail Sketching – https://www.online-courses.ramstudioscomics.com/courses/the-importance-of-thumbnail-sketching
0 Comments