In today’s art tutorial I will show you how to draw noses at various angles step by step.
Let’s face it, noses are a pretty hard thing to draw when we are first starting out. Don’t feel bad, you are not alone and after today’s lesson you’ll be drawing noses like a pro.
I just Nose it! Sorry, I couln’t help myself. Let’s do some drawing!
Things that we will cover in today’s tutorial –
Anatomy of the Nose
Planes of the Nose
Structure and Organic Combined
Stylized Versions
Adding Light and Shadow
Drawing the Anatomy of the Nose
We will first begin with the anatomy of the nose. By studying the underlying anatomy we gain a sense of confidence because we now know more about what we are really looking at.
Here is a break down for you to study and feel free to draw it in your own style. That is really the best way to learn these forms and commit them to memory.
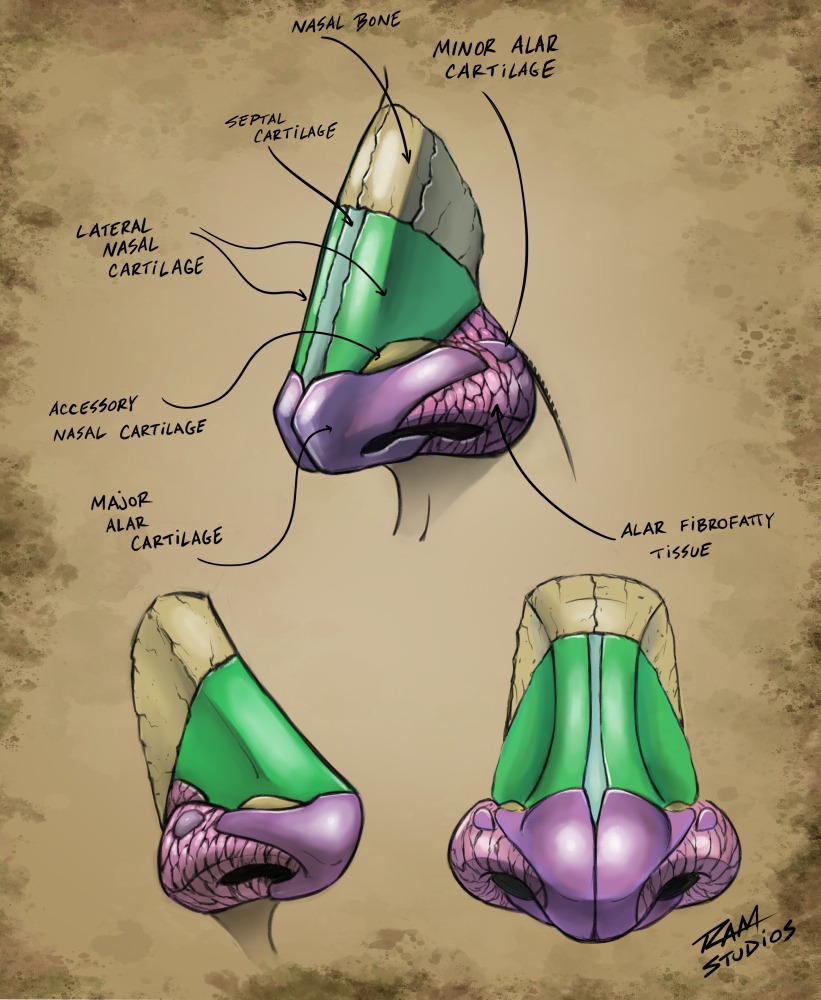
Pay attention to the big shapes that resonate with you. Notice how the Major Alar Cartilage flares outward over the nostrils and has a big divide down the middle.
It’s also interesting to see that the nose is clearly made up of 3 primary sections. The Nasal Bone, the Cartilage Areas, and the Fibrofatty Tissue.
Keep in mind that studying anatomy is a life long pursuit. It isnt something that you must fully understand before you move on to the next step of your drawing but rather something to revisit often.
Now that we have a basic understanding of what we are looking at, we can progress to the next area of study, planes of the nose.
Drawing the Planes of the Nose
Now we will focus on drawing the planes of the nose.
This is an extremely helpful practice activity since it allows us to have a better control of proportions and perspective in our drawings of the face.
Let me share some drawings for you to practice this technique. You are welcome to reach out to me if you need any help or clarification along the way…
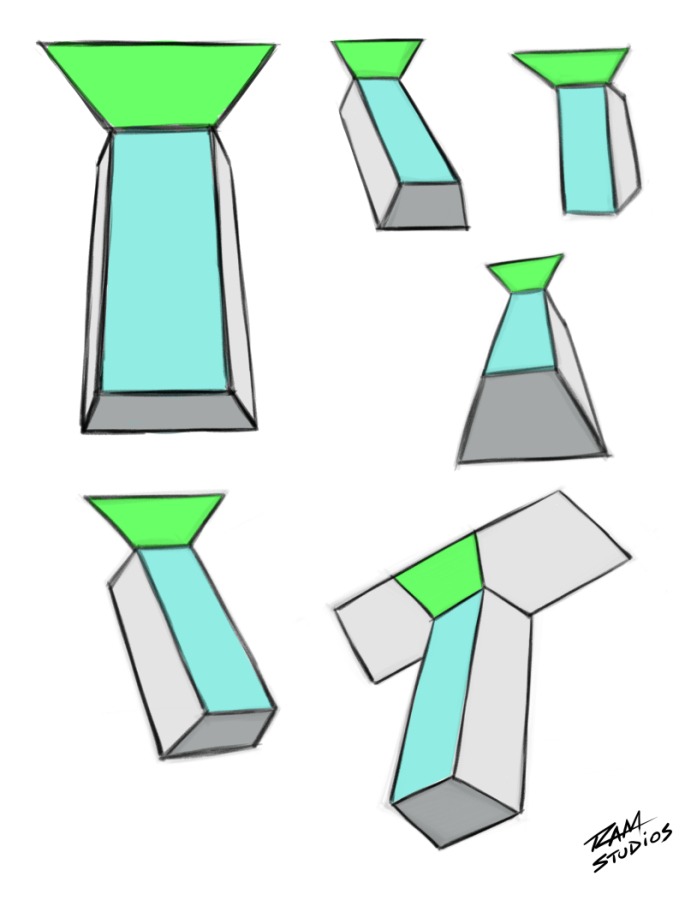
These are the plane changes described by Andrew Loomis in his book, “Drawing the Head and Hands.”
The ( bright green ) keystone shape helps us to draw the Glabella with its clear angle away from the bridge of the nose. ( light blue color. )
You can see that the drawings of the nose in the reference above are pretty simplistic. Don’t worry, that is the point.
I would like you to practice turning these forms on the page with as much variety and imagination as you muster.
This will warm you up to the next stages of the work and there is more value to this drawing exercise than you might think.
By doing this, you are strengthening your ability to draw the nose and ultimately the rest of the face with a sense of perspective.
These primitive forms also allow us to have a better idea of where the light and shadow will go since we have a clear definition of the plane changes.
Secondary Plane Changes of the Nose
Now that you have practiced the basic planes of the nose we can begin to add more angles to create secondary plane changes.
These are going to be a bit more advanced and more descriptive of an actual nose since noses are more intricate than a couple of distinct planes changes.
First draw the steps from the previous illustration, then add more angles to define the bulbous part ( tip ) of the nose.
From a straight on view, this could simply be a trapezoid to begin with. Over time you will find more subtle angles to incorporate into your process.
There is no right or wrong here. Many artists use this method of drawing with their own specific variations. Experiment with more and less angles in a given area to see what works for you.
For the bottom two examples in the illustration below, you can see that I also started to introduce some organic curves in with the angles. This gives us something that resembles a nose drawn in a stylistic way.
For the final drawing in the illustration below, I added the shape for the eye area. This is the way we learn to place the eyes, based upon the Andrew Loomis method.
The nose is done with my own variations in mind. Notice how I placed an angle for the bump on the bridge of the nose. I also keep the tip of the nose more simplified.
Again, these are not strict rules on how you might draw your own versions.
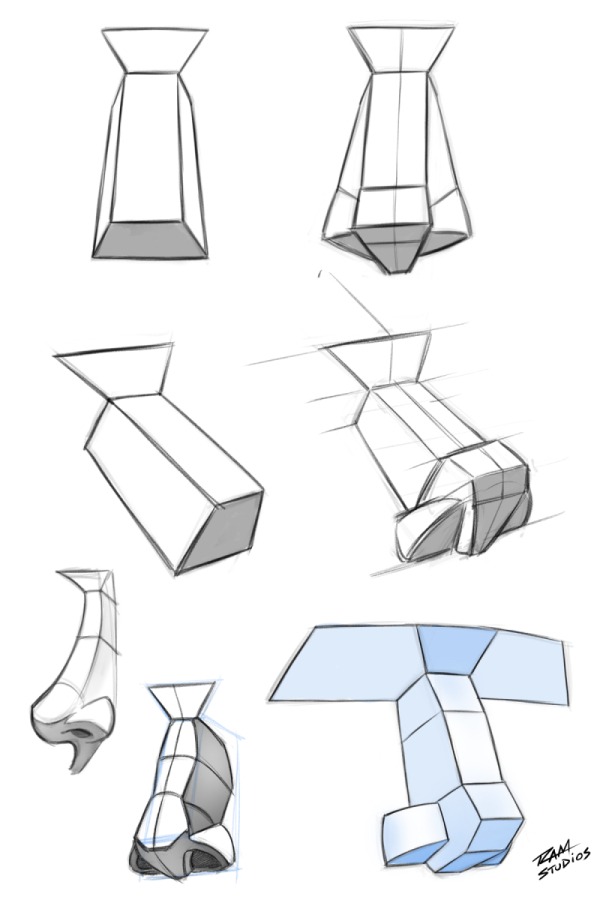
Hopefully you can see that the extra angles start to become much more descriptive of the various forms and volumes of the nose.
Practice drawing these at a variety of angles with and without reference. Play around with proportions and exaggerations if your goal is to be able to draw stylized faces.
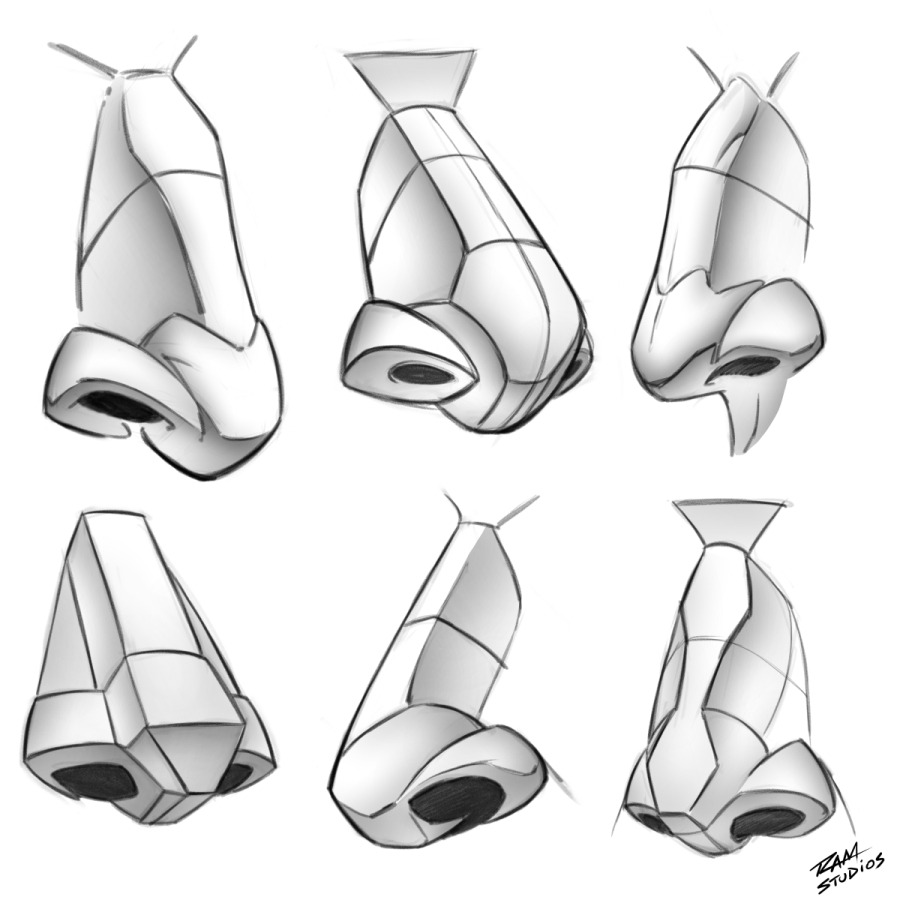
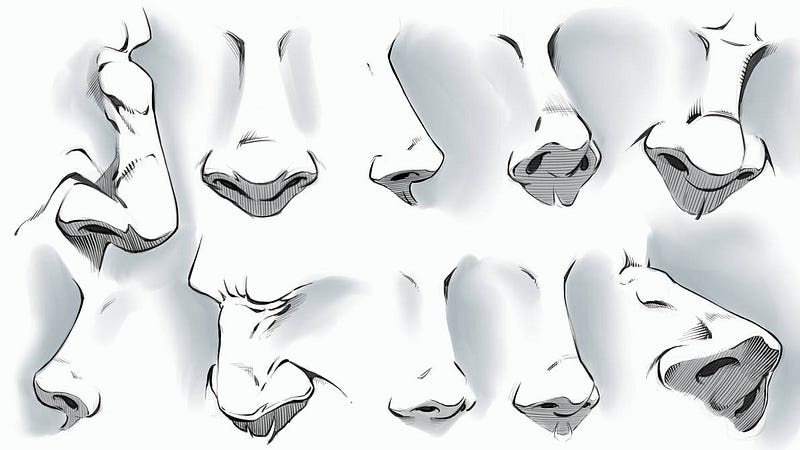
Structure and Organic Forms Combined
Another thing that we need to practice to get noses that have a good sense of variation is combining structure and organic forms.
When you learn to combine the two you begin to get a more confident looking illustration.
Too many angles and the nose will look overly stylized and robotic. Too many curves and it can look soft and cartoony.
Here is a reference sheet to show you how you might draw the nose with a mix of organic and angular forms –
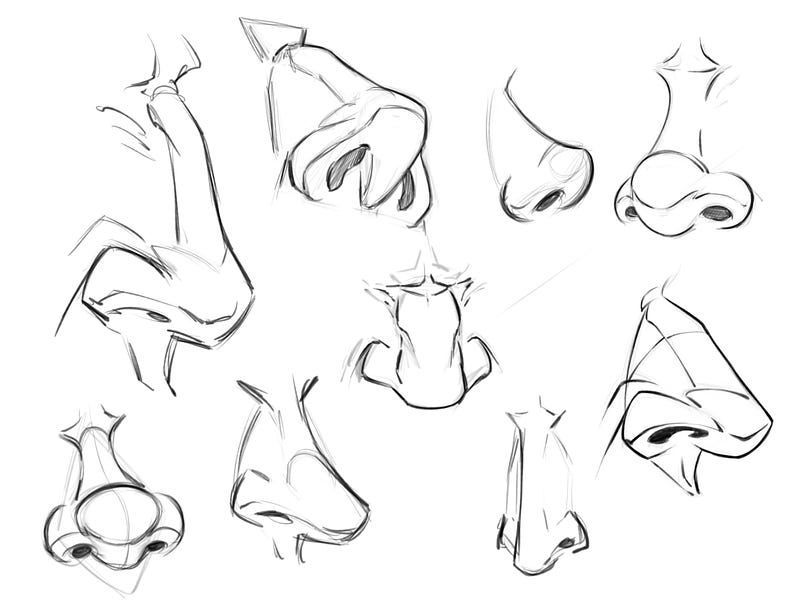
Stylized Versions of the Nose
Another thing that you can start to experiment with in your drawings is the proportions of the nose. Exaggerations in various areas can be a fun way to develop your style.
Also, by using more intense angles and curves you can push these stylized drawings even further.
Anything can really contribute to your style when it becomes a noticeable trait or focal point.
Here are some of my stylized drawings of the nose. See if you can spot my stylistic choices —
Adding Light and Shadows to the Nose
Now let’s add some rendering to the nose and create more depth and dimension.
We can use the previous methods to help with this part of the process. By using the basic planes of the nose to begin with, then developing some secondary planes for more details.
Then we can render the light and shadows. I will use some cross hatching for this example but you can use whatever methods that you prefer to create a sense of light and dark values.
I tend to find that I am able to draw light and shadows for my illustrations better with some reference. If you are less confident about any part of the illustration process, references can be a nice help.
Try creating a mood board with all sorts of noses! That is sure to help spark ideas.

Drawing the Nose with Simple Shapes
There are many ways to go about drawing the noses for your characters. If these versions were too much for you at your current level, don’t worry, there is an even easier way.
You can draw the nose with basic shapes. Using a less is more approach. Just think about your favorite cartoons.
Simplifications can really ease our minds and can still allow us to draw cool characters that tell a great story.
Besides, with enough practice, the complex becomes simple over time.
Here is a video that I created on drawing noses with basic shapes —
I hope that today’s nose drawing tutorial has be educational and informative for you. I am always creating new content so let me know what you think and what to cover next!
If you want to learn more on drawing the head and all the facial features, visit my in depth course, “How to Draw Heads Step by Step” here — Click here!
Thank you for viewing my post and good luck with your art!
Sincerely,
Robert A. Marzullo
Ram Studios Comics
For more Art Tutorials – Check out this page –
Check out our Art + Resources page here – https://ramstudioscomics.com/index.php/artist-resources-templates/
1 Comment
Artie · August 16, 2025 at 1:43 am
This is exemplary!! It’s clear, concise, informative, AND entertaining. Thanks for this incredible resource!