Hello My Fellow Artists!
Are you looking to improve your art and take it to that next level? We are all in this constant pursuit of developing our skills and one of the hardest areas to develop for many artists is good anatomy.
You have probably heard something like this at one point during your journey as an artist, “Your work looks great kid, but you need to practice your anatomy!”
I remember when I first heard this, I was very discouraged. Mainly, because I thought my anatomy was pretty good.
I mean, art is subjective anyways, right? It is, but only to a point. A good understanding of anatomy is an integral part of drawing characters that look and flow professionally on the page.
Don’t worry because in today’s post I will share some methods that will help you to simplify the process and get you one step closer to drawing great anatomy.
Tip #1 Simplify by Grouping Muscles Together
If you open your favorite anatomy book, you can get overwhelmed pretty quickly by the terminology and the complexity of the human body.
Over time it will start to make more sense but I don’t want you to get discouraged and give up.
Instead, start by learning the larger groups of muscles and then as your comfort level grows with the topic area, you can break things down further.
Working big to small in this way, can help us in so many areas of our artwork. Just think of how a painter will block in large shapes and then work into the finer details.
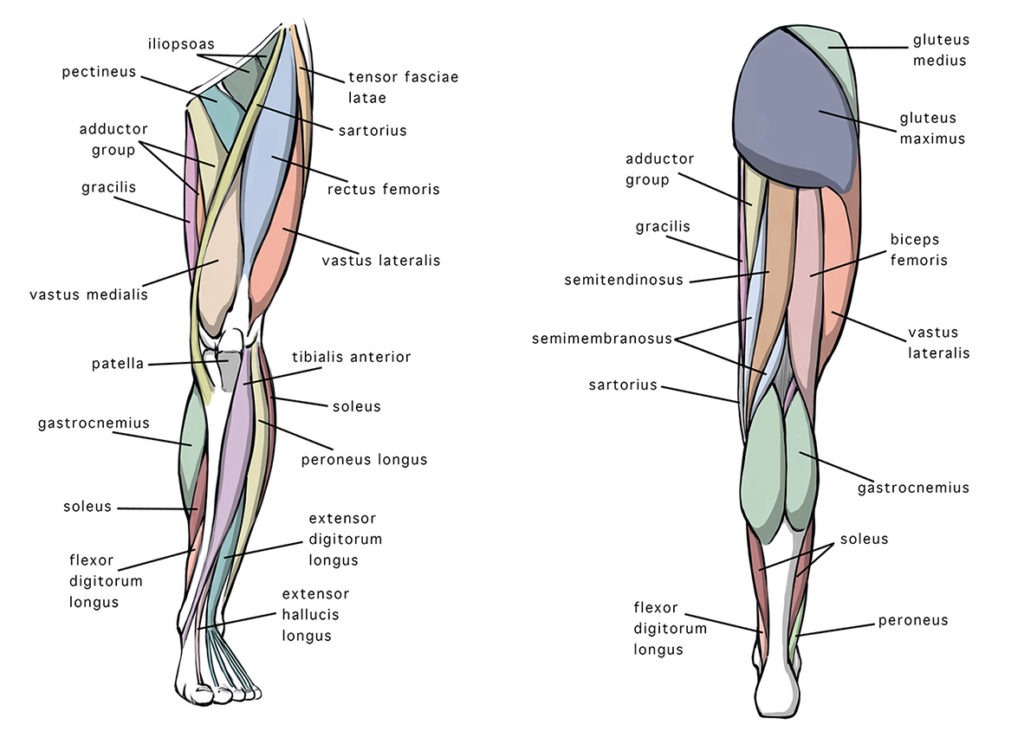
Let me show you an example of what I mean –
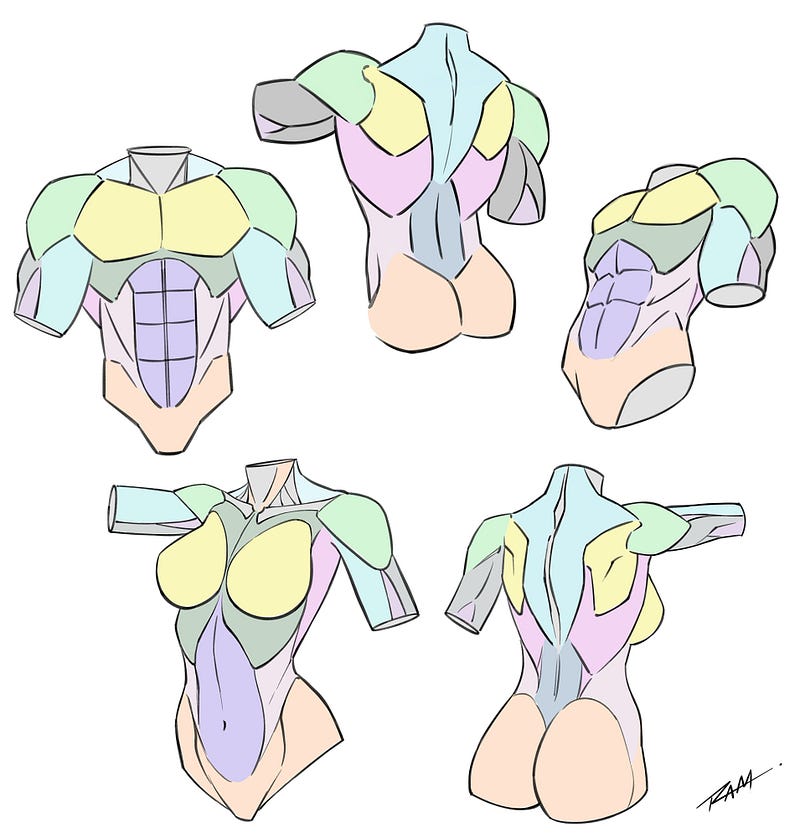
If you notice in the illustration above, I have color coded the various groups or basic shapes of the muscles.
This generally allows for us to look past the complexity of all the details and focus on the basic forms.
Here is a Youtube video to show you the drawing process that I use to simplify the torso —
/media/d83aaf07b6c96948e5b8ed0b154f0b78
In this next example, notice how we can look past all the details of the muscles by grouping together the shapes.
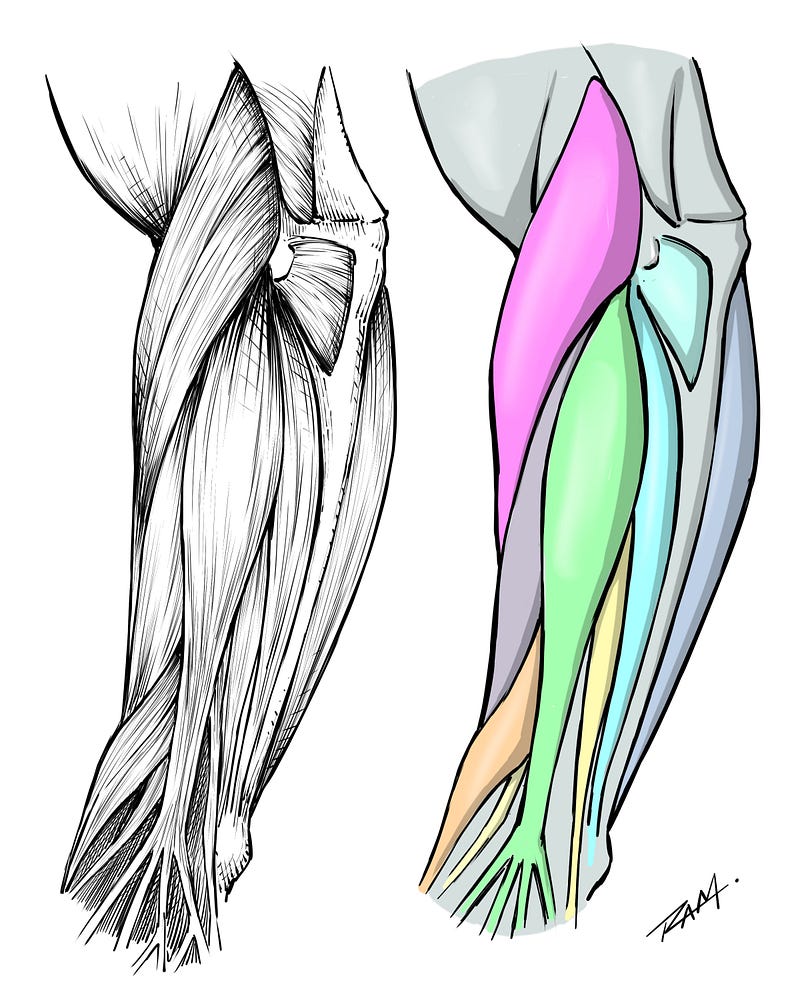
The Extensors are a good example of this. If you look at the Extensor digitorum (light green), Extensor digit minimi ( light yellow ), and the Extensor Carpi ulnaris ( light blue ) , you see they all travel down the back of the arm to the hand.
This is helpful to study these volumes and become aware of where they are located along the arm.
As we learn this our artwork begins to change because we are now more intimately aware of these forms instead of guessing.
Tip #2 Learn Basic Terminology
You don’t have to be an anatomy major to draw well but it also doesn’t hurt to start learning the names of the muscle groups.
Some of them are easier than you might thing and they offer some valuable insight into how you might draw them.
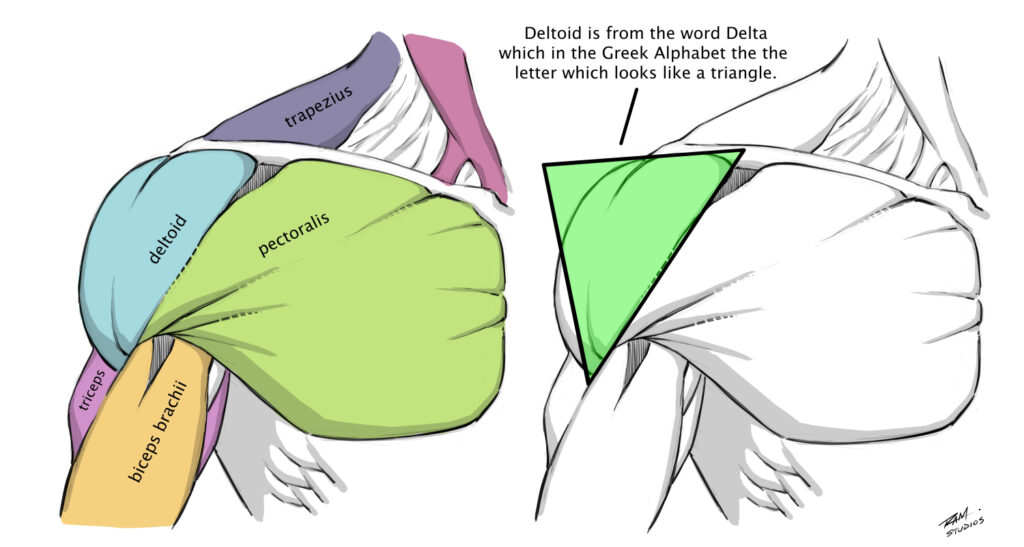
Let’s look at the Deltoid for instance. Deltoid comes from the word Delta which in the Greek alphabet is in the shape of a triangle.
Notice that the Deltoid looks like an upside down triangle. Shape memorization like this will make your life a lot easier as an artist.
Terminology takes time so be patient with yourself. Study it a little each day and it will start to make sense as you go.
Here are some basic ones that will help you get started –
Medial — Towards the center or middle of the body.
Lateral — Towards the outside or side of the body.
Anterior — In front of or towards the front of the body.
Posterior — Towards the back of the body.
Pronation — Palms facing downward
Supination — Palms facing upward
Here are some terminology illustrations that you can study along with —
Tip #3 Study Origin and Insertion Points
Another thing that I find to be very helpful when trying to draw the human figure with more confidence is studying the Origin and Insertion points to each muscle.
Again, this is something that takes time to memorize but it can have significant changes in the way that you approach drawing certain parts of the body.
It also helps us to acknowledge and eliminate bad habits that we previously didn’t recognize because of a lack of knowledge in the given area of the body.
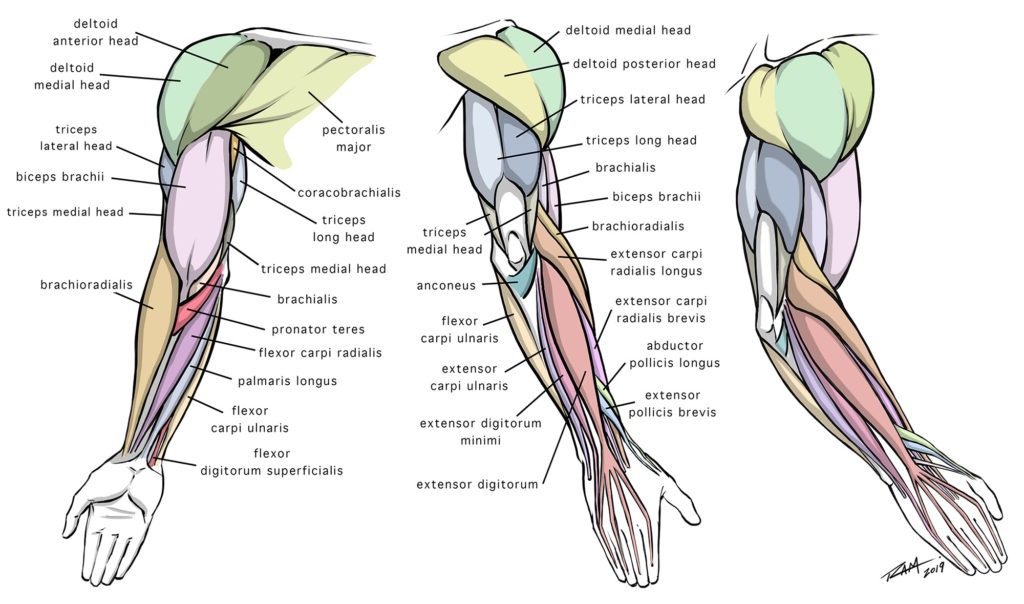
For instance, when we go to draw the chest and the shoulder area it can get a bit confusing when the arms raise upwards.
Mainly because the shoulders ( deltoid muscles ) don’t just move upward but they also rotate backwards.
When you learn that the pectoralis major muscle originates from the clavicle, sternum, ribs, and external oblique fascia and that it inserts into the lateral lip of the bicipital groove of the humerus, it changes the way you think about these areas as you draw them.
This coupled with the understanding of supination and pronation gives you a better chance at recognizing what is actually going on in a pose with the arms raised above the body.
Let me illustrate this to help simplify things a bit —
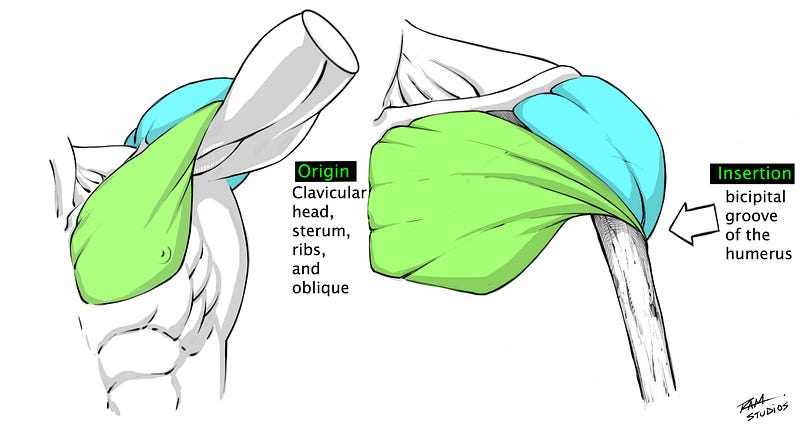
In the illustration above, hopefully you can now see that the chest muscle has to wrap around to the lateral side of the humerus.
So when the arms are raised we need to pay attention to the orientation of the pectoralis and the deltoids.
The deltoid muscles rotate to the back of the body and the pectoralis passes in front from this type of camera angle.
Again, origin and insertion points can help us to zero in on these types of relationships of the muscle groups and learn to draw them correctly.
Tip#4 Study Your Bony Landmarks
The bony landmarks are an excellent way to align parts of the body and also to check proportions.
They become a great way to check your work by understanding how the muscles relate to them.
Some popular bony landmarks for drawing the body include:
- Spine of the scapula: Located between the trapezius and deltoid muscles, this is a notable landmark of the shoulder
- Anterior superior iliac spine (ASIS): Located on the pelvis, this landmark can help establish the proportions of the figure and the alignment of the pelvis
- Clavicle: Also known as the collar bone, this landmark can be easily felt and easily seen on most individuals
- Scapula: Also known as the shoulder blade
- Patella: Also known as the knee cap
Let’s take a look at the Spine of scapula.
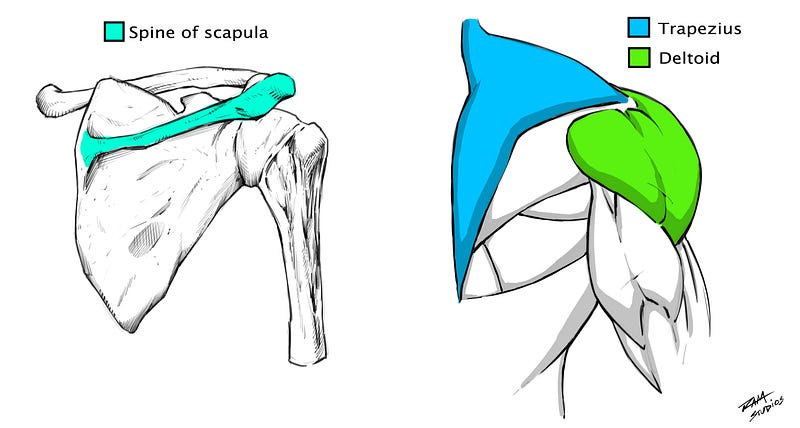
Notice in the illustration above that the ridge of the spine of scapula is an excellent reference point for both the trapezius and the deltoid muscle.
From here we can align and adjust the other muscles much more effectively because of this noticeable bony landmark.
Studying the skeleton is very important and as we learn the connections to the muscular system our drawings get better.
We can start with the superficial muscles since that is most of what we see but over time you will even want to learn the muscles that function underneath them because it teaches us about the body’s mobility.
Tip#5 Hit the Anatomy Books Often!
I am sure by now you have a couple of anatomy books. I probably have about eight or nine of them at this point.
They all offer a unique perspsective on this subject. Some are more about the illustration process and others are more focused on the informational aspect.
Here is a list of my favorite books on this subject —
Basic Human Anatomy by Roberto Osti
Anatomy for Sculptors
Dynamic Anatomy by Burne Hogarth
Constructive Anatomy by George B. Bridgman
I hope this post has been informative for you and I wish you luck on your travels as an artist! Practice patience and consistency and you will achieve your goals!
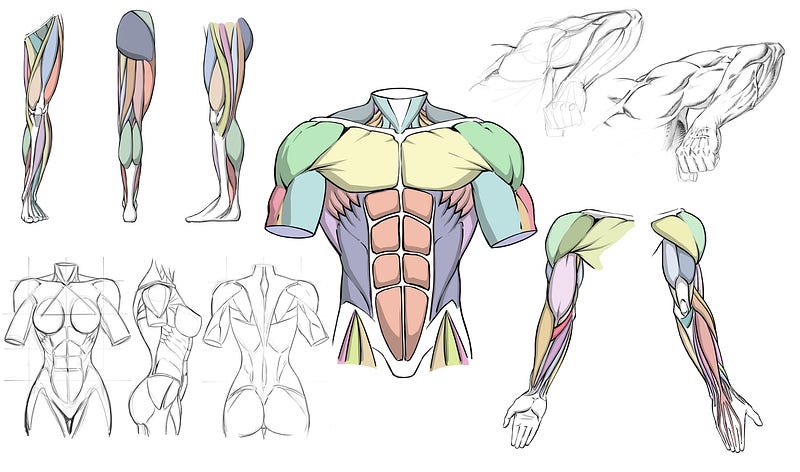
If you are interested in learning more about this subject, I have a full online course where I walk you through the break down of the arms, legs, and torso anatomy.
With any of my courses you can share your work and get personalized feedback to help you improve. Reach out through my contact form on the main page if you have any questions. I am here to help!
How to Draw Dynamic Anatomy Step by Step – Full Course with Art Files
You can view this course here — Click here….
Thank you for viewing my post and have an awesome day!
Sincerely,
Robert A. Marzullo
Ram Studios Comics
Want more written art tutorials? Head over to our tutorials page here – https://ramstudioscomics.com/index.php/comic-art-and-drawing-tutorials/
0 Comments