Hello Fellow Artists!
Are you ready to draw some more heroic poses? Let me help you with this seemingly complex subject matter in today’s art tutorial.
Drawing dynamic figures isn’t the easiest thing an artist can do but it sure is rewarding when you start to figure it out!
So let’s break this process down a bit and get you a few steps closer to drawing awesome poses for your comics.
How to Figure Out the Pose?

Many artists have different techniques for this part of the process. Some start with photo reference, some create their own photo reference, some have vivid imaginations that seem almost magical, and some use 3D models and figurines.
Some dabble in all of these methods. Personally, I like that approach. Even though I typically start with a bunch of tiny thumbnail sketches, I am sometimes quickly reminded that my imagination needs some fuel.
This is where I generally start to open up my comics, watch an animation, get out my art books, or watch a good movie while drawing of course.
From there I start with a bunch of loose thumbnail sketches. These are a fantastic way to warm up for the day and get those creative gears turning.
Make sure to draw them overly expressive and with lots of gesture!
Here are a few of my typical thumbnail pose sketches…

The real power of this type of exercise is that by drawing quick poses over and over, you start to see where your faults are in the process.
For instance, here I can see that I was drawing many of them overly stiff. That can really hurt a decent drawing.
So remember to draw loose and fast while avoiding the need to fix everything!
Add More Gesture by Throwing the Lines
To fix a stiff pose we just need to focus more on the energy of the pose and less on everything else.
If we throw the lines through the body we can get a sense of the energy and flow of the figure. Detailing is nice but only when the gesture and expressiveness is good.
So draw lots of little gestures each day and you will see your art come alive.
Use Basic Shapes and Simplify the Figure
The human figure can seem like a difficult thing to draw when we think about the possibilities of movement, pivoting and rotating joints, foreshortening, proportions, and the list goes on.
The best way to combat this in our minds is to simplify the parts with basic shapes.
The chest or upper torso can be a barrel shape or even just an oval. The pelvis can be drawn like floating underwear. Silly, I know but it really does work!
Attach these together with a big “S” curve for the spine and watch the magic happen.

Drawing the 3 Main Masses First
My next technique for drawing the figure is to focus on the 3 Main Masses of the body first.
This helps us to zero in on the tilt and rotation of these forms from one another. Then attaching the arms and legs becomes much easier to do.
You can still simplify these forms but for the sake of explanation, I will draw them in a bit more detail for you to visualize what I am aiming for.
Notice in the drawings below that I am trying to express various possibilities in which to draw the body’s action or posture.
Practice drawing these exercises with as much variation as you can imagine. Remember, you can study from life and apply this method to further enhance your visual library.

Attaching the Arms and Legs to the Figure
Now we can begin to attach the limbs to the trunk of our figures.
You can use the same simplified approach to build out the forms so start by drawing some arms and legs with tapered cylinders, spheres, and cubes.
This helps us to keep perspective in mind and gives us greater control over things like foreshortening.
Let me show you some basic examples to get you started…


Practice Foreshortening to Make Characters Leap off the Page
The next step is to start pushing the forms around in a way that explains perspective and foreshortening of the figure.
This isn’t the easiest thing to improve upon so be patient with yourself and log in lots of studies here from life, movies, and of course your favorite comics! 🙂
If you need some tips on drawing basic perspective I have an additional blog post here on that subject –
How to Draw Backgrounds in Perspective with Basic Steps – Ram Studios Comics
In today’s tutorial I will show you how to draw backgrounds using basic perspective techniques. Drawing in perspective…ramstudioscomics.com
Keep in mind that you can and probably should draw the entire body with basic forms to begin with.
You can always add more complex secondary forms as you become more knowledgeable of the anatomy.
Try drawing some of your favorite poses with basic prisms and forms like the illustration below –

Then you can spend more of your time refining the drawings in the style that you are after.
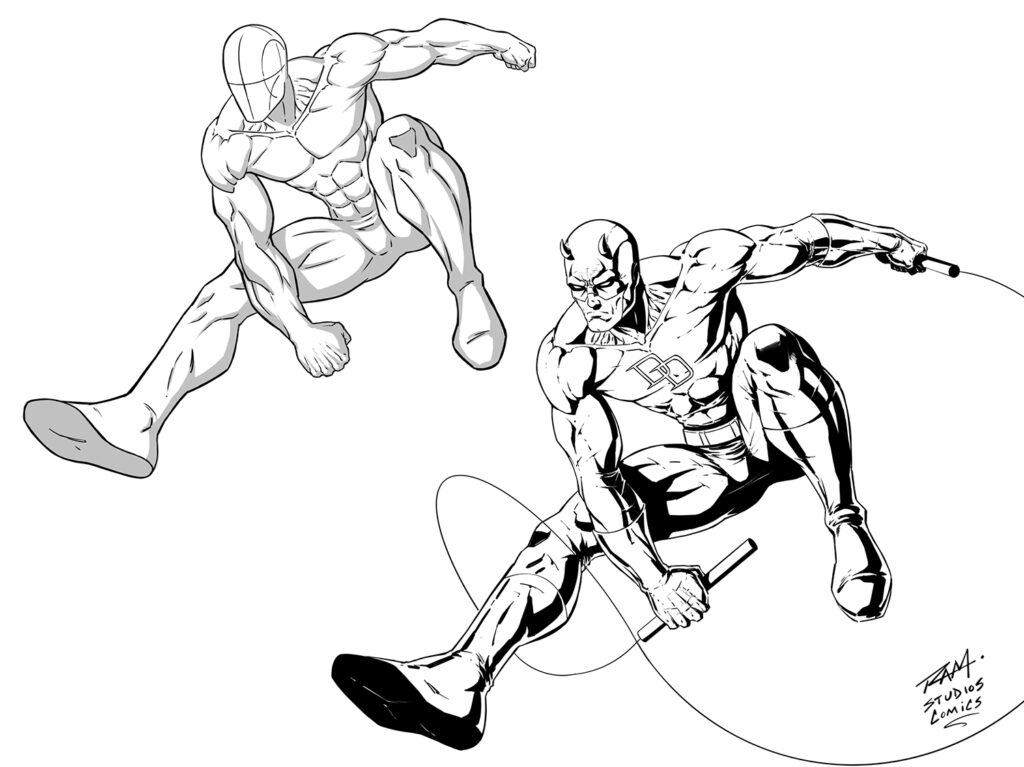
In this next one I will show you how I like to take the basic forms and then build up the anatomy over them.
Then I can add in the rendering to give it the finished look that I am after.

Keep practicing these techniques on a variety of poses and your art will start to become more dynamic and interesting to look at.

I hope you have enjoyed today’s post and let me know if you have any questions or requests for future content.
If you want to learn more on figure drawing and how to draw anatomy you can check out my online course content here –
Figure Drawing the Body in Action — Click Here!

Thank you for reading and never stop drawing! 🙂
Robert A. Marzullo
Ram Studios Comics
0 Comments