On this page you will find various drawing tutorials for comic artists. You can click on the images to enlarge and draw along. Share your work and this page if you find these lessons to be helpful!

Let me know what other art tutorials you would like to see covered on this site and I will make sure to add them as soon as I can!

-Rob

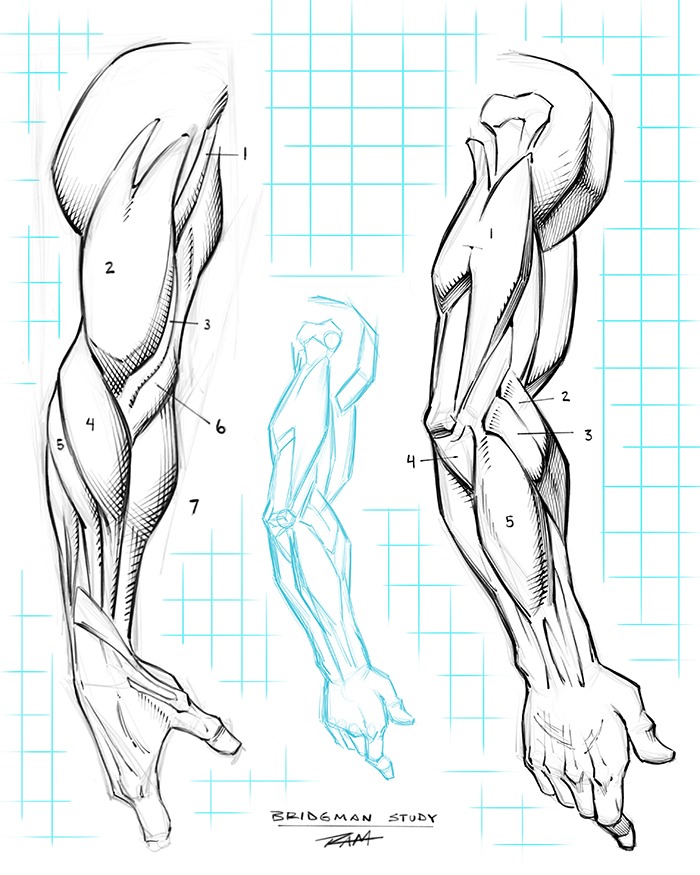
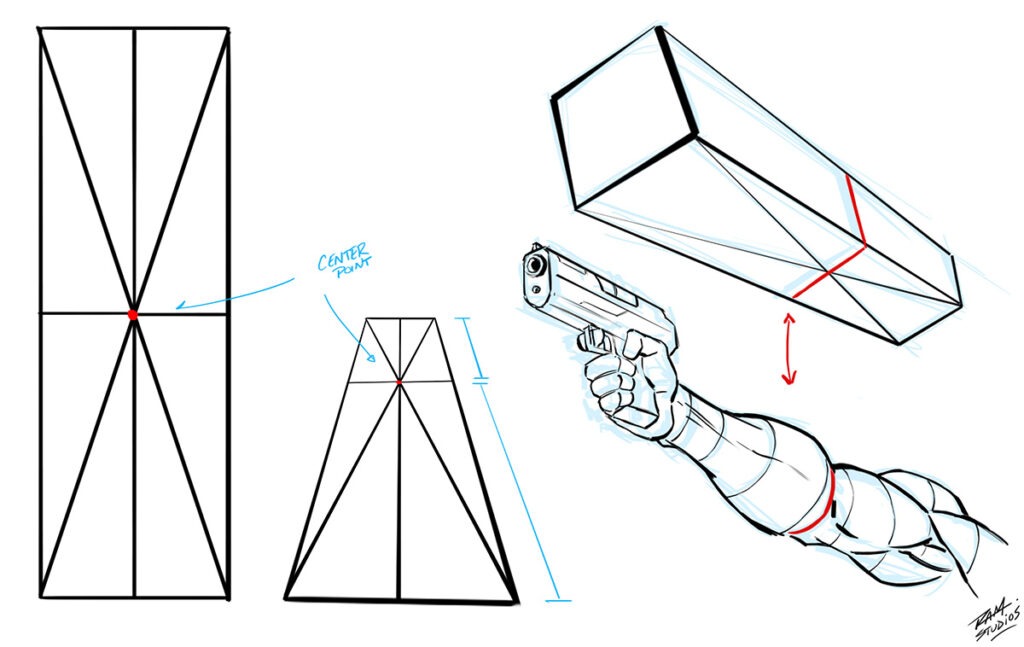
Drawing the Arm Anatomy - Bridgman Study by RAM
Hello Fellow Artists! In today’s post I want to share some of my studies from the amazing work of George Read more
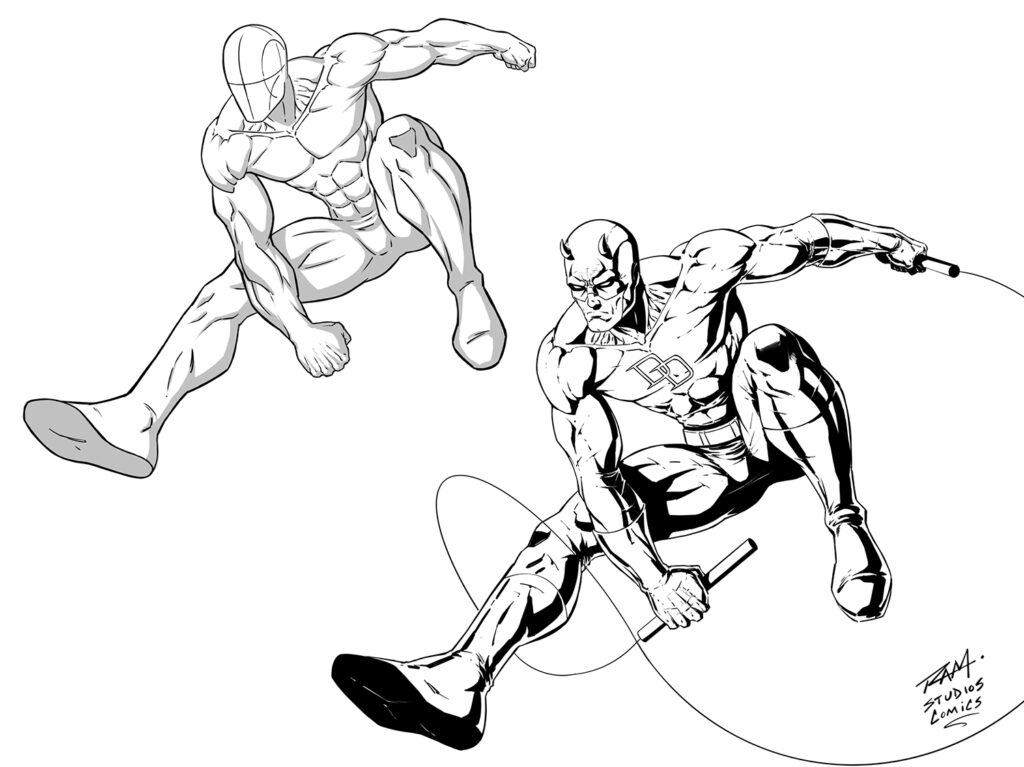
Pose Reference - Daredevil Fan Art by RAM
Hello Fellow Artists! Are you ready to draw some more heroic poses? Let me help you with this seemingly complex Read more
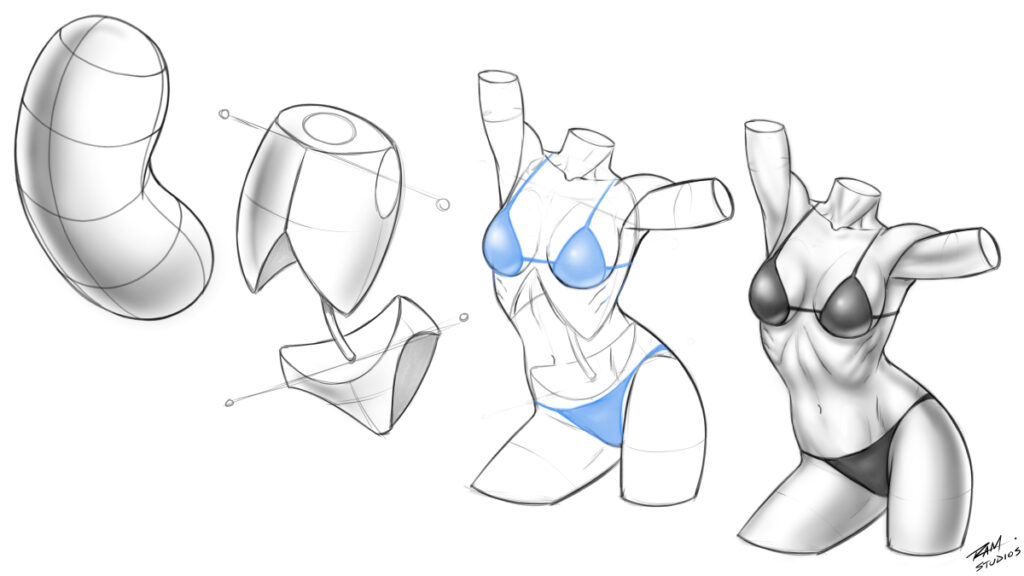
How to Draw the Figure with the Bean Shape Method
In this figure drawing tutorial you will learn how to draw the torso using the bean shape method and why Read more
How to Draw Noses - Structure and Rendering
In today’s art tutorial I will show you how to draw noses at various angles step by step. Let’s face Read more
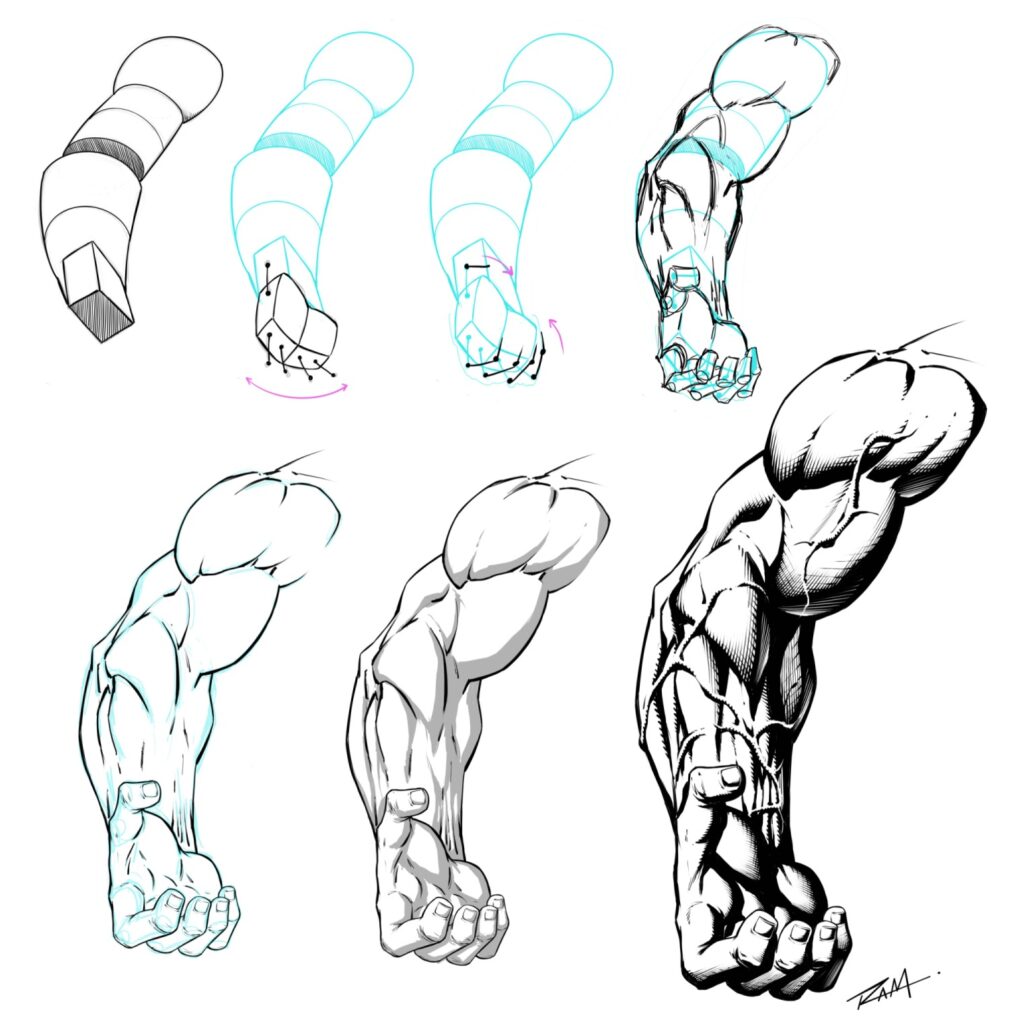
Arm Drawing Step by Step
Hello Fellow Artists! In today’s post I wanted to share some of my latest step by step tutorial sheets for Read more
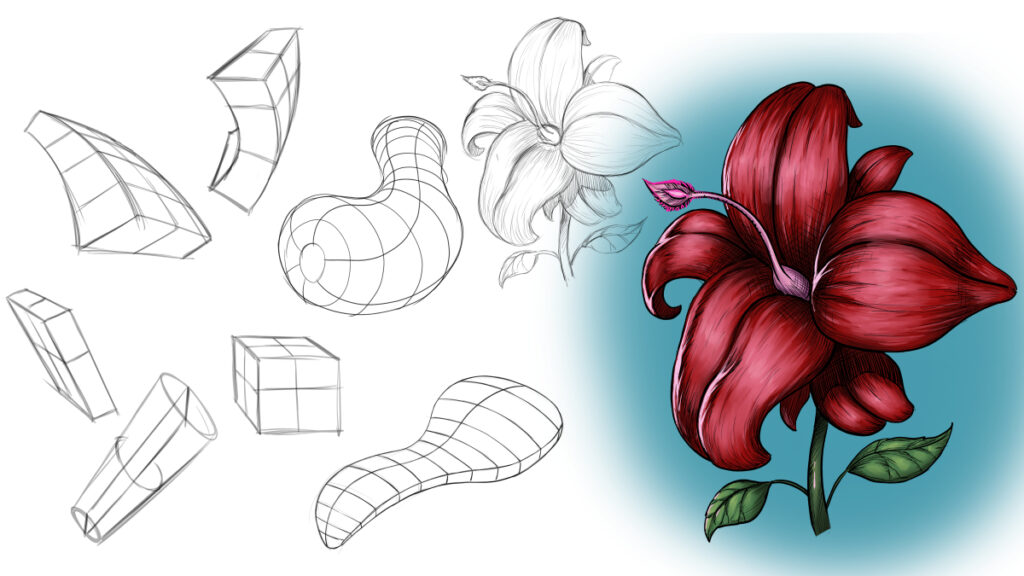
How to Draw with Organic Forms
Welcome Back Fellow Artists! Today I want to hopefully motivate you to work on a basic fundamental aspect of drawing. Read more
How to Draw the Back of the Arm - Comic Art Style
Welcome back fellow Artists! Today I want to share a few tips and techniques on how to draw the back Read more
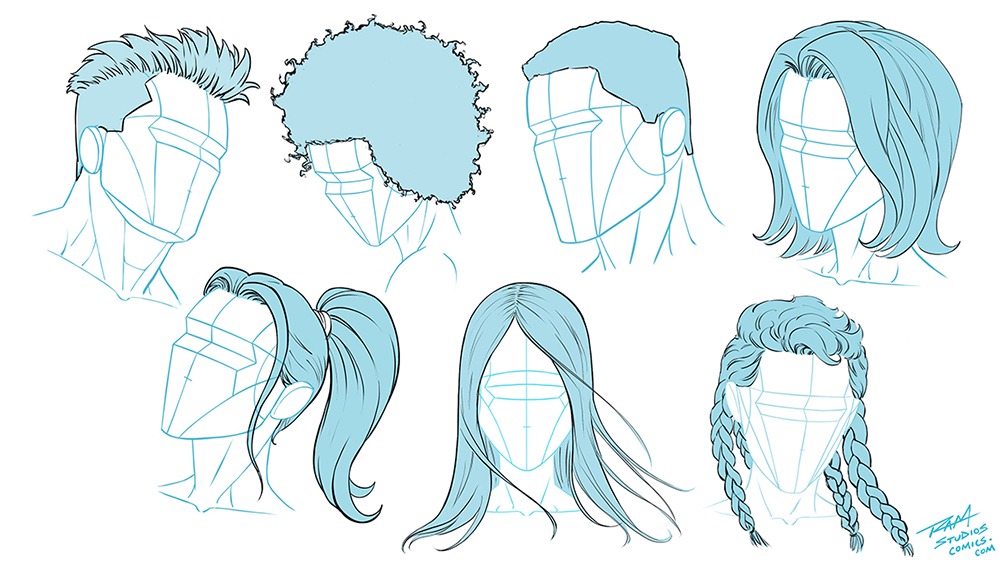
Hair Shape Reference by RAM
Welcome back my fellow artists! In today's tutorial you will learn how to draw hair a few different ways. I Read more
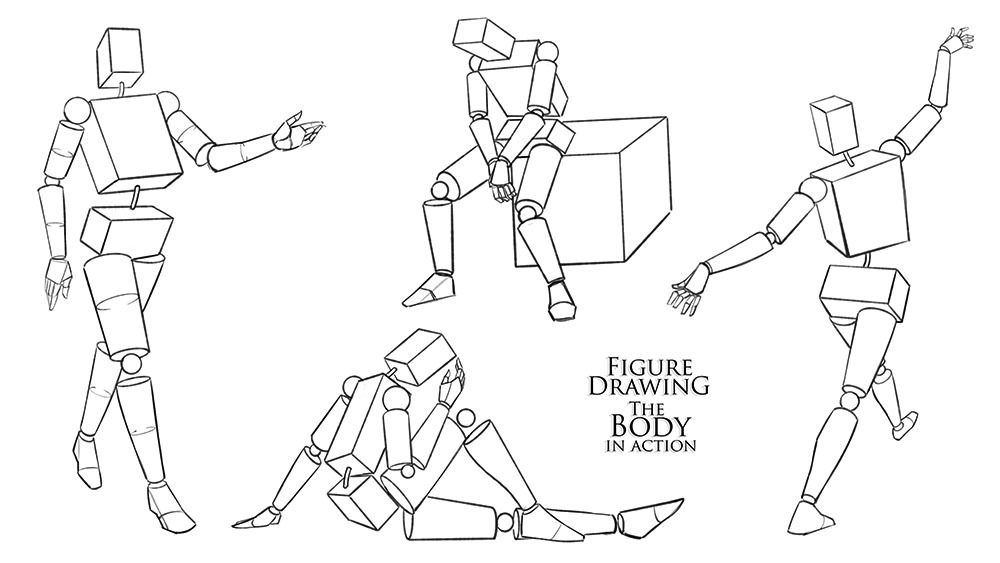
Drawing the Full Figure with Primitive Forms
Welcome back fellow artists! Today I want to talk to you about using basic forms to help develop your figure Read more
Space Scene Example by RAM
Welcome Back Fellow Artists! Today I am going to show you 3 quick and easy ways to blend paint in Read more

Hello Fellow Artists!

In today’s post I want to share some of my studies from the amazing work of George B. Bridgman.

I have learned a lot from his work over the years but I still have to revisit his book from time to time.

In this post I will be sharing some of my studies from his book, “Constructive Anatomy.” A must have for any serious figure drawing and character design artists out there!

What I enjoy most about Bridgman’s work is his powerful sense of structure and solid forms.

Drawing the Arm Anatomy

I study a few different art books for drawing anatomy but I have to say that this one is by far the best for certain reasons.

As he explains the anatomy of the arm, he makes it very clear that the forms wrap around one another but also keeps a strong emphasis on the volumes.

Many anatomy books don’t focus on this powerful sense of volume like Bridgman does.

This is probably the primary reason that this book is often the “go to” for comic artists when talking about improving one’s anatomy drawings.

Here is an image and a quick video where draw the front and back of the arm from his book — 

Drawing the Leg Anatomy from Bridgman

Now let’s work on the legs. Here are some more of my drawings and a time lapse video of the drawing process. 

Something that I appreciate about the leg drawings from Bridgman’s work is that he clearly shows the relationships from the muscles that we see and the bones beneath.

He does this all throughout the book with each aspect of the body and it is very relatable. How can we properly draw the human figure if we don’t have some understanding of what lies beneath?

There is a time and a place to study the superficial side of the human body and then there is a time to dig deeper and see how the muscles overlap and interlace together.

Another thing that his leg anatomy illustrations show me is how the forms of the leg are not straight from the top of the thigh down to the ankle.

When we first begin to draw arms and legs, most beginners start by drawing them overly symmetrical and with the forms stacked straight up and down.

Bridgman clearly shows how the body is not constructed in that way. I believe it is easy to understand with his illustrations because of his sense of structure and proper use of angles within the work.

Let’s Draw the Torso Anatomy

For this next one I am drawing from his art on page 125. Mine is a pale comparison to his stunning work of course.

I did my best to add a bit of my own style to these illustrations. I believe that we should always try to interpret his work rather than copy it verbatim.

What I really enjoyed about this one was how he focused on the obliques and latissimus dorsi over the skeleton to help us understand what we see and therefore draw it more confidently.

This book Show us the Benefits of Localized Studies

These types of localized studies are very important for us to zero in on the things that we struggle with. I find that they are essential for paying closer attention to the problem areas within our work and gaining a better understanding to move past them.

Drawing the Neck Anatomy

For this next part, we will draw the neck anatomy and see what we can learn from his illustrations.

Here are a few drawings of the neck muscles from different angles. Again, I also really like how he draw parts of the neck organically and parts with more defined angles.

Another fantastic aspect about this book is that he goes in-depth to show us the anatomical breakdowns, but also the simplified forms that are grouped together.

To me, this is very important for drawing the neck anatomy. The neck can appear extremely complex when we study anatomy books.

Being able to relate all that information into the right forms and volumes is essential. Bridgman’s work excels in that area.

So I have to say that Bridgman’s work is very inspiring and if you struggle with drawing anatomy that feels solid, you may want to get a copy of his book and fill up those sketchbooks!

Thank you for viewing my post and more on the way soon! 😎✏️

Are you ready to level up your skills on drawing anatomy?

Then please consider my course where we break down the figure piece by piece. You can also share your work and get feedback on how to improve!

How to Draw Dynamic Anatomy Online Course by Robert A. Marzullo

Check out this course here and get started today! — How to Draw Dynamic Anatomy Course!

Robert A. Marzullo

Ram Studios Comics

For more Free Tutorials check out our page here –

Hello Fellow Artists!

Are you ready to draw some more heroic poses? Let me help you with this seemingly complex subject matter in today’s art tutorial.

Drawing dynamic figures isn’t the easiest thing an artist can do but it sure is rewarding when you start to figure it out!

So let’s break this process down a bit and get you a few steps closer to drawing awesome poses for your comics.

How to Figure Out the Pose?

Many artists have different techniques for this part of the process. Some start with photo reference, some create their own photo reference, some have vivid imaginations that seem almost magical, and some use 3D models and figurines.

Some dabble in all of these methods. Personally, I like that approach. Even though I typically start with a bunch of tiny thumbnail sketches, I am sometimes quickly reminded that my imagination needs some fuel.

This is where I generally start to open up my comics, watch an animation, get out my art books, or watch a good movie while drawing of course.

From there I start with a bunch of loose thumbnail sketches. These are a fantastic way to warm up for the day and get those creative gears turning.

Make sure to draw them overly expressive and with lots of gesture!

Here are a few of my typical thumbnail pose sketches…

The real power of this type of exercise is that by drawing quick poses over and over, you start to see where your faults are in the process.

For instance, here I can see that I was drawing many of them overly stiff. That can really hurt a decent drawing.

So remember to draw loose and fast while avoiding the need to fix everything!

Add More Gesture by Throwing the Lines

To fix a stiff pose we just need to focus more on the energy of the pose and less on everything else.

If we throw the lines through the body we can get a sense of the energy and flow of the figure. Detailing is nice but only when the gesture and expressiveness is good.

So draw lots of little gestures each day and you will see your art come alive.

Use Basic Shapes and Simplify the Figure

The human figure can seem like a difficult thing to draw when we think about the possibilities of movement, pivoting and rotating joints, foreshortening, proportions, and the list goes on.

The best way to combat this in our minds is to simplify the parts with basic shapes.

The chest or upper torso can be a barrel shape or even just an oval. The pelvis can be drawn like floating underwear. Silly, I know but it really does work!

Attach these together with a big “S” curve for the spine and watch the magic happen.

Drawing the 3 Main Masses First

My next technique for drawing the figure is to focus on the 3 Main Masses of the body first.

This helps us to zero in on the tilt and rotation of these forms from one another. Then attaching the arms and legs becomes much easier to do.

You can still simplify these forms but for the sake of explanation, I will draw them in a bit more detail for you to visualize what I am aiming for.

Notice in the drawings below that I am trying to express various possibilities in which to draw the body’s action or posture.

Practice drawing these exercises with as much variation as you can imagine. Remember, you can study from life and apply this method to further enhance your visual library.

Attaching the Arms and Legs to the Figure

Now we can begin to attach the limbs to the trunk of our figures.

You can use the same simplified approach to build out the forms so start by drawing some arms and legs with tapered cylinders, spheres, and cubes.

This helps us to keep perspective in mind and gives us greater control over things like foreshortening.

Let me show you some basic examples to get you started…

Practice Foreshortening to Make Characters Leap off the Page

The next step is to start pushing the forms around in a way that explains perspective and foreshortening of the figure.

This isn’t the easiest thing to improve upon so be patient with yourself and log in lots of studies here from life, movies, and of course your favorite comics! 🙂

If you need some tips on drawing basic perspective I have an additional blog post here on that subject –

How to Draw Backgrounds in Perspective with Basic Steps – Ram Studios Comics
In today’s tutorial I will show you how to draw backgrounds using basic perspective techniques. Drawing in perspective…ramstudioscomics.com

Keep in mind that you can and probably should draw the entire body with basic forms to begin with.

You can always add more complex secondary forms as you become more knowledgeable of the anatomy.

Try drawing some of your favorite poses with basic prisms and forms like the illustration below –

Then you can spend more of your time refining the drawings in the style that you are after.

In this next one I will show you how I like to take the basic forms and then build up the anatomy over them.

Then I can add in the rendering to give it the finished look that I am after.

Keep practicing these techniques on a variety of poses and your art will start to become more dynamic and interesting to look at.

I hope you have enjoyed today’s post and let me know if you have any questions or requests for future content.

If you want to learn more on figure drawing and how to draw anatomy you can check out my online course content here –

Figure Drawing the Body in Action — Click Here!

Thank you for reading and never stop drawing! 🙂

Robert A. Marzullo

Ram Studios Comics

In this figure drawing tutorial you will learn how to draw the torso using the bean shape method and why it is so effective.

Why Learn this Particular Approach to Figure Drawing?

The bean shape method is beneficial because it simplifies the complex anatomy of the torso, making it easier to understand and draw. 

It also helps in establishing the movement and flow of the body, giving your figures a more dynamic and lifelike quality. Plus, it aids in visualizing the torso as a three-dimensional form, which is crucial for creating depth and realism in your drawings.

This method has been used in figure drawing education for many years but gained popularity through the teachings of Andrew Loomis in his book, “Figure Drawing for All it’s Worth.”

Here are some of the benefits of this method:

It simplifies the complex anatomy of the torso.

It helps establish the movement and flow of the figure.

It encourages thinking more organically about the body.

It makes twisting the figure much more intuitive.

Let’s do some drawing so that you can see how this technique can help you draw the figure more confidently.

Drawing the Figure with the Bean Shape Method

Step 1 — Draw Some Beans. 

You can imagine a human figure if you like but I tend to draw these in a more abstract manner and then see what I can come up with as I draw over them.

You can also try this method when studying from life. By combining the two approaches you will begin to commit more of the figure drawing process to memory and develop your own style.

Step 2 — Drawing the Torso with Simplified Forms

For the upper torso, draw an oval and then cut out the bottom with a triangular shape. This will give us a simplified form of the rib cage.

Another way to picture this part of the body is an action figure with the arms detached. For the lower pelvis, draw a set of floating underwear. I know it sounds silly but trust me, it works.

By the way, I learned these particular visualization techniques by watching a Youtube video from the amazing comic book artist Jim Lee!

The drawings that I created below are to show you how I think about these particular forms but you don’t need this amount of detail.

I rendered these for you in this way, so that you could use them for reference. So you can simplify these however you want.

By merging the bean shapes with these forms, we aim to develop a more organic and less mechanical drawing style

The bean shape encourages us to not draw the upper and lower portion of the torso, straight and stacked on top of one another. It lends to a more organic approach, which is very important in figure drawing.

Step 3 — Combining the Bean with the Simplified Forms of the Torso

Now let’s combine the two types of illustrations together. This approach should allow you to draw a more organic version of the torso if done correctly.

Here is a step by step drawing to help illustrate the process that I use — 

As you can see by the illustration above the bean shape allows us to envision the twisting and tilt of the pose rather easily.

When you draw from life, pay attention to the pinch and stretch of the midsection of the body. You will notice it in many expressive and dynamic poses of the figure.

Notice that on the left ( from our view ) of the figure, the torso is stretched and on the right, the torso is pinched with a bit of twist as well.

Again, the bean shape method helps us to draw this particular area more naturally.

Use this Method in Your Figure Drawing Studies

Now practice this approach with some reference and see what you come up with. A good site to use is Line of Action, where you can work with timed poses and test various techniques to improve your skills.

I hope you have enjoyed today’s figure drawing tutorial and I am here if you have any questions or need clarification on any of the drawing techniques that I have shared with you today.

How to Draw the Torso Using the Bean Shape — Video Demonstration

To further learn this drawing technique I have created a Youtube video for you that illustrates the process, step by step.

You can watch it here — 

Thank you very much for viewing my content and good luck with your art!

Robert A. Marzullo

Ram Studios Comics

IF you want to understand more techniques on Figure Drawing, I have a full course where you can study and learn at your own pace…

Figure Drawing the Body in Action

How to Draw the Figure - Online Course

Full Online Course – Click here!

For more written art tutorials, check out this pagehttps://ramstudioscomics.com/index.php/comic-art-and-drawing-tutorials/

In today’s art tutorial I will show you how to draw noses at various angles step by step.

Let’s face it, noses are a pretty hard thing to draw when we are first starting out. Don’t feel bad, you are not alone and after today’s lesson you’ll be drawing noses like a pro.

I just Nose it! Sorry, I couln’t help myself. Let’s do some drawing!

Things that we will cover in today’s tutorial –

Anatomy of the Nose

Planes of the Nose

Structure and Organic Combined

Stylized Versions

Adding Light and Shadow

Drawing the Anatomy of the Nose

We will first begin with the anatomy of the nose. By studying the underlying anatomy we gain a sense of confidence because we now know more about what we are really looking at. 

Here is a break down for you to study and feel free to draw it in your own style. That is really the best way to learn these forms and commit them to memory.

Pay attention to the big shapes that resonate with you. Notice how the Major Alar Cartilage flares outward over the nostrils and has a big divide down the middle.

It’s also interesting to see that the nose is clearly made up of 3 primary sections. The Nasal Bone, the Cartilage Areas, and the Fibrofatty Tissue.

Keep in mind that studying anatomy is a life long pursuit. It isnt something that you must fully understand before you move on to the next step of your drawing but rather something to revisit often.

Now that we have a basic understanding of what we are looking at, we can progress to the next area of study, planes of the nose.

Drawing the Planes of the Nose

Now we will focus on drawing the planes of the nose. 

This is an extremely helpful practice activity since it allows us to have a better control of proportions and perspective in our drawings of the face.

Let me share some drawings for you to practice this technique. You are welcome to reach out to me if you need any help or clarification along the way…

These are the plane changes described by Andrew Loomis in his book, “Drawing the Head and Hands.”

The ( bright green ) keystone shape helps us to draw the Glabella with its clear angle away from the bridge of the nose. ( light blue color. )

You can see that the drawings of the nose in the reference above are pretty simplistic. Don’t worry, that is the point.

I would like you to practice turning these forms on the page with as much variety and imagination as you muster.

This will warm you up to the next stages of the work and there is more value to this drawing exercise than you might think.

By doing this, you are strengthening your ability to draw the nose and ultimately the rest of the face with a sense of perspective.

These primitive forms also allow us to have a better idea of where the light and shadow will go since we have a clear definition of the plane changes.

Secondary Plane Changes of the Nose

Now that you have practiced the basic planes of the nose we can begin to add more angles to create secondary plane changes.

These are going to be a bit more advanced and more descriptive of an actual nose since noses are more intricate than a couple of distinct planes changes.

First draw the steps from the previous illustration, then add more angles to define the bulbous part ( tip ) of the nose. 

From a straight on view, this could simply be a trapezoid to begin with. Over time you will find more subtle angles to incorporate into your process.

There is no right or wrong here. Many artists use this method of drawing with their own specific variations. Experiment with more and less angles in a given area to see what works for you.

For the bottom two examples in the illustration below, you can see that I also started to introduce some organic curves in with the angles. This gives us something that resembles a nose drawn in a stylistic way.

For the final drawing in the illustration below, I added the shape for the eye area. This is the way we learn to place the eyes, based upon the Andrew Loomis method.

The nose is done with my own variations in mind. Notice how I placed an angle for the bump on the bridge of the nose. I also keep the tip of the nose more simplified.

Again, these are not strict rules on how you might draw your own versions.

Hopefully you can see that the extra angles start to become much more descriptive of the various forms and volumes of the nose.

Practice drawing these at a variety of angles with and without reference. Play around with proportions and exaggerations if your goal is to be able to draw stylized faces.

Structure and Organic Forms Combined

Another thing that we need to practice to get noses that have a good sense of variation is combining structure and organic forms.

When you learn to combine the two you begin to get a more confident looking illustration.

Too many angles and the nose will look overly stylized and robotic. Too many curves and it can look soft and cartoony.

Here is a reference sheet to show you how you might draw the nose with a mix of organic and angular forms –

Stylized Versions of the Nose

Another thing that you can start to experiment with in your drawings is the proportions of the nose. Exaggerations in various areas can be a fun way to develop your style.

Also, by using more intense angles and curves you can push these stylized drawings even further.

Anything can really contribute to your style when it becomes a noticeable trait or focal point.

Here are some of my stylized drawings of the nose. See if you can spot my stylistic choices — 

Adding Light and Shadows to the Nose

Now let’s add some rendering to the nose and create more depth and dimension.

We can use the previous methods to help with this part of the process. By using the basic planes of the nose to begin with, then developing some secondary planes for more details.

Then we can render the light and shadows. I will use some cross hatching for this example but you can use whatever methods that you prefer to create a sense of light and dark values.

I tend to find that I am able to draw light and shadows for my illustrations better with some reference. If you are less confident about any part of the illustration process, references can be a nice help.

Try creating a mood board with all sorts of noses! That is sure to help spark ideas.

Drawing the Nose with Simple Shapes

There are many ways to go about drawing the noses for your characters. If these versions were too much for you at your current level, don’t worry, there is an even easier way.

You can draw the nose with basic shapes. Using a less is more approach. Just think about your favorite cartoons.

Simplifications can really ease our minds and can still allow us to draw cool characters that tell a great story.

Besides, with enough practice, the complex becomes simple over time.

Here is a video that I created on drawing noses with basic shapes — 

I hope that today’s nose drawing tutorial has be educational and informative for you. I am always creating new content so let me know what you think and what to cover next!

If you want to learn more on drawing the head and all the facial features, visit my in depth course, “How to Draw Heads Step by Step” here — Click here!

Thank you for viewing my post and good luck with your art!

Sincerely,

Robert A. Marzullo

Ram Studios Comics

For more Art Tutorials – Check out this page –

Check out our Art + Resources page herehttps://ramstudioscomics.com/index.php/artist-resources-templates/

Hello Fellow Artists!

In today’s post I wanted to share some of my latest step by step tutorial sheets for you to practice with. If you are anything like me you have learned a tremendous amount with these types of drawings over the years.

I have always had to seek out various art books and tutorials since I have no formal art education to speak of. I am a self taught artist but I owe so much to all the awesome content out there!

Where my Love for Comic Art Tutorials Began

For me it all started with Wizard magazine years ago. I was so excited for each new tutorial to come out so I could level up my drawing skills and one day become a professional comic artist.

Years later, I now share step by step tutorials as an online instructor for comic art. Didn’t see that coming but I am extremely grateful all the same.

I am sure 99% of you know about Wizard magazine but in case you don’t, here it is. They are filled with so much eye candy and I really need to go back and collect them all. The tutorials alone make it worth it in my opinion.

Later it became books like, “How to Draw the Marvel Way” and all the books by Burne Hogarth. Books that I still study to this day.

Making these step by step illustrations allows me to give back to the comic art community that I love being part of. I hope you continue to find them to be a helpful resource!

If you find this post to be useful please share it to help me continue creating this type of content. Thanks in advance and now let’s get drawing!

Tutorial #1 – Drawing an Arm Pose – Starting with Basic Forms

For this one we will draw a muscular arm in a supinated position. Supination means that the palm is facing upwards.

Start with some basic forms to establish the proportions and orientation of the arm.

Next, draw the fingers with thin lines and dots to represent the knuckles. Make sure that the knuckles curve from one another and are not perfectly straight across.

Hands require a lot of practice so make sure to draw plenty of hand gestures with simplified sketches and this area of the work will get easier as you go.

After you are done with the base forms you can then begin to redraw a stylized arm over the top.

I push the opacity back on the previous layers and then redraw the clean lines with a bit more patience.

I then add the shapes of shadows with a light grey and then begin to render the cross hatching.

For the cross hatching I start from the shadow side and render tapered lines towards the light. By doing this and keeping the underlying form in mind I can add depth to the illustration with a bit of style as well.

Tutorial #2 – Legs in a Jumping Pose

For this first one I will share a step by step sheet and a time lapse video so that you have both options to work with. I practice comic style legs a lot. Mainly because there are so many angles and variations to learn to draw.

That and the fact that I also like to dabble with different rendering styles. So lots of things to imagine and play around with, even with specific parts of the body.


For this one I will start with a rough sketch of the pose. Something that I feel has the gesture and style that I am looking for.

People always ask me, do you start with a stick man, cylinders, or gesture? I start with whatever feels right for the area that I am drawing

If I am more confident at a particular part of the illustration, I generally go right to gesture drawing.

If I am struggling with the area then I add cylinders to figure out the form and the perspective. The “Stick-Man” approach is just to figure out the proportions.

Here is a video where I narrated the process on drawing these legs. Enjoy!

What’s Up with All the Body Parts?

So just in case you are wondering why I share lots of pieces or body parts, it is because I like to do localized studies.

I have always found this to be a great way to learn and sort of “zero in” on the parts that I am struggling with.

There are times I fill up an entire page with sketches of the legs, arms, eyes, ears, torsos, etc. It always teaches me something and the sheer volume of drawings really do add up and develop our skills.

This same approach applies to everything else. Drawing sections of buildings, facial expressions, gesture drawings, composition, and so on.

I hope that all makes sense and let’s continue on!

Tutorial #3 – Drawing Hair on a Female Character

There are tons of different hair styles to practice but I use a similar break down for most of them. Let me show you how easy this can be!

Start by drawing the hair line. This helps us to have a container and keeps the hair aligned.

Next draw in a hair shape. It should be asymmetrical and have an organic feeling to it but also keep it simple for now. We can and will add more details as we go.

For the third step in the illustration above you can draw the flow and direction of the hair. Avoid being two aligned or repetitive with the directional lines. If you want the hair to look organic then it needs to have curves and variation.

Now we can start to render the interior forms of the hair. Again, think with variation. Hair typically has various levels of thickness and volume. Try using “S” curves and at the end you can roll the edges up even more. These ( Pink Lines ) are called “Beauty Lines.”

Then for the final stage we an ink the work. I am adding stronger highlights on the top and thinner ones at the bottom and underside of the hair shapes.

For this style of rendering I like to use a bit of a Zig-Zag effect for the highlights. It works well for comics and you can draw it at pretty much any size with a bit of practice.

Try this same approach with different hair styles and see if you can make it work!

Tutorial #4 Drawing a Creepy Arm Pose

For this next one I will show you how I draw a creepy arm. I like drawing characters like Venom, Carnage, Sabertooth, etc. So these types of drawings are fun to practice.

I will let you work through this one without hitting you over the head with the same steps.

Here is another Youtube video of the process. I narrated this one for you so I go into much more of the thought process as I render the line art.

So as you can see, I really enjoy making these types of step by step tutorials. It allows me to improve my art while helping other artists. Win-Win baby! 😉

The crazy thing about this journey is that by making all these art videos and tutorials I was able to get my work published in my very own How-To-Draw book!

So hopefully you see that if you put in the work and develop your skills good things happen. Sometimes it’s not exactly what we wanted or expected but often times it is exactly what we needed!

Learn to Draw Action Heroes Feature Image

If you want to learn more you can check out my book, “Learn to Draw Action Heroes” here on Amazon – Click here!

If you want to learn more about drawing comic style art. I have courses on my website that walk you through the process step by step. Here is one on drawing stylized anatomy –

How to Draw Stylized Poses and Anatomy

Check out this course…..Click here

Thank you for viewing my blog posts and more are on the way soon! Have an awesome day and good luck with your art! 🙂

Sincerely,

Robert A. Marzullo

Ram Studios Comics

Welcome Back Fellow Artists!

Today I want to hopefully motivate you to work on a basic fundamental aspect of drawing. Drawing geometric and organic forms.

This may seem like an overly basic activity but I assure you, it is something that most of us don’t practice enough and can have drastic results in our artwork.

Geometric forms allow us to draw things with a sense of structure and perspective. Turning those forms on the page opens up our minds to all sorts of possibilities.

Another aspect of drawing with these forms is getting used to looking through them. This elevates our thinking even more when trying to imagine depth and dimension on a flat 2D piece of paper.

What are Geometric Forms?

Geometric Forms are shapes that can be defined mathematically but used in a three dimensional manner.

A square in a 2D shape but once we convert that square to a cube it becomes a Geometric Form or 3D Prism.

Geometric forms allow us to create a sense of perspective and structure within our illustrations.

What are Organic Forms?

Organic forms are three-dimensional shapes that appear natural, irregular, and unpredictable, often resembling shapes found in nature like flowing curves of a leaf, the contours of a mountain, or the form of an animal, characterized by smooth lines and asymmetry, as opposed to rigid geometric shapes; essentially, they mimic the organic structures found in the natural world.

Why Should I Practice Drawing Organic Forms?

Drawing organic forms has a host of benefits. Primarily if you want to draw things that appear alive or that exist in nature then drawing organic forms is extremely important.

Organic forms also have a calming effect on us since they are natural to our eye. We associate them to nature and therefore they are more relaxing to view.

Geometric shapes have a rigid appearance and are generally stiff and lifeless but also provide a sense of strength and function. Using them both is important of course and will provide a nice juxtaposition to your work.

Will Drawing Basic Forms Improve My Artwork?

Yes, practicing geometric and organic forms relates to all sorts of things that we need to draw as artists.

By drawing these various forms we are exercising our minds and stretching our imagination.

A big part of this is because when we practice drawing these forms in an abstract manner we avoid our critical thinking and tend to experiment more.

Over time as we draw a variety of different forms we learn to move more freely upon the page. We are basically programming our mind to accept these forms as possible choices. Over time you will naturally become more confident at drawing more complex ideas because of this.

Practicing any particular aspect of your work yields amazing results. The task may seem boring and repetitive at times but stick with it and you will be amazed by the long term results.

You can see this same idea at work within sports. They practice drills over and over until it becomes a response. Then they creatively add it into the way that they play the game.

How to Draw Geometric Forms?

Let’s start with a cube and practice turning it on the page. This is a great exercise since it relates to so many things around us.

After we get warmed up with the basic forms we will move on to the more organic examples.

Here is a practice sheet for you to work with —

Next let’s work on the cylindrical version. This is as simple as drawing two circles ( or ovals to apply a sense of perspective. ) and connecting them with two lines.

The two lines will be parallel from a straight view and if you are drawing a bit of perspective they will appear to converge towards a vanishing point.

Here is a practice sheet for you to work with —

Notice that on the second cylinder that is in perspective I drew a rectangle or floating interior plane through the center of the form.

This is another way to envision a more dimensional and complex form. I find this to be great for architectural style concepts. It provides me with ideas on how interior shapes or forms might look within a structure.

Visualizing the interior of these forms and being able to see through them is a very powerful skill to develop. Here are some more sketches for you to try out…

Twisting the Forms

For the next step I would like to show you how to bend and twist the forms. This will warm us up to the more organic forms that we will be doing shortly.

We will start with a rectangular prism and focus on the top and bottom plane. To practice this just draw a rectangular shape with any tilt or perspective that you envision, then add the next rectangle at a different orientation.

Then connect the two rectangles together with organic or curved lines. Finally, add the cross contour lines which helps to further explain the dimension of the forms.

Then practice this same exercise with as much variation as possible.

Here is a practice sheet to work with —

So hopefully by now you are starting to loosen up your drawings a bit. Combining form with a sense of gesture can have some very powerful effects within your artwork.

Drawing Organic Forms

For these next examples we will take a more abstract shape and convert it into a three dimensional form.

Start by drawing a basic shape on your canvas. Something like a bean or a fruit. Don’t worry about it being symmetrical and just move the pencil around the page with a bit of fluidity.

This doesn’t need to resemble anything particular if that helps you to create more variety at this stage. Even a blob tends to look pretty cool by the time we add the cross contour lines.

Also, don’t feel bad if you keep repeating the same pattern. Old habits die hard and I do the same thing. Over time you will break out of the rut and find some new shapes to explore.

Here are a couple basic examples to work with —

In the sketches above notice that the perimeter of the basic shapes is pretty random. The first one looks like a bean but the rest aren’t very distinguishable.

The green line running through the middle of the shapes ( 2nd Row ) are the Center Line. The little arrows pointing up are to help explain the curvature of the form.

I am drawing the Center Line and moving it up and down through the form to create a sense of depth and dimension.

Think of the highest points of the form as Convex and the recessed areas as Concave.

Next we add the blue lines in both directions to create a grid like pattern. Make sure to keep the form in mind as you draw these. The more of the form you can explain with these lines, the more depth and dimension your art will have.

Here are a couple more to try out. You can also apply some light and shadow to add more depth and dimension to the forms.

Practical Examples of Organic Forms

Now you can take what you have learned and use it within your studies. Try finding organic things to draw but use these methods to explore the forms.

For this one I drew an apple. By paying special attention to the direction of the forms and by drawing the cross contour lines, I was able to have a better understanding on how to draw and render the apple.

Cross contour lines help us to visualize the depth and dimension as we add in the light and shadow. This works on everything that we draw so practice them often!

I hope this art tutorial has been helpful to you. Please let me know if you have any questions and I will do my best to answer them.

If you would like to learn more on this subject, I have a full course that breaks down these concepts step by step. You can view the content here on Gumroad —

“How to Draw with Organic Forms”— Click here…

Thank you for viewing my content and good luck with your art! 🙂

Robert A. Marzullo

Ram Studios Comics

Welcome back fellow Artists!

Today I want to share a few tips and techniques on how to draw the back of the arm. This area has been a battle for me over the years. There is a lot going on here and since we are so used to focusing on the front of our characters more often, the back can tend to be more difficult.

Not to worry, I will shorten your painstaking studies with a few pointers that have served me well. Let’s dive on in and simplify this topic!

Quick Anatomy Lesson

I created this diagram for you to see how beneficial it can be to pay special attention to the Epicondyles of the forearm. The Medial ( Closer to the center of the body ) is in red and the Lateral ( Outside ) is in green. Notice how many of the muscles converge to these points in the arm.

Since there is a lot to keep in mind with this area of the body I will simplify and explain what to focus upon to aid in the drawing process.

  1. Notice that I have grouped the Extensors into one large category ( Magenta Color ). These go from the Lateral Epicondyle to the back of the hand.
  2. Now take a look at the Flexors ( Light Blue Color ). They go from the Medial Epicondyle and travel down to the palm of the hand.
  3. Another thing that is important to pay attention to is how the Triceps go down to these landmarks as well. You can also see how the Long Head ( On the left or Medial Side ) is much larger by comparison to the Short Head.
  4. The Triceps Tendon is the White Area inbetween the Elbow and the Triceps. Notice that is is not straight up and dow but rather angles towards the right or Lateral side of the arm.
  5. Finally take a look at the Brachioradialis muscle ( Orange Color ). It is tightly seated next to the Short Head of the Tricep and then rolls over and around the Extensors toward the thumb side of the hand.

Hopefully those observations will serve you as well as they have me but observations alone usually don’t cement the ideas into my mind. I need to draw what I learn to retain it. Sometimes over and over again. Ah, the joys of being an artist!

Let’s jump into a more practical example now!

In these first two steps I want you to focus on the length of the arm you want to draw. Just use simple circles and lines. No need to draw the actual skeleton, unless you really want to, then by all means go for it!

At the elbow area, make sure to draw the two circles for the Epicondyles. The center circle down to the bottom circle will represent the Ulna and the overall length of the forearm.

Next you can add the volumes of the muscles. I used a more silhouette based approach here with some angled lines. Angled lines can help us to figure out the direction of the muscles as well as simplify the forms.

Try to pay attention to where the peaks of the muscles are and how the arm is asymmetrical.

Organic Lines and Shadows

For the next step you can draw over the structured version and begin to illustrate the anatomy. Using the Epicondyles as your reference points should help you to place the muscle groups.

Remember that the Elbow or Olecranon is part of the Ulna and that extends down to the pinky side of the hand.

Also, keep in mind that you can follow this entire illustrative process in the video link down below if you are struggling to follow along.

For the next step you can draw in the shadows and add some light rendering. I tend to sketch this area of the work to keep ideas flowing. If I am too tense at this stage then I will loose the organic feeling to the anatomy, so sketching helps to avoid that.

Loose lines have more energy so cleaning up the work too soon as well as too much can make it overly rigid and lifeless.

Inking the Artwork

Now we can begin to redraw the artwork with cleaner lines. I recommend trying to be as organic as possible for anatomy. It doesn’t mean you won’t add small amounts of angles here and there. It’s a bit of a balancing act. Too many curves and things can look soft and rubbery. Too many angles and it can look overly rigid and tense.

Just play around with these concepts to hone your style. Generally angles will be for the bony landmarks and curves for the muscles but again it is a bit of a mix and personal taste.

Next we will apply the shadows. Here I find it to be helpful to add larger shadows to the bigger muscle groups first and then tie into the smaller muscles. Keep your light source in mind as you move around the forms but be careful not to segment each muscle entirely as you place your shadows.

All the individual muscles should make sense as a larger whole, so we have to shadow them in a way where they are defined but shouldn’t appear to be legos stacked on one another.

In the video I explain how each muscle has a different thickness and belly to them. We need to couple that idea with the fact that the forearm is basically a large cylindrical object. The muscles generally read better if they flow in and out of the larger form.

A good way to achieve this is to break up the lines and shadows on the light source side and where the muscles become less defined or fade into the underlying forms.

Finally! The Rendering Stage!

Finally! The glorious rendering stage or what I like to call it, “The Icing on the Cake!” This is where we bring all those previous concepts together into a more dimensional and stylized illustration.

I like to experiment with the cross hatching a bit but in most cases it is best to push the lines in the direction of the form. Wrapping the lines around the form helps us to reinforce the dimension and volume of the anatomy.

To add another layer of value and tone you can cross hatch at various angles and with varying degrees of line thickness. There are all sorts of ways to implement your style into this part of the work so just play around and study from your favorite artists.

I like to add the veins towards the end of the inking process. Notice the little sketch at the top right. Here I am trying to show you how the veins look better if they wrap around the underlying form versus just drawing them in random directions. Think of them like ropes wrapping around a cylinder but then add variations such as small bumps and imperfections.

So there you go! I hope this tutorial has been helpful and I will be adding more so please come back soon.

Good luck with your art and have an awesome day! 🙂

You can also watch the narrated video demonstration of this drawing process here on my Youtube channel –

If you would like to learn more on drawing anatomy I have courses on my teaching site. You can check out my course on Drawing Stylized Anatomy here –

How to Draw Stylized Poses and Anatomy

Visit my course here – https://www.online-courses.ramstudioscomics.com/courses/how-to-draw-stylized-poses-and-anatomy-figure-drawing

Sincerely,

Robert A. Marzullo

Ram Studios Comics

Welcome back my fellow artists!

In today’s tutorial you will learn how to draw hair a few different ways. I will show you some patterns to look for that make drawing hair much easier to accomplish.

So let’s get drawing and give those characters some hair that will keep their heads warm!

Drawing Hair with the Ribbon Technique

There are many different hair styles to choose from but with these techniques you can start to create all sorts of variations. The first practice activity that I want to show you will be to draw the hair by thinking of ribbons.

The reason this works so well is that in the beginning we tend to think of hair as a bunch of lines versus the forms and volumes that give hair it’s bounce and flow.

When drawing the hair as ribbons we start to get more curves involved and begin to roll the forms around one another.

Let me show you with a few sketches since it is much easier to illustrate this method than try to explain it.

How to Draw Hair with the Ribbon Effect - Practice Art
How to Draw Hair with the Ribbon Effect – Practice Art

Notice in the illustration above that we can start with a basic “S” curve and then by adding a second one we start to get a sense of the first volume.

Then by continuing this method we can roll the form around like a ribbon. Pay attention to the areas labeled in blue. Each time we add a new ribbon to this drawing it adds more depth and dimension to the hair.

By the end of the this drawing you can add in some fine lines for texture. Just make sure not to draw them too aligned to one another. This will flatten out the forms and will make the hair appear more rigid.

Also notice that by varying up the little flips or curls at the end of the ribbons we can give the hair more body.

Those little flips at the ends are called “Beauty Lines” and you can really add lots of style to that part of the work as many comic artists do.

Blocking in the Shape of the Hair

Another technique that pairs with this ribbon drawing method is blocking in the shape of the hair.

This helps us to simplify more complex hair styles and it is also another great opportunity to introduce your style.

For a more cartoony style use bigger shapes and volumes.  This can really speed things up and you can always learn to develop more details as you gain confidence with these techniques.  It’s easy to kind of overdo the hair renderings anyways.  I like to believe less is more in this area of our work.

Drawing a Female Hair Style Step by Step

Let’s go through a step by step and see the process in action. Start by drawing a character of your choice.  I will go with a comic style female face from a front view.  Now let’s get into the steps.

Drawing a Female Hair Style Part 1

Step 1 – Draw a Basic Hairline Shape.

This gives us a great starting point to work from.  Even if you draw a hair style that completely covers the hair line this method still helps out in my opinion.  Most hair styles will show at least some of the hair line so this is a good place to start.

Step 2 – Draw the Overall Shape of the Hair

This is a great way to simplify the hair.  Since the hair can get pretty complex to draw these simple shapes can help us focus on certain aspects of the design.

Notice how this hair style is like a bell shape.  Also, notice how the folds in the darker blue by the scalp are in the shape of an “M”.  Little observations like this make the process much easier to accomplish.

Try observing a series of photos or comics and drawing a bunch of these basic hair shapes.  You’ll learn a lot from the exercise, I promise!

Step 3 – Draw the Flow and Direction of the Hair

Now that we have the shape of the hair in place we can now draw in some directional lines.  

These will keep us on track when drawing the interior hair shapes and smaller volumes.  This also becomes another area of study since these directional lines will vary based upon the hair type.  I will use slightly wavy lines for this example.

Drawing a Female Hair Style Part 2

Step 4 – Draw the Interior Volumes of the Hair and Beauty Lines

Now we can break down the interior forms with the previous steps guiding us. This is also a good time to add those beauty lines or curls. 

Those little flips of hair add a lot of character and can make a stiff hair style look more organic and interesting.

Step 5 – Ink the Work!

Now we can finalize the line work and place the shapes of shadows.  In this example I am putting the light source on the top of the hair.  Light and shadow can be a complex topic so I will cover that in more detail soon.

Just try to simplify the idea and keep the light source in mind as you draw in the big shapes. So establish a more focused area then break off into smaller areas since light doesn’t just end abruptly on an object unless there is a steep angle.

As I start to ink the hair I am looking for patterns that create a sense of texture.  When I study hair I tend to see “W” like shapes for the glares and half moon shapes for the shadows.  Remember that simplifications like this can make recreating your work easier and therefore faster.

You may see different shapes than I do, the point is to relate them to something you can remember and to practice often so that you are consistent.

Let’s use the Same Techniques for Drawing Short Wavy Hair

Drawing Short Wavy Hair on a Male Character

Notice in this next example that the same step by step approach will work on this shorter male hair style.  Probably the biggest differences that I see when drawing this hair style is that the hair volume is more angular.

This is part of my style choice of course but also it tends to look more masculine and also a bit rigid.

The same patterns are apparent in the inking stage but they are more compressed together.  Practice drawing intersecting waves with points on the end.  Usually after you warm up and get the pattern working in your  mind it goes much faster with less effort.  Remember, you can also try to draw a similar pattern with less details.  You can see that the larger folds of hair on the right are an example of this idea.

How to Draw Black Curly Hair

Let’s start with the easy one.  Short curly hair can be simplified even further than the previous examples.  We will still use the same step by step approach but then as we get to the inking stage we can use a bit of stipple shading.

Notice in the example below that I have drawn a perimeter shape of the hair but then filled most of it in.  This allows me to just focus on the light source side and render tiny curls over and over. 

Just make sure to space them out as you reach the lighter side of the hair.  This also works with bounced light but on this drawing I am only using a single light source.

Notice that I also added some curls to the edge of the hair style.  Sometimes leaving it overly smooth can look a bit fake or out of style.  Just play around with this effect and pay attention to hair style trends.

Pinterest is great for looking up cool hair styles by the way!

Drawing a Short Hair Style on a Black Male Character

How to Draw a Braid

For this next part I will break down how to draw a braid. These come in all sorts of variations but this techniques should help you draw them regardless of the style.

Study this step by step below and see if the shapes makes sense to you. You may have to draw this a couple of times before you commit the process to memory but that is normal. I still struggle to see the patterns and use this style of template myself from time to time. How embarrassing right? lol

How to Draw Braids - Step by Step - Ram Studios Comics
How to Draw Braids – Step by Step – Ram Studios Comics

Step 1 – Draw the Taper and Centerline

For this style of braid we want it to be larger near the head of the character and thin down toward the end. By starting with the tapered lines it will help guide us to this outcome.

Like many things that we draw a center line can be very helpful as well. The centerline will get us ready for the next step.

Step 2 – Draw a Zigzag Over the Centerline

This zigzag is a simplification but it can be very helpful to work with. You can play around with the thickness of the effect but I like to keep it pretty tight to the middle of the braid.

Another thing to pay attention to is the way that the zigzags get smaller as they move down the braid to the tapered end. This helps us to proportionately decrease the size of the braid in the next couple of steps.

Step 3 – Draw Curves Towards the Red Dots

Notice how the red dots are only on the right points of the zigzag. The curves that we will add will start higher and flow down to the red dots.

Step 4 – Draw the Curves on the Opposite Side

Now to do the same thing on the opposite side but staggered just a bit.

Step 5 – Draw the Braid Over the Template

Now that we have established a base template to work with we can draw the braid more organically over the top.

As you draw this part try to think about how the braided hair passes in front and behind the other sections. That way you start to put a bit more curve on the parts that need it to imply depth.

Step 6 – Add Texture to the Hair

We can start to add texture to the hair and a sense of flow by drawing the hair in the right direction. Draw the hair lines going from top to the bottom of each segment but also try to break things up from left to the right across the volume of the hair.

You don’t want a bunch of lines that are too evenly distributed because that will flatten out the volume of the hair. Instead, try to picture highs and lows in the volume of the hair. Then draw your lines accordingly.

Step 7 – Additional Rendering to the Hair

Now we can add more rendering lines and a greater sense of shadow to the braid. Like before, try to keep the volumes in mind as you apply the rendering. You want to round out each segment of the braid but you also want small variations in the segment itself.

Hair is very organic so if you find yourself being too repetitive in your drawing process then it may be hurting the look of the illustration.

Step 8 – Blending the Texture of the Hair

Now to soften things up a bit. I am working digitally with Clip Studio Paint for this drawing so I am using the “Blending Brush” to soften up the harsh edges to the lines.

This helps to give the hair volume a little more of a pillowy sort of look. Be careful with this part of the process. It is all about balance. You need a nice mixture of soft shadows and hair texture to make it look believable.

Make sure to blend with the direction of the hair strands and not side to the side. You can also switch to the eraser or a white pencil tip to bring out more of the highlights as you go.

Step 9 – Adding in Strands of Hair

Now we can finish this braid up by drawing in some loose strands of hair. This adds a sense of realism to the work. No matter how tight your braids are you will have some loose strands here and there.

Hair Shape Examples to Practice

There are tons of various hair shapes to use these methods on. Here are a few that I drew for you to reference.

Just try to simplify the hair as much as possible at this stage. Try to look through all the details and just find the big shapes. I will repeat myself here, not only does this make the drawing process easier it will also help you find ways to add more style to your work.

Hair Shape Reference by RAM

I hope that today’s blog post has given you some ideas on how to draw various hair styles for your characters. I will add more content to cover this topic again in the future. We are constantly learning and growing and this post has inspired me to learn even more on this subject.

Let me know what other topics you want to see covered and I will make sure to work on that as soon as I can. Good luck with your art and never stop drawing!!

Robert A. Marzullo

Ram Studios Comics

If you are ready to learn more on this subject please checkout my content here –

How to Draw Heads from Any Angle Course

How to Draw Heads from Any Angle ( Full Course ) Click here!

Would you like to know when new courses are released and stay up to date with new art tutorials and resources? Then sign up for our newsletter hereClick here!

Drawing the Full Figure with Primitive Forms

Welcome back fellow artists!

Today I want to talk to you about using basic forms to help develop your figure drawings with more confidence and accuracy.

For many years I would simply start drawing the figure by outlining the entire body. I got pretty good at this approach but there always seemed to be flaws in the end result. Proportions would be wildly off and the perspective throughout the body would be inconsistent.

This is where taking the time to draw the body with basic forms really helped me and it may help you as well. It gives us a relatable way to design the figure and simplify the process.

Let me show you what I mean with a few examples. ( You can click on any of these images for the larger version. You can also reach out to me through the contact form if you want a higher resolution version for your studies. )

Start by Drawing the 3 Main Masses First

A common problem that we all face at first is to ignore or miss the fact that the head, upper torso, and pelvis are all at different angles from one another. This combined with the twisting of the torso makes for a complex area of study all by itself.

I try to study the torso as often as possible. Getting better at drawing this area of the body can really help our characters to look more expressive.

So use this method of drawing to do a few of these studies of the 3 Main Masses of the body. Draw from life and/or imagination. I like to do both. I draw from my imagination to implement style and I draw from life to figure out where I went wrong!

Drawing the Figure with Basic Forms by RAM

Notice with the art file above that each area of the body has a slight difference in the way that it is facing. It is also good to keep the spine in mind as you start to draw these examples.

Practice Drawing with this Method with Various Poses

Here are some sketches for you to practice with. Draw these or envision your own. Try to explore as much variation as possible.

If you can’t imagine your own poses very well right now then do this exercise while studying poses from life photos, movies, or even comics.

Over time you will start to see the patterns you are looking for and be able to draw these from memory.

Notice the two on the very right are in a more dramatic perspective. I did this by first drawing a single vanishing point and then using that to help me imagine the figure in space.

Drawing the 3 Main Masses of the Body with Basic Forms

Use the Same Technique for Drawing Arms and Legs

After you feel comfortable with the previous exercise we can move on to the next step. We can attach the arms and the legs to the body with a similar approach.

For arms and legs I tend to use elongated cylinders with a bit of taper towards the wrist and the ankles. I also use spheres for the joints. Areas like the shoulder, elbows, knees, and ankles.

Obviously these are just basic representations of these areas. Each of those areas get refined in the later stages of the drawing process.

If this step seems too difficult for you, don’t worry you will get better with a bit of practice each day. Always remind yourself that if it was easy, everyone would be a great artist and then it wouldn’t be so cool!

Here are some simplified arms and legs for you to practice with. Try to focus on the proportions and the perspective of these areas of the body, not the detail or the anatomy.

Again, the main goal is to simplify these complex areas of the figure so that we can get better at proportions, volume, and perspective within the body.

Drawings Arms and Legs with Primitive Forms

Practice Drawing the Full Figure with Basic Forms

Now trying putting these concepts together and draw some of your favorite poses. If you struggle to draw the pose you want you may need to start with something more basic. A person standing or walking, then move on to more complex versions.

After you put in a lot of practice you can try to really push yourself to draw more difficult poses over time. The real strength of this exercise is that since you are simplifying the process, the more difficult poses will be easier as well.

Another great way to practice this method is to do a few gesture drawing first and then add the primitive forms to those sketches. These methods work well together and each delivers a different benefit to your work.

Gesture will help you to loosen up the figures and give them a sense of movement. Primitive forms will strengthen the character and give it a feeling of weight and volume on the page. Like anything else it is all about finding a balance to these concepts.

Drawing the Full Figure with Primitive Forms

Here is a video demonstrating the drawing process. If you have any questions please comment and let me know how I can help you.

Drawing the Figure More Organically

After you have spent a fair amount of time on the previous exercises the next step is to start drawing with more organic lines and forms.

This part takes some knowledge on anatomy and daily figure drawing studies. Again, draw from life photos, movies, or use a figure drawing program like www.quickposes.com

Try taking some of the poses that you have constructed and add more organic forms. Here is another drawing to show you some of my process for drawing the female torso.

Drawing the Female Torso Breakdown

Just keep practicing a combination of going from basic shapes to curves while studying from anatomy books and you will start to memorize what you need to.

Anatomy Books that I Highly Recommend

Some of my favorite anatomy books are here ( Amazon Affiliate Links – I get a small commission at no additional cost to you if you decide to use them. ; )

Basic Human Anatomy by Roberto Osti

Anatomy for Sculptors

If you are ready to learn more on Figure Drawing and Gesture. Here is my course, “Figure Drawing – The Body in Action.” Learn step by step techniques where I teach you to draw the human body with confidence. Click here to Enroll.

Figure Drawing The Body in Action

I hope you have enjoyed today’s post. Let me know if you have any requests for new blog posts or Youtube videos. Have a great day and good luck with your art! 🙂

-Robert

Ram Studios Comics

Want to learn more? Check out my video course content here where I teach figure drawing, anatomy, and how to draw comic style art!Online Art Courses

For more written tutorials you can check out this section here –

Drawing Tutorials

Welcome Back Fellow Artists!

Today I am going to show you 3 quick and easy ways to blend paint in the Procreate app. Let’s dive on in and get blending!

My list of Digital Art Tools for today’s post ( My Amazon Affiliate links )-

Ipad Pro 4th Generationhttps://amzn.to/46DNJqG

Apple Pencil 2nd Generationhttps://amzn.to/3Fc8tKA

Procreate apphttps://www.procreate.com

The Procreate app has come a long ways over the years. It is one of my favorite programs to create my digital art in. It has a streamline interface and tons of features to get the job done.

The first method I want to show you for blending paint in Procreate is by using a soft airbrush. It is super simple and effective.

Setting Up the Canvas in Procreate

First create a new canvas. Go to the top right of the gallery and hit the little “+” sign to start a new canvas. I will be using a canvas at 1920px x 1080px.

You can create a canvas at any size you want really but keep in mind the bigger the canvas and the less layers you will be able to use as you create.

Now we can create our first shape to paint. Go the selection tool located at the top left. It looks like an “S” shape just left of the little arrow. When you have the selection tool active you will see a menu pop up on the bottom. Go to the very right and select “Ellipse”.

We want a perfect circle so to do this you will draw across the screen and place one finger on the canvas as you drag across with the Apple Pencil. This will convert the ellipse to a circle.

Creating a Selection in Procreate

Now we can fill the circle with a color of your choice. Just click the color swatch at the top right and choose your color. I will be using a bright red to start with. Drag the color and drop it into the selection for a quick fill.

Next we will add a new layer over the top of this one. A great way to add paint on a floating layer that will only effect the previous layer is by using a “Clipping Mask.”

To do this you will tap the new layer on top and select “Clipping Mask” as highlighted in the next image.

Enable Clipping Mask on the New Layer

Clipping Masks are a great way to digitally paint in Procreate in a non-destructive way.

Now when we paint on the new layer it will only add paint to the red circle. This works with as many new layers as you need as long as they are stacked on top of one another. When the clipping mask is enabled you will see the layer move over slightly and see a small hooked arrow to the left of the clipped layer.

This technique is very powerful since it provides a non destructive approach to add paint to your base layer and you can also use Blending Modes for each new layer if needed.

Blending Method 1 – The Soft Airbrush

Now we are ready to start painting with a large soft airbrush. Procreate has a ton of great brushes to choose from but I want to get your rolling with the basics first.

Select the “Soft Brush” from the “Airbrush” folder in the brushes menu. See the image below for reference.

Select the Soft Brush in the Brush Menu

Now select a new color to start painting. I will be using a solid black. Make sure you are still on the new Clipping Mask layer and start painting around the edge of the circle. We want to round the form and turn it from a circle to a spherical shape.

I like to increase the brush size to around half of the size of the circle. This way I can blend the shape without getting smaller brush strokes. I also like to turn the opacity down to about 50% so that I can slowly add the effect without it going straight to black.

This percentage may vary for you based upon your pressure settings and/or your hand strength so you might need to experiment here a bit.

You should have something like the image below at this next step.

Adding Paint to the Circle

Another great thing about this new layer being a Clipping Mask is that we can paint and erase as much as we need to get the desired result.

Let’s erase some of the paint away on the lower bottom right of the sphere. This will give us a nice bounced light effect that you will see on spherical objects that are slightly reflective.

I will use the same “Soft Brush” for the eraser and create the effect as shown below.

Bounced Light Effect

This same effect could have also been achieved by painting a new color on an additional clipping mask layer. This way you can control lighting effects and color at the same time.

Blending method 2 – Using the Smudge Brush

For the next method we will use the smudge brush to blend the paint so let’s keep painting!

To speed things along I am going to Group these two layers together to make a copy of the sphere. To do this simply select the first layer and then swipe over on the next layer. Once both are selected you should see the word “Group” pop up on the top right. Click that and these two layers will not be in a grouped folder.

Swipe over to the left on the grouped folder and hit “Duplicate.” Now select the new folder and move it over to the right.

Just to make things a little more interesting lets change the color of the new sphere. This is pretty easy to do. Simple swipe over with two fingers to the right on the new sphere layer to enable the “Alpha Lock.” This will allow us to paint on the layer without going over the edges.

This feature combined with Clipping Masks gives us a lot of ways to edit our work and not get stuck. Now select a new color and drag it to the red circle. I will use a lighter blue for this but you can pick whatever you like.

We will use the existing clipping mask layer with the fade already applied. No sense in wasting it!

Another thing we can do when we start to experiment with things like this is to copy the clipping mask layer and turn the visibility off of the copy. Do that by swiping over to the left on the layer with the fade and tapping “Duplicate.”

Now select the smudge brush on the top right. It is directly to the right of the brush icon and looks like a hand with the fingers pointing down.

You can play around with all sorts of brushes for this part but I will be using a brush that comes with Procreate. It is under the Painting folder and is called “Salamanca”. You can see it here.

Selecting the Smudge Brush in Procreate

The nice thing about this type of brush is that it will allow us to move the paint around and give us some well needed texture at the same time.

So now I will take the smudge brush and move the black shadows layer paint around a bit. Notice that when you push the paint from the shadow side it will appear darker. You can also start form the lighter side and push the paint back in the other direction.

Like any other brush you can play around with the opacity slider and control the intensity in which it moves the paint. You can also do a two finger tap on the layer and control the opacity to pull back on the effect as well.

Blending with the Smudge Brush

Blending Method 3 – Overlapping Strokes

For this next way of blending we will copy the red sphere yet again. Go back to the first group and swipe over to the left and hit “Duplicate.”

You can move the groups around and place them wherever you want to give yourself room to work.

Just make sure that when your selection tool is active that you toggle it on “Uniform” so that when you grab the corners of the object it doesn’t distort unless you like that sort of thing!

Now lets take the red circle and change the base color one more time. Remember to make sure that the “Alpha Lock” is on and then drag and drop your desired color. I will pick a bright green to work with.

For this one I want to introduce another color. I will add a new layer and set it to “Clipping Mask” on top of the black fade that should already be in the group if you have been following along properly.

Just select a brush of your choice ( I am using the basic “Round Brush” ) and apply the new color. Since I will be using a brighter yellow I will add it to the light source side like the image below.

Painting the 3rd Example

You can see that this big blob of yellow isn’t what we are after. We now have to blend it. We can do this by holding our finger on the color next to the edge that we are trying to blend.

I like to use a brush that is big enough to easily pass on both sides of whatever I am trying to blend. This brush size will vary depending upon exactly where I am at in the painting process.

The other tricky thing about this is that we have to keep holding our finger on each new point of selection to continue to refine the paint work. This would be best explained with a video

Here is what I ended up with after adding some more effects to the illustration. I love painting space scenes with these basic techniques and a few different brushes.

Space Scene Example by RAM

I hope today’s digital painting tutorial has been informative. I am creating new tutorials to help beginners get better at digital painting so please check back for more.

You can also sign up for my newsletter and get informed of new blog posts and other digital products that I create. You can opt in on the home page of this site.

If you want to learn more about digital painting you can view my Procreate course here. I will be updating this soon and adding more content. Feel free to reach out and let me know what questions you have and I will do my best to help out directly or create new content that answers your questions.

Procreate Like a Pro: Create Awesome Digital Art on an iPad

View this course here – Click here

Thanks for reading today and good luck with your digital art!

-Robert