Gesture drawing is learning to look through the figure and being able to see the energy and motion of the body and capture it within a few strokes.
As new artists, we tend to struggle with this concept because the figure is so complex.
As many artists will tell you, “Learning to Draw is Learning to See.”
With gesture drawing, it is learning to look past what we think we see and find what is beneath or through the forms.
Gesture is in almost everything around us and the more we can begin to identify this, the more our drawings can come to life.
The Benefits of Timed Gesture Drawings
One of the first things that we should do to improve our gesture drawings is to create lots of timed studies.
At first, you may struggle with drawing a full figure in under 5 minutes. There is nothing wrong with that and we have all been there.
Over time you will get faster as you learn to imply certain things rather than trying to illustrate everything you see in full detail.
There is a technique that many painters will use and that is to paint an apple with the least amount of brush stokes as possible.
Exercises like this can teach us a lot about what is needed and what can be discarded from our process.
Gesture drawing can be thought of in the same way. Try drawing the figure with the least amount of stokes as possible.
Over time, this will allow you to draw the figure faster and with more life and energy within the sketch.
Drawing the figure in 5 minutes will likely teach you something different than drawing the figure in 2 minutes.
With more time in the 5 minute drawing, you are likely to start thinking about the overlapping forms and the anatomy.
The 2 minute drawing will probably make you think more about the silhouettes.
Eventually you will want to try some 30 second poses and these can be a real challenge but the amazing thing about them is that they will push you to only draw the energy and flow of the figure.
For timed studies I like to use websites like –
Line of Action.com
Quick Poses.com
Pinterest ( Set your own timer! )
For Pinterest I create figure drawing boards with tons of great poses that I want to draw and learn from. You can follow me on there and we can learn and grow together!
If you want a more interactive experience on Gesture Drawing, I have created a video demonstration of my process here –
What is the Action Line?
Remember what I said about the apple? What if you had to simplify the entire human body down to one line? That would be your Action Line.
For many poses you can generally picture the spine of the human body but not every time.
Picture a person running towards the viewer. The action line for this type of pose would be from the top of the head, all the way down to the point at which the foot meets the ground.
Likely one big sweeping “C” curve through the entire figure. This is of course, just the start but now everything else will sort of hinge upon that initial Action Line.
It becomes a very important guide for the rest of the drawing.
Other gesture lines to look for are “S” and “I”. Let me explain why these are so important and effective to use.
What is C.S.I. in Figure Drawing?
Time to do some detective work right? Well sort of but not really. CSI is a way to remember the primary lines or curves in gesture drawings.
We can find large sweeping curves through the figure and they resemble a C, S, or an I.
Let me show you rather than tell you since it will make much more sense when you see them in action.
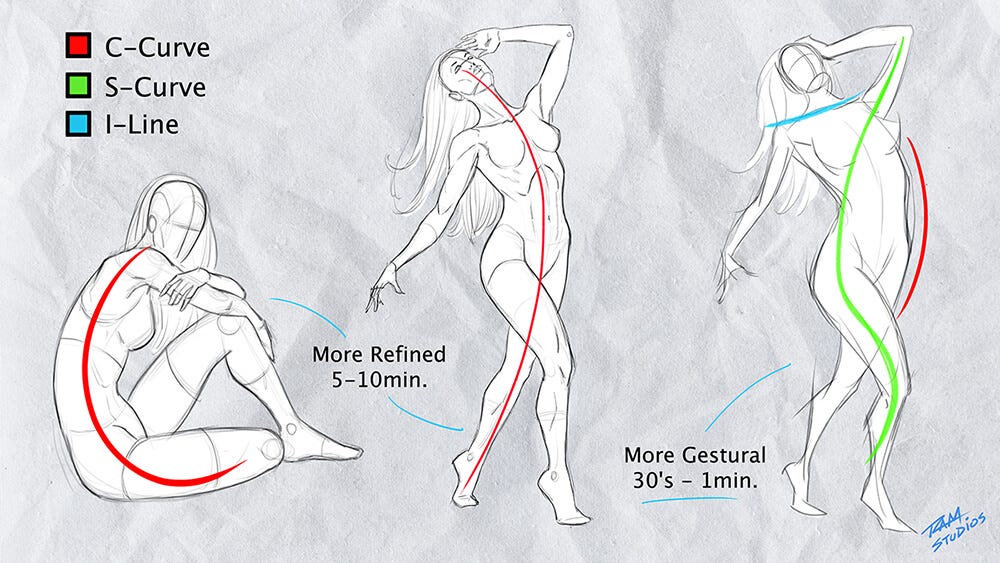
Notice that the “C” curve is a bit more literal in the first example on the left but more elongated on the middle illustration.
In the middle drawing the “C” curve is represented as one big Action Line through the entire figure.
This goes from the top of the head, all the way down to the foot as it meets the ground.
The final drawing, which is more gestural, shows how we can see multiple curves in a single figure.
As you create more and more of your timed studies you will begin to naturally draw with more of this CSI approach.
How Much Gesture is Too Much?
Just a basic way to think about this is if your characters are too stiff then you need more gesture in them.
If they appear too rubbery or soft then you probably need less gesture.
I rarely see drawings that need less gesture. It is usual the opposite. Most drawings will see a significant improvement with more gesture in them.
Quick Tip! — I find that adding gesture drawings in the morning help to improve my ability to draw more dynamic figures throughout the day. Give it shot!
When to Use Angles and When to Use Curves?
Gesture is more about curves but angles serve a purpose as well.
Generally angles are going to help strengthen the forms and add a bit of rigidity with a sense of structure.
Another way to think about them is that angles are great for the bony landmarks and curves are great for the more organic parts of the body.
Angles are also great for maping out the proportions. I find it to be much easier to figure out proportions with angles by paying attention to the negative space.
Let me show you what I mean with this next gesture drawing study…
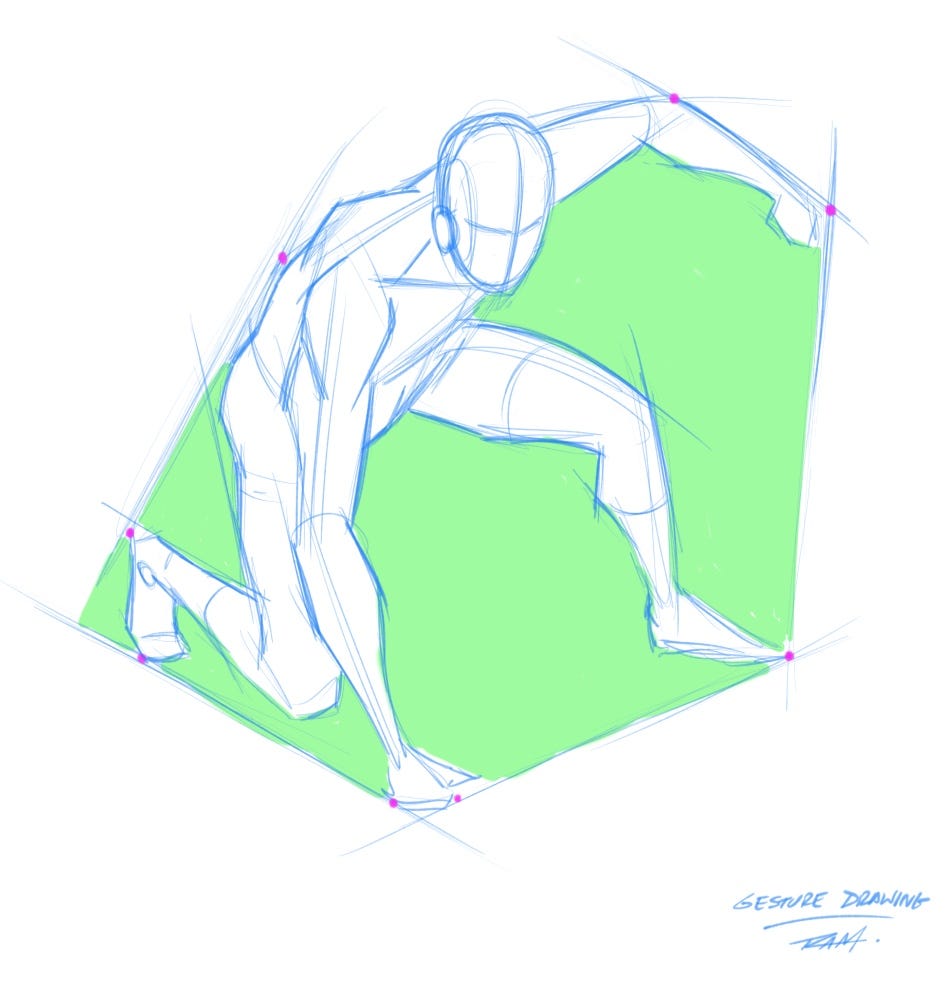
Notice that we can easily figure out the alignment of the forms by drawing angles from the apex or furthest points out from each part of the figure.
I have marked these with the magenta dots. The lime green is just to help you visualize the negative shapes that I see when studying this part of the drawing.
This often helps us to spot an arm or leg that is oddly placed or far too big compared to another part of the body.
Critical Thinking Vs. Speed and Flow
I wanted to touch on this a bit more. Mainly because with the previous example I don’t want to confuse you and blend too much of these concepts together.
There is a time and place for critical observations but with gesture drawing it is more important to focus on speed and flow.
Gesture tends to be in the shorter time period of the drawing. Anything past 5 minutes and you are probably more in to the refinement.
Once we begin to refine the pose then we can get more critical and stress out about all those little details. ( Seriously, try not to stress out. This is suppose to be fun! )
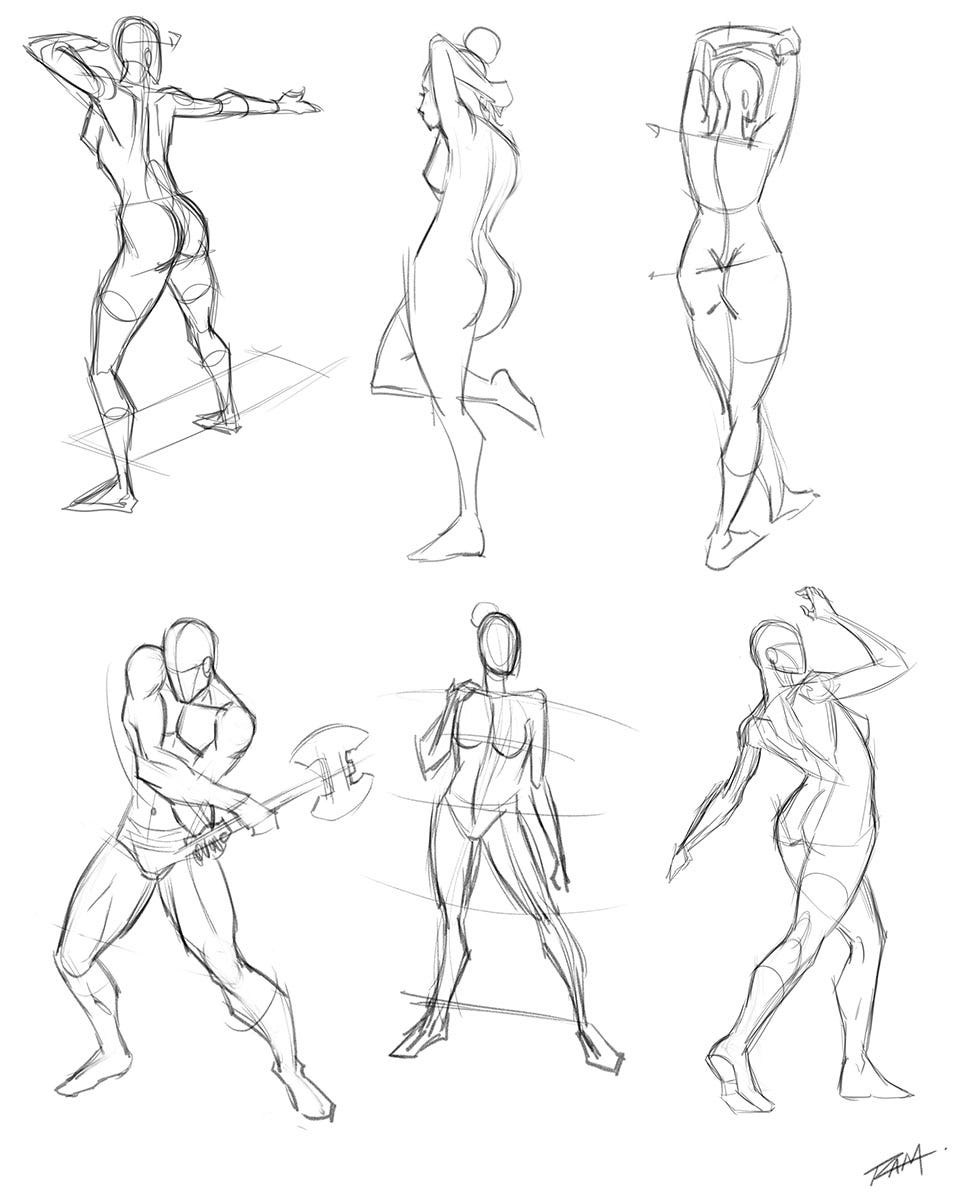
Here are some more of my quick gestures and I hope they spark your creativity a bit —
I hope you learned something from today’s post and please follow for more art tutorials.

If you want to learn Figure Drawing step by step and get personal guidance as you move through the course – Click here!
Get my free PDF guide on drawing heads using the Andrew Loomis Method here — Click here!
Have a great day and good luck with your art!
Sincerely,
Robert A. Marzullo
0 Comments